Tock OS Book
 This book introduces you to Tock, a secure embedded operating system for sensor
networks and the Internet of Things. Tock is the first operating system to allow
multiple untrusted applications to run concurrently on a microcontroller-based
computer. The Tock kernel is written in Rust, a memory-safe systems language
that does not rely on a garbage collector. Userspace applications are run in
single-threaded processes that can be written in any language.
This book introduces you to Tock, a secure embedded operating system for sensor
networks and the Internet of Things. Tock is the first operating system to allow
multiple untrusted applications to run concurrently on a microcontroller-based
computer. The Tock kernel is written in Rust, a memory-safe systems language
that does not rely on a garbage collector. Userspace applications are run in
single-threaded processes that can be written in any language.
Getting Started
The book includes a quick start guide.
Tock Workshop Courses
For a more in-depth walkthough-style less, look here.
Development Guides
The book also has walkthoughs on how to implement different features in Tock OS.
Hands-on Guides
This portion of the book includes workshops and tutorials to teach how to use and develop with Tock, and is divided into two sections: the course and a series of mini tutorials. The course is a good place to start, and provides a structured introduction to Tock that should take a few hours to complete (it was designed for a half day workshop). The tutorials are smaller examples that highlight specific features.
Tock Course
In this hands-on guide, we will look at some of the high-level services provided by Tock. We will start with an understanding of the OS and its programming environment. Then we'll look at how a process management application can help afford remote debugging, diagnosing and fixing a resource-intensive app over the network. The last part of the tutorial is a bit more free-form, inviting attendees to further explore the networking and application features of Tock or to dig into the kernel a bit and explore how to enhance and extend the kernel.
This course assumes some experience programming embedded devices and fluency in C. It assumes no knowledge of Rust, although knowing Rust will allow you to be more creative during the kernel exploration at the end.
Tock Mini Tutorials
These tutorials feature specific examples of Tock applications. They can be completed after the course to learn about different capabilities of Tock apps.
Getting Started
This getting started guide covers how to get started using Tock.
Hardware
To really be able to use Tock and get a feel for the operating system, you will need a hardware platform that tock supports. The TockOS Hardware includes a list of supported hardware boards. You can also view the boards folder to see what platforms are supported.
As of February 2021, this getting started guide is based around five hardware
platforms. Steps for each of these platforms are explicitly described here.
Other platforms will work for Tock, but you may need to reference the README
files in tock/boards/ for specific setup information. The five boards are:
- Hail
- imix
- nRF52840dk (PCA10056)
- Arduino Nano 33 BLE (regular or Sense version)
- BBC Micro:bit v2
These boards are reasonably well supported, but note that others in Tock may have some "quirks" around what is implemented (or not), and exactly how to load code and test that it is working. This guides tries to be general, and Tock generally tries to follow a certain convention, but the project is under active development and new boards are added rapidly. You should definitely consult the board-specific README to see if there are any board-specific details you should be aware of.
Host Machine Setup
You can either download a virtual machine with the development environment pre-installed, or, if you have a Linux or OS X workstation, you may install the development environment natively. Using a virtual machine is quicker and easier to set up, while installing natively will yield the most comfortable development environment and is better for long term use.
Virtual Machine
If you're comfortable working inside a Debian virtual machine, you can download
an image with all of the dependencies already installed
here or
here. Using curl to
download the image is recommended, but your browser should be able to download
it as well:
$ curl -O <url>
With the virtual machine image downloaded, you can run it with VirtualBox or VMWare:
- VirtualBox users: File → Import Appliance...,
- VMWare users: File → Open...
The VM account is "tock" with password "tock". Feel free to customize it with whichever editors, window managers, etc. you like.
If the Host OS is Linux, you may need to add your user to the
vboxusersgroup on your machine in order to connect the hardware boards to the virtual machine.
Native Installation
If you choose to install the development environment natively on an existing operating system install, you will need the following software:
-
Command line utilities:
curl,make,git,python(version 3) andpip3. -
Clone the Tock kernel repository.
$ git clone https://github.com/tock/tock -
rustup. This tool helps manage installations of the Rust compiler and related tools.
$ curl https://sh.rustup.rs -sSf | sh -
arm-none-eabi toolchain (version >= 5.2). This enables you to compile apps written in C for Cortex-M boards.
# mac $ brew tap ARMmbed/homebrew-formulae && brew update && brew install ARMmbed/homebrew-formulae/arm-none-eabi-gcc # linux $ sudo apt install gcc-arm-none-eabi -
Optional. riscv64-unknown-elf toolchain for compiling C apps for RISC-V platforms. Getting this toolchain varies platform-to-platform.
# mac $ brew tap riscv/riscv && brew install riscv-gnu-toolchain --with-multilib # linux $ sudo apt install gcc-riscv64-unknown-elf -
tockloader. This is an all-in-one tool for programming boards and using Tock.
$ pip3 install -U --user tockloaderNote: On MacOS, you may need to add
tockloaderto your path. If you cannot run it after installation, run the following:$ export PATH=$HOME/Library/Python/3.9/bin/:$PATHSimilarly, on Linux distributions, this will typically install to
$HOME/.local/bin, and you may need to add that to your$PATHif not already present:$ PATH=$HOME/.local/bin:$PATH
Testing You Can Compile the Kernel
To test if your environment is working enough to compile Tock, go to the
tock/boards/ directory and then to the board folder for the hardware you have
(e.g. tock/boards/imix for imix). Then run make in that directory. This
should compile the kernel. It may need to compile several supporting libraries
first (so may take 30 seconds or so the first time). You should see output like
this:
$ cd tock/boards/imix
$ make
   Compiling tock-cells v0.1.0 (/Users/bradjc/git/tock/libraries/tock-cells)
   Compiling tock-registers v0.5.0 (/Users/bradjc/git/tock/libraries/tock-register-interface)
   Compiling enum_primitive v0.1.0 (/Users/bradjc/git/tock/libraries/enum_primitive)
   Compiling tock-rt0 v0.1.0 (/Users/bradjc/git/tock/libraries/tock-rt0)
   Compiling imix v0.1.0 (/Users/bradjc/git/tock/boards/imix)
   Compiling kernel v0.1.0 (/Users/bradjc/git/tock/kernel)
   Compiling cortexm v0.1.0 (/Users/bradjc/git/tock/arch/cortex-m)
   Compiling capsules v0.1.0 (/Users/bradjc/git/tock/capsules)
   Compiling cortexm4 v0.1.0 (/Users/bradjc/git/tock/arch/cortex-m4)
   Compiling sam4l v0.1.0 (/Users/bradjc/git/tock/chips/sam4l)
   Compiling components v0.1.0 (/Users/bradjc/git/tock/boards/components)
    Finished release [optimized + debuginfo] target(s) in 28.67s
   text    data     bss     dec     hex filename
 165376    3272   54072  222720   36600 /Users/bradjc/git/tock/target/thumbv7em-none-eabi/release/imix
   Compiling typenum v1.11.2
   Compiling byteorder v1.3.4
   Compiling byte-tools v0.3.1
   Compiling fake-simd v0.1.2
   Compiling opaque-debug v0.2.3
   Compiling block-padding v0.1.5
   Compiling generic-array v0.12.3
   Compiling block-buffer v0.7.3
   Compiling digest v0.8.1
   Compiling sha2 v0.8.1
   Compiling sha256sum v0.1.0 (/Users/bradjc/git/tock/tools/sha256sum)
6fa1b0d8e224e775d08e8b58c6c521c7b51fb0332b0ab5031fdec2bd612c907f  /Users/bradjc/git/tock/target/thumbv7em-none-eabi/release/imix.bin
You can check that tockloader is installed by running:
$ tockloader --help
If either of these steps fail, please double check that you followed the environment setup instructions above.
Getting the Hardware Connected and Setup
Plug your hardware board into your computer. Generally this requires a micro USB cable, but your board may be different.
Note! Some boards have multiple USB ports.
Some boards have two USB ports, where one is generally for debugging, and the other allows the board to act as any USB peripheral. You will want to connect using the "debug" port.
Some example boards:
- imix: Use the port labeled
DEBUG.- nRF52 development boards: Use the port of the left, on the skinny side of the board.
The board should appear as a regular serial device (e.g.
/dev/tty.usbserial-c098e5130006 on my Mac or /dev/ttyUSB0 on my Linux box).
This may require some setup, see the "one-time fixups" box.
One-Time Fixups
On Linux, you might need to give your user access to the serial port used by the board. If you get permission errors or you cannot access the serial port, this is likely the issue.
You can fix this by setting up a udev rule to set the permissions correctly for the serial device when it is attached. You only need to run the command below for your specific board, but if you don't know which one to use, running both is totally fine, and will set things up in case you get a different hardware board!
$ sudo bash -c "echo 'ATTRS{idVendor}==\"0403\", ATTRS{idProduct}==\"6015\", MODE=\"0666\"' > /etc/udev/rules.d/99-ftdi.rules"
$ sudo bash -c "echo 'ATTRS{idVendor}==\"2341\", ATTRS{idProduct}==\"005a\", MODE=\"0666\"' > /etc/udev/rules.d/98-arduino.rules"
Afterwards, detach and re-attach the board to reload the rule.
With a virtual machine, you might need to attach the USB device to the VM. To do so, after plugging in the board, select in the VirtualBox/VMWare menu bar:
Devices -> USB Devices -> [The name of your board]If you aren't sure which board to select, it is often easiest to unplug and re-plug the board and see which entry is removed and then added.
If this generates an error, often unplugging/replugging fixes it. You can also create a rule in the VM USB settings which will auto-attach the board to the VM.
With Windows Subsystem for Linux (WSL), the serial device parameters stored in the FTDI chip do not seem to get passed to Ubuntu. Plus, WSL enumerates every possible serial device. Therefore, tockloader cannot automatically guess which serial port is the correct one, and there are a lot to choose from.
You will need to open Device Manager on Windows, and find which
COMport the tock board is using. It will likely be called "USB Serial Port" and be listed as an FTDI device. The COM number will match what is used in WSL. For example,COM9is/dev/ttyS9on WSL.To use tockloader you should be able to specify the port manually. For example:
tockloader --port /dev/ttyS9 list.
One Time Board Setup
If you have a Hail, imix, or nRF52840dk please skip to the next section.
If you have an Arduino Nano 33 BLE (sense or regular), you need to update the bootloader on the board to the Tock bootloader. Please follow the bootloader update instructions.
If you have a Micro:bit v2 then you need to load the Tock booloader. Please follow the bootloader installation instructions.
Test The Board
With the board connected, you should be able to use tockloader to interact with
the board. For example, to retrieve serial UART data from the board, run
tockloader listen, and you should see something like:
$ tockloader listen
No device name specified. Using default "tock"
Using "/dev/ttyUSB0 - Imix - TockOS"

Listening for serial output.
Initialization complete. Entering main loop
You may also need to reset (by pressing the reset button on the board) the board to see the message. You may also not see any output if the Tock kernel has not been flashed yet.
You can also see if any applications are installed with tockloader list:
$ tockloader list
[INFO   ] No device name specified. Using default name "tock".
[INFO   ] Using "/dev/cu.usbmodem14101 - Nano 33 BLE - TockOS".
[INFO   ] Paused an active tockloader listen in another session.
[INFO   ] Waiting for the bootloader to start
[INFO   ] No found apps.
[INFO   ] Finished in 2.928 seconds
[INFO   ] Resumed other tockloader listen session
If these commands fail you may not have installed Tockloader, or you may need to update to a later version of Tockloader. There may be other issues as well, and you can ask on Slack if you need help.
Flash the kernel
Now that the board is connected and you have verified that the kernel compiles (from the steps above), we can flash the board with the latest Tock kernel:
$ cd boards/<your board>
$ make
Boards provide the target make install as the recommended way to load the
kernel.
$ make install
You can also look at the board's README for more details.
Install Some Applications
We have the kernel flashed, but the kernel doesn't actually do anything. Applications do! To load applications, we are going to use tockloader.
Loading Pre-built Applications
We're going to install some pre-built applications, but first, let's make sure we're in a clean state, in case your board already has some applications installed. This command removes any processes that may have already been installed.
$ tockloader erase-apps
Now, let's install two pre-compiled example apps. Remember, you may need to specify which board you are using and how to communicate with it for all of these commands. If you are using Hail or imix you will not have to.
$ tockloader install https://www.tockos.org/assets/tabs/blink.tab
The
installsubcommand takes a path or URL to an TAB (Tock Application Binary) file to install.
The board should restart and the user LED should start blinking. Let's also install a simple "Hello World" application:
$ tockloader install https://www.tockos.org/assets/tabs/c_hello.tab
If you now run tockloader listen you should be able to see the output of the
Hello World! application. You may need to manually reset the board for this to
happen.
$ tockloader listen
[INFO   ] No device name specified. Using default name "tock".
[INFO   ] Using "/dev/cu.usbserial-c098e513000a - Hail IoT Module - TockOS".

[INFO   ] Listening for serial output.
Initialization complete. Entering main loop.
Hello World!
␀
Uninstalling and Installing More Apps
Lets check what's on the board right now:
$ tockloader list
...
┌──────────────────────────────────────────────────┐
│ App 0                                            |
└──────────────────────────────────────────────────┘
  Name:                  blink
  Enabled:               True
  Sticky:                False
  Total Size in Flash:   2048 bytes


┌──────────────────────────────────────────────────┐
│ App 1                                            |
└──────────────────────────────────────────────────┘
  Name:                  c_hello
  Enabled:               True
  Sticky:                False
  Total Size in Flash:   1024 bytes


[INFO   ] Finished in 2.939 seconds
As you can see, the apps are still installed on the board. We can remove apps with the following command:
$ tockloader uninstall
Following the prompt, if you remove the blink app, the LED will stop blinking,
however the console will still print Hello World.
Now let's try adding a more interesting app:
$ tockloader install https://www.tockos.org/assets/tabs/sensors.tab
The sensors app will automatically discover all available sensors, sample them
once a second, and print the results.
$ tockloader listen
[INFO   ] No device name specified. Using default name "tock".
[INFO   ] Using "/dev/cu.usbserial-c098e513000a - Hail IoT Module - TockOS".

[INFO   ] Listening for serial output.
Initialization complete. Entering main loop.
[Sensors] Starting Sensors App.
Hello World!
␀[Sensors] All available sensors on the platform will be sampled.
ISL29035:   Light Intensity: 218
Temperature:                 28 deg C
Humidity:                    42%
FXOS8700CQ: X:               -112
FXOS8700CQ: Y:               23
FXOS8700CQ: Z:               987
Compiling and Loading Applications
There are many more example applications in the libtock-c repository that you
can use. Let's try installing the ROT13 cipher pair. These two applications use
inter-process communication (IPC) to implement a
ROT13 cipher.
Start by uninstalling any applications:
$ tockloader uninstall
Get the libtock-c repository:
$ git clone https://github.com/tock/libtock-c
Build the rot13_client application and install it:
$ cd libtock-c/examples/rot13_client
$ make
$ tockloader install
Then make and install the rot13_service application:
$ cd ../rot13_service
$ tockloader install --make
Then you should be able to see the output:
$ tockloader listen
[INFO   ] No device name specified. Using default name "tock".
[INFO   ] Using "/dev/cu.usbserial-c098e5130152 - Hail IoT Module - TockOS".
[INFO   ] Listening for serial output.
Initialization complete. Entering main loop.
12: Uryyb Jbeyq!
12: Hello World!
12: Uryyb Jbeyq!
12: Hello World!
12: Uryyb Jbeyq!
12: Hello World!
12: Uryyb Jbeyq!
12: Hello World!
Note: Tock platforms are limited in the number of apps they can load and run. However, it is possible to install more apps than this limit, since tockloader is (currently) unaware of this limitation and will allow to you to load additional apps. However the kernel will only load the first apps until the limit is reached.
Note about Identifying Boards
Tockloader tries to automatically identify which board is attached to make this process simple. This means for many boards (particularly the ones listed at the top of this guide) tockloader should "just work".
However, for some boards tockloader does not have a good way to identify which
board is attached, and requires that you manually specify which board you are
trying to program. This can be done with the --board argument. For example, if
you have an nrf52dk or nrf52840dk, you would run Tockloader like:
$ tockloader <command> --board nrf52dk --jlink
The --jlink flag tells tockloader to use the JLink JTAG tool to communicate
with the board (this mirrors using make flash above). Some boards support
OpenOCD, in which case you would pass --openocd instead.
To see a list of boards that tockloader supports, you can run
tockloader list-known-boards. If you have an imix or Hail board, you should
not need to specify the board.
Note, a board listed in
tockloader list-known-boardsmeans there are default settings hardcoded into tockloader's source on how to support those boards. However, all of those settings can be passed in via command-line parameters for boards that tockloader does not know about. Seetockloader --helpfor more information.
Familiarize Yourself with tockloader Commands
The tockloader tool is a useful and versatile tool for managing and installing
applications on Tock. It supports a number of commands, and a more complete list
can be found in the tockloader repository, located at
github.com/tock/tockloader. Below is
a list of the more useful and important commands for programming and querying a
board.
tockloader install
This is the main tockloader command, used to load Tock applications onto a
board. By default, tockloader install adds the new application, but does not
erase any others, replacing any already existing application with the same name.
Use the --no-replace flag to install multiple copies of the same app. To
install an app, either specify the tab file as an argument, or navigate to the
app's source directory, build it (probably using make), then issue the install
command:
$ tockloader install
Tip: You can add the
--makeflag to have tockloader automatically run make before installing, i.e.tockloader install --make
Tip: You can add the
--eraseflag to have tockloader automatically remove other applications when installing a new one.
tockloader uninstall [application name(s)]
Removes one or more applications from the board by name.
tockloader erase-apps
Removes all applications from the board.
tockloader list
Prints basic information about the apps currently loaded onto the board.
tockloader info
Shows all properties of the board, including information about currently loaded applications, their sizes and versions, and any set attributes.
tockloader listen
This command prints output from Tock apps to the terminal. It listens via UART, and will print out anything written to stdout/stderr from a board.
Tip: As a long-running command,
listeninteracts with other tockloader sessions. You can leave a terminal window open and listening. If another tockloader process needs access to the board (e.g. to install an app update), tockloader will automatically pause and resume listening.
tockloader flash
Loads binaries onto hardware platforms that are running a compatible bootloader.
This is used by the Tock Make system when kernel binaries are programmed to the
board with make program.
Tock Course
The Tock course includes several different modules that guide you through various aspects of Tock and Tock applications. Each module is designed to be fairly standalone such that a full course can be composed of different modules depending on the interests and backgrounds of those doing the course. You should be able to do the lessons that are of interest to you.
Each module begins with a description of the lesson, and then includes steps to follow. The modules cover both programming in the kernel as well as applications.
Setup and Preparation
You should follow the getting started guide to get your development setup and ensure you can communicate with the hardware.
Compile the Kernel
All of the hands-on exercises will be done within the main Tock repository and
the libtock-c or libtock-rs userspace repositories. To work on the kernel,
pop open a terminal, and navigate to the repository. If you're using the VM,
that'll be:
$ cd ~/tock
Make sure your Tock repository is up to date
$ git pull
This will fetch the lastest commit from the Tock kernel repository. Individual modules may ask you to check out specific commits or branches. In this case, be sure to have those revisions checked out instead.
Build the kernel
To build the kernel for your board, navigate to the boards/$YOUR_BOARD
subdirectory. From within this subdirectory, a simple make should be
sufficient to build a kernel. For instance, for the Nordic nRF52840DK board, run
the following:
$ cd boards/nordic/nrf52840dk
$ make
   Compiling nrf52840 v0.1.0 (/home/tock/tock/chips/nrf52840)
   Compiling components v0.1.0 (/home/tock/tock/boards/components)
   Compiling nrf52_components v0.1.0 (/home/tock/tock/boards/nordic/nrf52_components)
    Finished release [optimized + debuginfo] target(s) in 24.07s
   text    data     bss     dec     hex filename
 167940       4   28592  196536   2ffb8 /home/tock/tock/target/thumbv7em-none-eabi/release/nrf52840dk
88302039a5698ab37d159ec494524cc466a0da2e9938940d2930d582404dc67a  /home/tock/tock/target/thumbv7em-none-eabi/release/nrf52840dk.bin
If this is the first time you are trying to make the kernel, the build system will use cargo and rustup to install various Tock dependencies.
Programming the kernel and interfacing with your board
Boards may require slightly different procedures for programming the Tock kernel.
If you are following along with the provided VM, do not forget to pass your
board's USB interface(s) to the VM. In VirtualBox, this should work by selecting
"Devices > USB" and then enabling the respective device (for example
SEGGER J-Link [0001]).
Nordic nRF52840DK
The Nordic nRF52840DK development board contains an integrated SEGGER J-Link JTAG debugger, which can be used to program and debug the nRF52840 microcontroller. It is also connected to the nRF's UART console and exposes this as a console device.
To flash the Tock kernel and applications through this interface, you will need to have the SEGGER J-Link tools installed. If you are using a VM, we provide a script you can execute to install these tools. TODO!
With the J-Link software installed, we can use Tockloader to flash the Tock kernel onto this board.
$ make install
[INFO   ] Using settings from KNOWN_BOARDS["nrf52dk"]
[STATUS ] Flashing binary to board...
[INFO   ] Finished in 7.645 seconds
Congrats! Tock should be running on your board now.
To verify that Tock runs, try to connect to your nRF's serial console.
Tockloader provides a tockloader listen command for opening a serial
connection. In case you have multiple serial devices attached to your computer,
you may need to select the appropriate J-Link device:
$ tockloader listen
[INFO   ] No device name specified. Using default name "tock".
[INFO   ] No serial port with device name "tock" found.
[INFO   ] Found 2 serial ports.
Multiple serial port options found. Which would you like to use?
[0]     /dev/ttyACM1 - J-Link - CDC
[1]     /dev/ttyACM0 - L830-EB - Fibocom L830-EB

Which option? [0] 0
[INFO   ] Using "/dev/ttyACM1 - J-Link - CDC".
[INFO   ] Listening for serial output.
Initialization complete. Entering main loop
NRF52 HW INFO: Variant: AAC0, Part: N52840, Package: QI, Ram: K256, Flash: K1024
tock$
In case you don't see any text printed after "Listening for serial output", try
hitting [ENTER] a few times. You should be greeted with a tock$ shell
prompt. You can use the reset command to restart your nRF chip and see the
above greeting.
In case you want to use a different serial console monitor, you may need to identify the serial console device created for your board. On Linux, you can identify the J-Link debugger's serial port by running:
$ dmesg -Hw | grep tty
< ... some output ... >
< plug in the nRF52840DKs front USB (not "nRF USB") >
[  +0.003233] cdc_acm 1-3:1.0: ttyACM1: USB ACM device
In this case, the nRF's serial console can be accessed as /dev/ttyACM1.
Security USB Key with Tock
This module and submodules will walk you through how to create a USB security key using Tock.

Hardware Notes
To fully follow this guide you will need a hardware board that supports a peripheral USB port (i.e. where the microcontroller has USB hardware support). We recommend using the nRF52840dk.
Compatible boards:
- nRF52840dk
- imix
You'll also need two USB cables, one for programming the board and the other for attaching it as a USB device.
Goal
Our goal is to create a standards-compliant HOTP USB key that we can use with a demo website. The key will support enrolling new URL domains and providing secure authentication.
The main logic of the key will be implemented as a userspace program. That userspace app will use the kernel to decrypt the shared key for each domain, send the HMAC output as a USB keyboard device, and store each encrypted key in a nonvolatile key-value storage.
nRF52840dk Hardware Setup
If you are using the nRF52840dk, there are a couple of configurations on the nRF52840DK board that you should double-check:
- The "Power" switch on the top left should be set to "On".
- The "nRF power source" switch in the top middle of the board should be set to "VDD".
- The "nRF ONLY | DEFAULT" switch on the bottom right should be set to "DEFAULT".
For now, you should plug one USB cable into the top of the board for programming (NOT into the "nRF USB" port on the side). We'll attach the other USB cable later.
Stages
This module is broken into four stages:
- Configuring the kernel to provide necessary syscall drivers:
- Creating an HOTP userspace application.
- Creating an in-kernel encryption oracle.
- Enforcing access control restrictions to the oracle.
Implementing a USB Keyboard Device
The Tock kernel supports implementing a USB device and we can setup our kernel so that it is recognized as a USB keyboard device. This is necessary to enable the HOTP key to send the generated key to the computer when logging in.
Configuring the Kernel
We need to setup our kernel to include USB support, and particularly the USB HID
(keyboard) profile. This requires modifying the boards main.rs file. You
should add the following setup near the end of main.rs, just before the creating
the Platform struct.
You first need to create three strings that will represent this device to the USB host.
#![allow(unused)]
fn main() {
// Create the strings we include in the USB descriptor.
let strings = static_init!(
    [&str; 3],
    [
        "Nordic Semiconductor", // Manufacturer
        "nRF52840dk - TockOS",  // Product
        "serial0001",           // Serial number
    ]
);
}
Then we need to create the keyboard USB capsule in the board. This example works for the nRF52840dk. You will need to modify the types if you are using a different microcontroller.
#![allow(unused)]
fn main() {
let (keyboard_hid, keyboard_hid_driver) = components::keyboard_hid::KeyboardHidComponent::new(
    board_kernel,
    capsules_core::driver::NUM::KeyboardHid as usize,
    &nrf52840_peripherals.usbd,
    0x1915, // Nordic Semiconductor
    0x503a,
    strings,
)
.finalize(components::keyboard_hid_component_static!(
    nrf52840::usbd::Usbd
));
}
Towards the end of the main.rs, you need to enable the USB HID driver:
#![allow(unused)]
fn main() {
keyboard_hid.enable();
keyboard_hid.attach();
}
Finally, we need to add the driver to the Platform struct:
#![allow(unused)]
fn main() {
pub struct Platform {
	...
	keyboard_hid_driver: &'static capsules_extra::usb_hid_driver::UsbHidDriver<
	    'static,
	    capsules_extra::usb::keyboard_hid::KeyboardHid<'static, nrf52840::usbd::Usbd<'static>>,
	>,
    ...
}

let platform = Platform {
    ...
    keyboard_hid_driver,
    ...
};
}
and map syscalls from userspace to our kernel driver:
#![allow(unused)]
fn main() {
// Keyboard HID Driver Num:
const KEYBOARD_HID_DRIVER_NUM: usize = capsules_core::driver::NUM::KeyboardHid as usize;

impl SyscallDriverLookup for Platform {
    fn with_driver<F, R>(&self, driver_num: usize, f: F) -> R
    where
        F: FnOnce(Option<&dyn kernel::syscall::SyscallDriver>) -> R,
    {
        match driver_num {
        	...
            KEYBOARD_HID_DRIVER_NUM => f(Some(self.keyboard_hid_driver)),
            ...
        }
    }
}
}
Now you should be able to compile the kernel and load it on to your board.
cd tock/boards/...
make install
Connecting the USB Device
We will use both USB cables on our hardware. The main USB header is for debugging and programming. The USB header connected directly to the microcontroller will be the USB device. Ensure both USB devices are connected to your computer.
Testing the USB Keyboard
To test the USB keyboard device will will use a simple userspace application. libtock-c includes an example app which just prints a string via USB keyboard when a button is pressed.
cd libtock-c/examples/tests/keyboard_hid
make
tockloader install
Position your cursor somewhere benign, like a new terminal. Then press a button on the board.
Checkpoint: You should see a welcome message from your hardware!
Using HMAC-SHA256 in Userspace
Our next task is we need an HMAC engine for our HOTP application to use. Tock already includes HMAC-SHA256 as a capsule within the kernel, we just need to expose it to userspace.
Configuring the Kernel
First we need to use components to instantiate a software implementation of SHA256 and HMAC-SHA256. Add this to your main.rs file.
#![allow(unused)]
fn main() {
//--------------------------------------------------------------------------
// HMAC-SHA256
//--------------------------------------------------------------------------

let sha256_sw = components::sha::ShaSoftware256Component::new()
    .finalize(components::sha_software_256_component_static!());

let hmac_sha256_sw = components::hmac::HmacSha256SoftwareComponent::new(sha256_sw).finalize(
    components::hmac_sha256_software_component_static!(capsules_extra::sha256::Sha256Software),
);

let hmac = components::hmac::HmacComponent::new(
    board_kernel,
    capsules_extra::hmac::DRIVER_NUM,
    hmac_sha256_sw,
)
.finalize(components::hmac_component_static!(
    capsules_extra::hmac_sha256::HmacSha256Software<capsules_extra::sha256::Sha256Software>,
    32
));
}
Then add these capsules to the Platform struct:
#![allow(unused)]
fn main() {
pub struct Platform {
	...
	hmac: &'static capsules_extra::hmac::HmacDriver<
	    'static,
	    capsules_extra::hmac_sha256::HmacSha256Software<
	        'static,
	        capsules_extra::sha256::Sha256Software<'static>,
	    >,
	    32,
	>,
    ...
}

let platform = Platform {
    ...
    hmac,
    ...
};
}
And make them accessible to userspace by adding to the with_driver function:
#![allow(unused)]
fn main() {
impl SyscallDriverLookup for Platform {
    fn with_driver<F, R>(&self, driver_num: usize, f: F) -> R
    where
        F: FnOnce(Option<&dyn kernel::syscall::SyscallDriver>) -> R,
    {
        match driver_num {
        	...
            capsules_extra::hmac::DRIVER_NUM => f(Some(self.hmac)),
            ...
        }
    }
}
}
Testing
You should be able to install the libtock-c/examples/tests/hmac app and run
it:
cd libtock-c/examples/tests/hmac
make
tockloader install
Checkpoint: HMAC is now accessible to userspace!
Using Nonvolatile Application State in Userspace
When we use the HOTP application to store new keys, we want those keys to be persistent across reboots. That is, if we unplug the USB key, we would like our saved keys to still be accessible when we plug the key back in.
To enable this, we are using the app_state capsule. This allows userspace
applications to edit their own flash region. We will use that flash region to
save our known keys.
Configuring the Kernel
Again we will use components to add app_state to the kernel. To add the proper drivers, include this in the main.rs file:
#![allow(unused)]
fn main() {
//--------------------------------------------------------------------------
// APP FLASH
//--------------------------------------------------------------------------

let mux_flash = components::flash::FlashMuxComponent::new(&base_peripherals.nvmc).finalize(
    components::flash_mux_component_static!(nrf52840::nvmc::Nvmc),
);

let virtual_app_flash = components::flash::FlashUserComponent::new(mux_flash).finalize(
    components::flash_user_component_static!(nrf52840::nvmc::Nvmc),
);

let app_flash = components::app_flash_driver::AppFlashComponent::new(
    board_kernel,
    capsules_extra::app_flash_driver::DRIVER_NUM,
    virtual_app_flash,
)
.finalize(components::app_flash_component_static!(
    capsules_core::virtualizers::virtual_flash::FlashUser<'static, nrf52840::nvmc::Nvmc>,
    512
));
}
Then add these capsules to the Platform struct:
#![allow(unused)]
fn main() {
pub struct Platform {
	...
	app_flash: &'static capsules_extra::app_flash_driver::AppFlash<'static>,
    ...
}

let platform = Platform {
    ...
    app_flash,
    ...
};
}
And make them accessible to userspace by adding to the with_driver function:
#![allow(unused)]
fn main() {
impl SyscallDriverLookup for Platform {
    fn with_driver<F, R>(&self, driver_num: usize, f: F) -> R
    where
        F: FnOnce(Option<&dyn kernel::syscall::SyscallDriver>) -> R,
    {
        match driver_num {
        	...
            capsules_extra::app_flash_driver::DRIVER_NUM => f(Some(self.app_flash)),
            ...
        }
    }
}
}
Checkpoint: App Flash is now accessible to userspace!
HOTP Application
The motivating example for this entire tutorial is the creation of a USB security key: a USB device that can be connected to your computer and authenticate you to some service. One open standard for implementing such keys is HMAC-based One-Time Password (HOTP). It generates the 6 to 8 digit numeric codes which are used as a second-factor for some websites.
The crypto for implementing HOTP has already been created (HMAC and SHA256), so you certainly don't have to be an expert in cryptography to make this application work. We have actually implemented the software for generating HOTP codes as well. Instead, you will focus on improving that code as a demonstration of Tock and its features.
On the application side, we'll start with a basic HOTP application which has a pre-compiled HOTP secret key. Milestone one will be improving that application to take user input to reconfigure the HOTP secret. Milestone two will be adding the ability to persistently store the HOTP information so it is remembered across resets and power cycles. Finally, milestone three will be adding the ability to handle multiple HOTP secrets simultaneously.
The application doesn't just calculate HOTP codes, it implements a USB HID device as well. This means that when plugged in through the proper USB port, it appears as an additional keyboard to your computer and is capable of entering text.
We have provided starter code as well as completed code for each of the milestones. If you're facing some bugs which are limiting your progress, you can reference or even wholesale copy a milestone in order to advance to the next parts of the tutorial.
Applications in Tock
A few quick details on applications in Tock.
Applications in Tock look much closer to applications on traditional OSes than to normal embedded software. They are compiled separately from the kernel and loaded separately onto the hardware. They can be started or stopped individually and can be removed from the hardware individually. Importantly for later in this tutorial, the kernel is really in full control here and can decide which applications to run and what permissions they should be given.
Applications make requests from the OS kernel through system calls, but for the
purposes of this part of the tutorial, those system calls are wrapped in calls
to driver libraries. The most important aspect though is that results from
system calls never interrupt a running application. The application must yield
to receive callbacks. Again, this is frequently hidden within synchronous
drivers, but our application code will have a yield in the main loop as well,
where it waits for button presses.
The tool for interacting with Tock applications is called Tockloader. It is a
python package capable of loading applications onto a board, inspecting
applications on a board, modifying application binaries before they are loaded
on a board, and opening a console to communicate with running applications.
We'll reference various Tockloader commands which you'll run throughout the
tutorial.
Starter Code
We'll start by playing around with the starter code which implements a basic HOTP key.
-
Within the
libtock-ccheckout, navigate tolibtock-c/examples/tutorials/hotp/hotp_starter/.This contains the starter code for the HOTP application. It has a hardcoded HOTP secret and generates an HOTP code from it each time the Button 1 on the board is pressed.
-
To compile the application and load it onto your board, run
make flashin the terminal (running justmakewill compile but not upload).- You likely want to remove other applications that are running on your board
if there are any. You can see which applications are installed with
tockloader listand you can remove an app withtockloader uninstall(it will let you choose which app(s) to remove). Bonus information:make flashis just a shortcut formake && tockloader install.
- You likely want to remove other applications that are running on your board
if there are any. You can see which applications are installed with
-
To see console output from the application, run
tockloader listenin a separate terminal.
TIP: You can leave the console running, even when compiling and uploading new applications. It's worth opening a second terminal and leaving
tockloader listenalways running.
-
Since this application creates a USB HID device to enter HOTP codes, you'll need a second USB cable which will connect directly to the microcontroller. Plug it into the port on the left-hand side of the nRF52840DK labeled "nRF USB".
- After attaching the USB cable, you should restart the application by hitting the reset button the nRF52840DK labeled "IF BOOT/RESET".
-
To generate an HOTP code, press "Button 1" on the nRF5240DK. You should see a message printed to console output that says
Counter: 0. Typed "750359" on the USB HID the keyboard.The HOTP code will also be written out over the USB HID device. The six-digit number should appear wherever your cursor is.
-
You can verify the HOTP values with https://www.verifyr.com/en/otp/check#hotp
Go to section "#2 Generate HOTP Code". Enter "test" as the HOTP Code to auth, the current counter value from console as the Counter, "sha256" as the Algorithm, and 6 as the Digits. Click "Generate" and you'll see a six-digit HOTP code that should match the output of the Tock HOTP app.
-
The source code for this application is in the file
main.c.This is roughly 300 lines of code and includes Button handling, HMAC use and the HOTP state machine. Execution starts at the
main()function at the bottom of the file. -
Play around with the app and take a look through the code to make sure it makes sense. Don't worry too much about the HOTP next code generation, as it already works and you won't have to modify it.
Checkpoint: You should be able to run the application and have it output HOTP codes over USB to your computer when Button 1 is pressed.
Milestone One: Configuring Secrets
The first milestone is to modify the HOTP application to allow the user to set a
secret, rather than having a pre-compiled default secret. Completed code is
available in hotp_milestone_one/ in case you run into issues.
-
First, modify the code in main() to detect when a user wants to change the HOTP secret rather than get the next code.
The simplest way to do this is to sense how long the button is held for. You can delay a short period, roughly 500 ms would work well, and then read the button again and check if it's still being pressed. You can wait synchronously with the
delay_ms()function and you can read a button with thebutton_read()function.-
Note that buttons are indexed from 0 in Tock. So "Button 1" on the hardware is button number 0 in the application code. All four of the buttons on the nRF52840DK are accessible, although the
initialize_buttons()helper function in main.c only initializes interrupts for button number 0. (You can change this if you want!) -
An alternative design would be to use different buttons for different purposes. We'll focus on the first method, but feel free to implement this however you think would work best.
-
-
For now, just print out a message when you detect the user's intent. Be sure to compile and upload your modified application to test it.
-
Next, create a new helper function to allow for programming new secrets. This function will have three parts:
-
The function should print a message about wanting input from the user.
- Let them know that they've entered this mode and that they should type a new HOTP secret.
-
The function should read input from the user to get the base32-encoded secret.
-
You'll want to use the Console functions
getch()andputnstr().getch()can read characters of user input whileputnstr()can be used to echo each character the user types. Make a loop that reads the characters into a buffer. -
Since the secret is in base32, special characters are not valid. The easiest way to handle this is to check the input character with
isalnum()and ignore it if it isn't alphanumeric. -
When the user hits the enter key, a
\ncharacter will be received. This can be used to break from the loop.
-
-
The function should decode the secret and save it in the
hotp-key.- Use the
program_default_secret()implementation for guidance here. Thedefault_secrettakes the place of the string you read from the user, but otherwise the steps are the same.
- Use the
-
-
Connect the two pieces of code you created to allow the user to enter a new key. Then upload your code to test it!
- You can test that the new secret works with https://www.verifyr.com/en/otp/check#hotp as described previously.
Checkpoint: Your HOTP application should now take in user-entered secrets and generate HOTP codes for them based on button presses.
Milestone Two: Persistent Secrets
The second milestone is to save the HOTP struct in persistent Flash rather than
in volatile memory. After doing so, the secret and current counter values will
persist after resets and power outages. We'll do the saving to flash with the
App State driver, which allows an application to save some information to its
own Flash region in memory. Completed code is available in hotp_milestone_two/
in case you run into issues.
-
First, understand how the App State driver works by playing with some example code. The App State test application is available in
libtock-c/examples/tests/app_state/main.c-
Compile it and load it onto your board to try it out.
-
If you want to uninstall the HOTP application from the board, you can do so with
tockloader uninstall. When you're done, you can use that same command to remove this application.
-
-
Next, we'll go back to the HOTP application code and add our own App State implementation.
Start by creating a new struct that holds both a
magicfield and the HOTP key struct.- The value in the
magicfield can be any unique number that is unlikely to occur by accident. A 32-bit value (that is neither all zeros nor all ones) of your choosing is sufficient.
- The value in the
-
Create an App State initialization function that can be called from the start of
main()which will load the struct from Flash if it exists, or initialize it and store it if it doesn't.- Be sure to call the initialization function after the one-second delay at
the start of
main()so that it doesn't attempt to modify Flash during resets while uploading code.
- Be sure to call the initialization function after the one-second delay at
the start of
-
Update code throughout your application to use the HOTP key inside of the App State struct.
You'll also need to synchronize the App State whenever part of the HOTP key is modified: when programming a new secret or updating the counter.
-
Upload your code to test it. You should be able to keep the same secret and counter value on resets and also on power cycles.
-
There is an on/off switch on the top left of the nRF52840DK you can use for power cycling.
-
Note that uploading a modified version of the application will overwrite the App State and lose the existing values inside of it.
-
Checkpoint: Your application should now both allow for the configuring of HOTP secrets and the HOTP secret and counter should be persistent across reboots.
Milestone Three: Multiple HOTP Keys
The third and final application milestone is to add multiple HOTP keys and a
method for choosing between them. This milestone is optional, as the rest of
the tutorial will work without it. If you're short on time, you can skip it
without issue. Completed code is available in hotp_milestone_three/ in case
you run into issues.
-
The recommended implementation of multiple HOTP keys is to assign one key per button (so four total for the nRF52840DK). A short press will advance the counter and output the HOTP code while a long press will allow for reprogramming of the HOTP secret.
-
The implementation here is totally up to you. Here are some suggestions to consider:
-
Select which key you are using based on the button number of the most recent press. You'll also need to enable interrupts for all of the buttons instead of just Button 1.
-
Make the HOTP key in the App State struct into an array with up to four slots.
-
Having multiple key slots allows for different numbers of digits for the HOTP code on different slots, which you could experiment with.
-
Checkpoint: Your application should now hold multiple HOTP keys, each of which can be configured and is persistent across reboots.
Encryption Oracle Capsule
Our HOTP security key works by storing a number of secrets on the device, and using these secrets together with some moving factor (e.g., a counter value or the current time) in an HMAC operation. This implies that our device needs some way to store these secrets, for instance in its internal flash.
However, storing such secrets in plaintext in ordinary flash is not particularly secure. For instance, many microcontrollers offer debug ports which can be used to gain read and write access to flash. Even if these ports can be locked down, such protection mechanisms have been broken in the past. Apart from that, disallowing external flash access makes debugging and updating our device much more difficult.
To circumvent these issues, we will build an encryption oracle capsule: this Tock kernel module will allow applications to request decryption of some ciphertext, using a kernel-internal key not exposed to applications themselves. By only storing an encrypted version of their secrets, applications are free to use unprotected flash storage, or store them even external to the device itself. This is a commonly used paradigm in root of trust systems such as TPMs or OpenTitan, which feature hardware-embedded keys that are unique to a chip and hardened against key-readout attacks.
Our kernel module will use a hard-coded symmetric encryption key (AES-128 CTR-mode), embedded in the kernel binary. While this does not actually meaningfully increase the security of our example application, it demonstrates some important concepts in Tock:
- How custom userspace drivers are implemented, and the different types of system calls supported.
- How Tock implements asynchronous APIs in the kernel.
- Tock's hardware-interface layers (HILs), which provide abstract interfaces for hardware or software implementations of algorithms, devices and protocols.
Capsules – Tock's Kernel Modules
Most of Tock's functionality is implemented in the form of capsules – Tock's
equivalent to kernel modules. Capsules are Rust modules contained in Rust crates
under the capsules/ directory within the Tock kernel repository. They can be
used to implement userspace drivers, hardware drivers (for example, a driver for
an I²C-connected sensor), or generic reusable code snippets.
What makes capsules special is that they are semi-trusted: they are not
allowed to contain any unsafe Rust code, and thus can never violate Tock's
memory safety guarantees. They are only trusted with respect to liveness and
correctness – meaning that they must not block the kernel execution for long
periods of time, and should behave correctly according to their specifications
and API contracts.
We start our encryption oracle driver by creating a new capsule called
encryption_oracle. Create a file under
capsules/extra/src/tutorials/encryption_oracle.rs in the Tock kernel
repository with the following contents:
#![allow(unused)]
fn main() {
// Licensed under the Apache License, Version 2.0 or the MIT License.
// SPDX-License-Identifier: Apache-2.0 OR MIT
// Copyright Tock Contributors 2022.

pub static KEY: &'static [u8; kernel::hil::symmetric_encryption::AES128_KEY_SIZE] =
    b"InsecureAESKey12";

pub struct EncryptionOracleDriver {}

impl EncryptionOracleDriver {
    /// Create a new instance of our encryption oracle userspace driver:
    pub fn new() -> Self {
        EncryptionOracleDriver {}
    }
}

}
We will be filling this module with more interesting contents soon. To make this
capsule accessible to other Rust modules and crates, add it to
capsules/extra/src/tutorials/mod.rs:
  #[allow(dead_code)]
  pub mod encryption_oracle_chkpt5;

+ pub mod encryption_oracle;
EXERCISE: Make sure your new capsule compiles by running
cargo checkin thecapsules/extra/folder.
The capsules/tutorial crate already contains checkpoints of the encryption
oracle capsule we'll be writing here. Feel free to use them if you're stuck. We
indicate that your capsule should have reached an equivalent state to one of our
checkpoints through blocks such as the following:
CHECKPOINT:
encryption_oracle_chkpt0.rs
BACKGROUND: While a single "capsule" is generally self-contained in a Rust module (
.rsfile), these modules are again grouped into Rust crates such ascapsules/coreandcapsules/extra, depending on certain policies. For instance, capsules incorehave stricter requirements regarding their code quality and API stability. Neithercorenor theextraextracapsules crates allow for external dependencies (outside of the Tock repository). The document on external dependencies further explains these policies.
Userspace Drivers
Now that we have a basic capsule skeleton, we can think about how this code is
going to interact with userspace applications. Not every capsule needs to offer
a userspace API, but those that do must implement
the SyscallDriver trait.
Tock supports different types of application-issued systems calls, four of which are relevant to userspace drivers:
-
subscribe: An application can issue a subscribe system call to register upcalls, which are functions being invoked in response to certain events. These upcalls are similar in concept to UNIX signal handlers. A driver can request an application-provided upcall to be invoked. Every system call driver can provide multiple "subscribe slots", each of which the application can register a upcall to.
-
read-only allow: An application may expose some data for drivers to read. Tock provides the read-only allow system call for this purpose: an application invokes this system call passing a buffer, the contents of which are then made accessible to the requested driver. Every driver can have multiple "allow slots", each of which the application can place a buffer in.
-
read-write allow: Works similarly to read-only allow, but enables drivers to also mutate the application-provided buffer.
-
command: Applications can use command-type system calls to signal arbitrary events or send requests to the userspace driver. A common use-case for command-style systems calls is, for instance, to request that a driver start some long-running operation.
All Tock system calls are synchronous, which means that they should immediately return to the application. In fact, subscribe and allow-type system calls are transparently handled by the kernel, as we will see below. Capsules must not implement long-running operations by blocking on a command system call, as this prevents other applications or kernel routines from running – kernel code is never preempted.
Application Grants
Now there's just one key part missing to understanding Tock's system calls: how drivers store application-specific data. Tock differs significantly from other operating systems in this regard, which typically simply allocate some memory on demand through a heap allocator.
However, on resource constraint platforms such as microcontrollers, allocating from a pool of (limited) memory can inevitably become a prominent source of resource exhaustion errors: once there's no more memory available, Tock wouldn't be able to service new allocation requests, without revoking some prior allocations. This is especially bad when this memory pool is shared between kernel resources belonging to multiple processes, as then one process could potentially starve another.
To avoid these issues, Tock uses grants. A grant is a memory allocation belonging to a process, and is located within a process-assigned memory allocation, but reserved for use by the kernel. Whenever a kernel component must keep track of some process-related information, it can use a grant to hold this information. By allocating memory from a process-specific memory region it is impossible for one process to starve another's memory allocations, independent of whether those allocations are in the process itself or in the kernel. As a consequence, Tock can avoid implementing a kernel heap allocator entirely.
Ultimately, our encryption oracle driver will need to keep track of some
per-process state. Thus we extend the above driver with a Rust struct to be
stored within a grant, called App. For now, we just keep track of whether a
process has requested a decryption operation. Add the following code snippet to
your capsule:
#![allow(unused)]
fn main() {
#[derive(Default)]
pub struct ProcessState {
    request_pending: bool,
}
}
By implementing Default, grant types can be allocated and initialized on
demand. We integrate this type into our EncryptionOracleDriver by adding a
special process_grants variable of
type Grant. This Grant
struct takes a generic type parameter T (which we set to our ProcessState
struct above) next to some constants: as a driver's subscribe upcall and allow
buffer slots also consume some memory, we store them in the process-specific
grant as well. Thus, UpcallCount, AllowRoCont, and AllowRwCount indicate
how many of these slots should be allocated respectively. For now we don't use
any of these slots, so we set their counts to zero. Add the process_grants
variable to your EncryptionOracleDriver:
#![allow(unused)]
fn main() {
use kernel::grant::{Grant, UpcallCount, AllowRoCount, AllowRwCount};

pub struct EncryptionOracleDriver {
    process_grants: Grant<
        ProcessState,
        UpcallCount<0>,
        AllowRoCount<0>,
        AllowRwCount<0>,
    >,
}
}
EXERCISE: The
Grantstruct will be provided as an argument to constructor of theEncryptionOracleDriver. Extendnewto accept it as an argument. Afterwards, make sure your code compiles by runningcargo checkin thecapsules/extra/directory.
Implementing a System Call
Now that we know about grants we can start to implement a proper system call. We start with the basics and implement a simple command-type system call: upon request by the application, the Tock kernel will call a method in our capsule.
For this, we implement the following SyscallDriver trait for our
EncryptionOracleDriver struct. This trait contains two important methods:
command: this method is called whenever an application issues a command-type system call towards this driver, andallocate_grant: this is a method required by Tock to allocate some space in the process' memory region. The implementation of this method always looks the same, and while it must be implemented by every userspace driver, it's exact purpose is not important right now.
#![allow(unused)]
fn main() {
use kernel::{ErrorCode, ProcessId};
use kernel::syscall::{SyscallDriver, CommandReturn};

impl SyscallDriver for EncryptionOracleDriver {
    fn command(
        &self,
        command_num: usize,
        _data1: usize,
        _data2: usize,
        processid: ProcessId,
    ) -> CommandReturn {
        // Syscall handling code here!
        unimplemented!()
    }

    // Required by Tock for grant memory allocation.
    fn allocate_grant(&self, processid: ProcessId) -> Result<(), kernel::process::Error> {
        self.process_grants.enter(processid, |_, _| {})
    }
}
}
The function signature of command tells us a lot about what we can do with
this type of system call:
- Applications can provide a
command_num, which indicates what type of command they are requesting to be handled by a driver, and - they can optionally pass up to two
usizedata arguments. - The kernel further provides us with a unique identifier of the calling
process, through a type called
ProcessId.
Our driver can respond to this system call using a CommandReturn struct. This
struct allows for returning either a success or a failure indication, along
with some data (at most four usize return values). For more details, you can
look at its definition and API
here.
In our encryption oracle driver we only need to handle a single application
request: to decrypt some ciphertext into its corresponding plaintext. As we are
missing the actual cryptographic operations still, let's simply store that a
process has made such a request. Because this is per-process state, we store it
in the request_pending field of the process' grant region. To obtain a
reference to this memory, we can conveniently use the ProcessId type provided
to us by the kernel. The following code snippet shows how an implementation of
the command could look like. Replace your command method body with this
snippet:
#![allow(unused)]
fn main() {
match command_num {
    // Check whether the driver is present:
    0 => CommandReturn::success(),

    // Request the decryption operation:
    1 => {
        self
            .process_grants
            .enter(processid, |app, _kernel_data| {
			    kernel::debug!("Received request from process {:?}", processid);
                app.request_pending = true;
                CommandReturn::success()
            })
            .unwrap_or_else(|err| err.into())
    },

    // Unknown command number, return a NOSUPPORT error
    _ => CommandReturn::failure(ErrorCode::NOSUPPORT),
}
}
There's a lot to unpack here: first, we match on the passed command_num. By
convention, command number 0 is reserved to check whether a driver is loaded
on a kernel. If our code is executing, then this must be the case, and thus we
simply return success. For all other unknown command numbers, we must instead
return a NOSUPPORT error.
Command number 1 is assigned to start the decryption operation. To get a
reference to our process-local state stored in its grant region, we can use the
enter method: it takes a ProcessId, and in return will call a provided Rust
closure that provides us access to the process' own ProcessState instance.
Because entering a grant can fail (for instance when the process does not have
sufficient memory available), we handle any errors by converting them into a
CommandReturn.
EXERCISE: Make sure that your
EncryptionOracleDriverimplements theSyscallDrivertrait as shown above. Then, verify that your code compiles by runningcargo checkin thecapsules/extra/folder.
CHECKPOINT:
encryption_oracle_chkpt1.rs
Congratulations, you have implemented your first Tock system call! Next, we will look into how to to integrate this driver into a kernel build.
Adding a Capsule to a Tock Kernel
To actually make our driver available in a given build of the kernel, we need to
add it to a board crate. Board crates tie the kernel, a given chip, and a
set of drivers together to create a binary build of the Tock operating system,
which can then be loaded into a physical board. For the purposes of this
section, we assume to be targeting the Nordic Semiconductor nRF52840DK board,
and thus will be working in the boards/nordic/nrf52840dk/ directory.
EXERCISE: Enter the
boards/nordic/nrf52840dk/directory and compile a kernel by typingmake. A successful build should end with a message that looks like the following:Finished release [optimized + debuginfo] target(s) in 20.34s text data bss dec hex filename 176132 4 33284 209420 3320c /home/tock/tock/target/thumbv7em-none-eabi/release/nrf52840dk [Hash ommitted] /home/tock/tock/target/thumbv7em-none-eabi/release/nrf52840dk.bin
Applications interact with our driver by passing a "driver number" alongside
their system calls. The capsules/core/src/driver.rs module acts as a registry
for driver numbers. For the purposes of this tutorial we'll use an unassigned
driver number in the misc range, 0x99999, and add a constant to capsule
accordingly:
#![allow(unused)]
fn main() {
pub const DRIVER_NUM: usize = 0x99999;
}
Accepting an AES Engine in the Driver
Before we start adding our driver to the board crate, we'll modify it slightly
to acceppt an instance of an AES128 cryptography engine. This is to avoid
modifying our driver's instantiation later on. We provide the
encryption_oracle_chkpt2.rs checkpoint which has these changes integrated,
feel free to use this code. We make the following mechanical changes to our
types and constructor – don't worry about them too much right now.
First, we change our EncryptionOracleDriver struct to hold a reference to some
generic type A, which must implement the AES128 and the AESCtr traits:
+ use kernel::hil::symmetric_encryption::{AES128Ctr, AES128};

- pub struct EncryptionOracleDriver {
+ pub struct EncryptionOracleDriver<'a, A: AES128<'a> + AES128Ctr> {
+     aes: &'a A,
      process_grants: Grant<
          ProcessState,
          UpcallCount<0>,
Then, we change our constructor to accept this aes member as a new argument:
- impl EncryptionOracleDriver {
+ impl<'a, A: AES128<'a> + AES128Ctr> EncryptionOracleDriver<'a, A> {
      /// Create a new instance of our encryption oracle userspace driver:
      pub fn new(
+         aes: &'a A,
+         _source_buffer: &'static mut [u8],
+         _dest_buffer: &'static mut [u8],
          process_grants: Grant<ProcessState, UpcallCount<0>, AllowRoCount<0>, AllowRwCount<0>>,
      ) -> Self {
          EncryptionOracleDriver {
              process_grants: process_grants,
+             aes: aes,
          }
      }
  }
And finally we update our implementation of SyscallDriver to match these new
types:
- impl SyscallDriver for EncryptionOracleDriver {
+ impl<'a, A: AES128<'a> + AES128Ctr> SyscallDriver for EncryptionOracleDriver<'a, A> {
      fn command(
          &self,
Finally, make sure that your modified capsule still compiles.
CHECKPOINT:
encryption_oracle_chkpt2.rs
Instantiating the System Call Driver
Now, open the board's main file (boards/nordic/nrf52840dk/src/main.rs) and
scroll down to the line that reads "PLATFORM SETUP, SCHEDULER, AND START KERNEL
LOOP". We'll instantiate our encryption oracle driver right above that, with
the following snippet:
#![allow(unused)]
fn main() {
const CRYPT_SIZE: usize = 7 * kernel::hil::symmetric_encryption::AES128_BLOCK_SIZE;
let aes_src_buffer = kernel::static_init!([u8; 16], [0; 16]);
let aes_dst_buffer = kernel::static_init!([u8; CRYPT_SIZE], [0; CRYPT_SIZE]);

let oracle = static_init!(
    capsules_extra::tutorials::encryption_oracle::EncryptionOracleDriver<
        'static,
        nrf52840::aes::AesECB<'static>,
    >,
    // Call our constructor:
    capsules_extra::tutorials::encryption_oracle::EncryptionOracleDriver::new(
        &base_peripherals.ecb,
        aes_src_buffer,
        aes_dst_buffer,
		// Magic incantation to create our `Grant` struct:
        board_kernel.create_grant(
            capsules_extra::tutorials::encryption_oracle::DRIVER_NUM, // our driver number
            &create_capability!(capabilities::MemoryAllocationCapability)
        ),
    ),
);

// Leave commented out for now:
// kernel::hil::symmetric_encryption::AES128::set_client(&base_peripherals.ecb, oracle);
}
Now that we instantiated our capsule, we need to wire it up to Tock's system
call handling facilities. This involves two steps: first, we need to store our
instance in our Platform struct. That way, we can refer to our instance while
the kernel is running. Then, we need to route system calls to our driver number
(0x99999) to be handled by this driver.
Add the following line to the very bottom of the pub struct Platform {
declaration:
  pub struct Platform {
      [...],
      systick: cortexm4::systick::SysTick,
+     oracle: &'static capsules_extra::tutorials::encryption_oracle::EncryptionOracleDriver<
+         'static,
+         nrf52840::aes::AesECB<'static>,
+     >,
  }
Furthermore, add our instantiated oracle to the let platform = Platform {
instantiation:
  let platform = Platform {
      [...],
      systick: cortexm4::systick::SysTick::new_with_calibration(64000000),
+     oracle,
  };
Finally, to handle received system calls in our driver, add the following line
to the match block in the with_driver method of the SyscallDriverLookup
trait implementation:
  impl SyscallDriverLookup for Platform {
      fn with_driver<F, R>(&self, driver_num: usize, f: F) -> R
      where
          F: FnOnce(Option<&dyn kernel::syscall::SyscallDriver>) -> R,
      {
          match driver_num {
              capsules_core::console::DRIVER_NUM => f(Some(self.console)),
              [...],
              capsules_extra::app_flash_driver::DRIVER_NUM => f(Some(self.app_flash)),
+             capsules_extra::tutorials::encryption_oracle::DRIVER_NUM => f(Some(self.oracle)),
              _ => f(None),
          }
      }
  }
That's it! We have just added a new driver to the nRF52840DK's Tock kernel build.
EXERCISE: Make sure your board compiles by running
make. If you want, you can test your driver with a libtock-c application which executes the following:command( 0x99999, // driver number 1, // command number 0, 0 // optional data arguments );Upon receiving this system call, the capsule should print the "Received request from process" message.
Interacting with HILs
The Tock operating system supports different hardware platforms, each featuring
an individual set of integrated peripherals. At the same time, a driver such as
our encryption oracle should be portable between different systems running Tock.
To achieve this, Tock uses the concept of Hardware-Interface Layers (HILs), the
design paradigms of which are described in
this document.
HILs are organized as Rust modules, and can be found under the
kernel/src/hil/
directory. We will be working with the
symmetric_encryption.rs HIL.
HILs capture another important concept of the Tock kernel: asynchronous
operations. As mentioned above, Tock system calls must never block for extended
periods of time, as kernel code is not preempted. Blocking in the kernel
prevents other useful being done. Instead, long-running operations in the Tock
kernel are implemented as asynchronous two-phase operations: one function call
on the underlying implementation (e.g., of our AES engine) starts an operation,
and another function call (issued by the underlying implementation, hence named
callback) informs the driver that the operation has completed. You can see
this paradigm embedded in all of Tock's HILs, including the
symmetric_encryption HIL: the
crypt() method
is specified to return immediately (and return a Some(_) in case of an error).
When the requested operation is finished, the implementor of AES128 will call
the
crypt_done() callback,
on the client registered with
set_client().
The below figure illustates the way asynchronous operations are handled in Tock,
using our encryption oracle capsule as an example. One further detail
illustrated in this figure is the fact that providers of a given interface
(e.g., AES128) may not always be able to perform a large user-space operation
in a single call; this may be because of hardware-limitations, limited buffer
allocations, or to avoid blocking the kernel for too long in
software-implentations. In this case, a userspace-operation is broken up into
multiple smaller operations on the underlying provider, and the next
sub-operation is scheduled once a callback has been received:

To allow our capsule to receive crypt_done callbacks, add the following trait
implementation:
#![allow(unused)]
fn main() {
use kernel::hil::symmetric_encryption::Client;

impl<'a, A: AES128<'a> + AES128Ctr> Client<'a> for EncryptionOracleDriver<'a, A> {
    fn crypt_done(&'a self, mut source: Option<&'static mut [u8]>, destination: &'static mut [u8]) {
	    unimplemented!()
    }
}
}
With this trait implemented, we can wire up the oracle driver instance to
receive callbacks from the AES engine (base_peripherals.ecb) by uncommenting
the following line in boards/nordic/nrf52840dk/src/main.rs:
- // Leave commented out for now:
- // kernel::hil::symmetric_encryption::AES128::set_client(&base_peripherals.ecb, oracle);
+ kernel::hil::symmetric_encryption::AES128::set_client(&base_peripherals.ecb, oracle);
If this is missing, our capsule will not be able to receive feedback from the AES hardware that an operation has finished, and it will thus refuse to start any new operation. This is an easy mistake to make – you should check whether all callbacks are set up correctly when the kernel is in such a stuck state.
Multiplexing Between Processes
While our underlying AES128 implementation can only handle one request at a
time, multiple processes may wish to use this driver. Thus our capsule
implements a queueing system: even when another process is already using our
capsule to decrypt some ciphertext, another process can still initate such a
request. We remember these requests through the request_pending flag in our
ProcessState grant, and we've already implemented the logic to set this flag!
Now, to actually implement our asynchronous decryption operation, it is further
important to keep track of which process' request we are currently working on.
We add an additional state field to our EncryptionOracleDriver holding an
OptionalCell:
this is a container whose stored value can be modified even if we only hold an
immutable Rust reference to it. The optional indicates that it behaves similar
to an Option – it can either hold a value, or be empty.
  use kernel::utilities::cells::OptionalCell;

  pub struct EncryptionOracleDriver<'a, A: AES128<'a> + AES128Ctr> {
      aes: &'a A,
      process_grants: Grant<ProcessState, UpcallCount<0>, AllowRoCount<0>, AllowRwCount<0>>,
+     current_process: OptionalCell<ProcessId>,
  }
We need to add it to the constructor as well:
  pub fn new(
      aes: &'a A,
      _source_buffer: &'static mut [u8],
      _dest_buffer: &'static mut [u8],
      process_grants: Grant<ProcessState, UpcallCount<0>, AllowRoCount<0>, AllowRwCount<0>>,
  ) -> Self {
      EncryptionOracleDriver {
          process_grants,
          aes,
+         current_process: OptionalCell::empty(),
      }
  }
In practice, we simply want to find the next process request to work on. For
this, we add a helper method to the impl of our EncryptionOracleDriver:
#![allow(unused)]
fn main() {
/// Return a `ProcessId` which has `request_pending` set, if there is some:
fn next_pending(&self) -> Option<ProcessId> {
    unimplemented!()
}
}
EXERCISE: Try to implement this method according to its specification. If you're stuck, see whether the documentation of the
OptionalCellandGranttypes help. Hint: to interact with theProcessStateof every processes, you can use theitermethod on aGrant: the returnedItertype then has anentermethod access the contents of an invidiual process' grant.
CHECKPOINT:
encryption_oracle_chkpt3.rs
Interacting with Process Buffers and Scheduling Upcalls
For our encryption oracle, it is important to allow users provide buffers containing the encryption initialization vector (to prevent an attacker from inferring relationships between messages encrypted with the same key), and the plaintext or ciphertext to encrypt and decrypt respectively. Furthermore, userspace must provide a mutable buffer for our capsule to write the operation's output to. These buffers are placed into read-only and read-write allow slots by applications accordingly. We allocate fixed IDs for those buffers:
#![allow(unused)]
fn main() {
/// Ids for read-only allow buffers
mod ro_allow {
    pub const IV: usize = 0;
    pub const SOURCE: usize = 1;
    /// The number of allow buffers the kernel stores for this grant
    pub const COUNT: u8 = 2;
}

/// Ids for read-write allow buffers
mod rw_allow {
    pub const DEST: usize = 0;
    /// The number of allow buffers the kernel stores for this grant
    pub const COUNT: u8 = 1;
}
}
To deliver upcalls to the application, we further allocate an allow-slot for the
DONE callback:
#![allow(unused)]
fn main() {
/// Ids for subscribe upcalls
mod upcall {
    pub const DONE: usize = 0;
    /// The number of subscribe upcalls the kernel stores for this grant
    pub const COUNT: u8 = 1;
}
}
Now, we need to update our Grant type to actually reserve these new allow and
subscribe slots:
  pub struct EncryptionOracleDriver<'a, A: AES128<'a> + AES128Ctr> {
      aes: &'a A,
      process_grants: Grant<
          ProcessState,
-         UpcallCount<0>,
-         AllowRoCount<0>,
-         AllowRwCount<0>,
+         UpcallCount<{ upcall::COUNT }>,
+         AllowRoCount<{ ro_allow::COUNT }>,
+         AllowRwCount<{ rw_allow::COUNT }>,

      >,
Update this type signature in your constructor as well.
While Tock applications can expose certain sections of their memory as buffers to the kernel, access to the buffers is limited while their grant region is entered (implemented through a Rust closure). Unfortunately, this implies that asynchronous operations cannot keep a hold of these buffers and use them while other code (or potentially the application itself) is executing.
For this reason, Tock uses static mutable slices (&'static mut [u8]) in
HILs. These Rust types have the distinct advantage that they can be passed
around the kernel as "persistent references": when borrowing a 'static
reference into another 'static reference, the original reference becomes
inaccessible. Tock features a special container to hold such mutable references,
called TakeCell. We add such a container for each of our source and
destination buffers:
  use core::cell::Cell;
  use kernel::utilities::cells::TakeCell;

  pub struct EncryptionOracleDriver<'a, A: AES128<'a> + AES128Ctr> {
      [...],
	  current_process: OptionalCell<ProcessId>,
+     source_buffer: TakeCell<'static, [u8]>,
+     dest_buffer: TakeCell<'static, [u8]>,
+     crypt_len: Cell<usize>,
  }
  ) -> Self {
      EncryptionOracleDriver {
          process_grants: process_grants,
          aes: aes,
          current_process: OptionalCell::empty(),
+         source_buffer: TakeCell::new(source_buffer),
+         dest_buffer: TakeCell::new(dest_buffer),
+         crypt_len: Cell::new(0),
      }
  }
Now we have all pieces in place to actually drive the AES implementation. As
this is a rather lengthy implementation containing a lot of specifics relating
to the AES128 trait, this logic is provided to you in the form of a single
run() method. Fill in this implementation from encryption_oracle_chkpt4.rs:
#![allow(unused)]
fn main() {
use kernel::processbuffer::ReadableProcessBuffer;
use kernel::hil::symmetric_encryption::AES128_BLOCK_SIZE;

/// The run method initiates a new decryption operation or
/// continues an existing two-phase (asynchronous) decryption in
/// the context of a process.
///
/// If the process-state `offset` is `0`, we will initialize the
/// AES engine with an initialization vector (IV) provided by the
/// application, and configure it to perform an AES128-CTR
/// operation.
///
/// If the process-state `offset` is larger or equal to the
/// process-provided source or destination buffer size, we return
/// an error of `ErrorCode::NOMEM`. A caller can use this as a
/// method to check whether the descryption operation has
/// finished.
fn run(&self, processid: ProcessId) -> Result<(), ErrorCode> {
    // Copy in the provided code from `encryption_oracle_chkpt4.rs`
    unimplemented!()
}
}
A core part still missing is actually invoking this run() method, namely for
each process that has its request_pending flag set. As we need to do this each
time an application requests an operation, as well as each time we finish an
operation (to work on the next enqueued) one, this is implemented in a helper
method called run_next_pending.
#![allow(unused)]
fn main() {
/// Try to run another decryption operation.
///
/// If `self.current_current` process contains a `ProcessId`, this
/// indicates that an operation is still in progress. In this
/// case, do nothing.
///
/// If `self.current_process` is vacant, use your implementation
/// of `next_pending` to find a process with an active request. If
/// one is found, remove its `request_pending` indication and start
//  a new decryption operation with the following call:
///
///    self.run(processid)
///
/// If this method returns an error, return the error to the
/// process in the registered upcall. Try this until either an
/// operation was started successfully, or no more processes have
/// pending requests.
///
/// Beware: you will need to enter a process' grant both to set the
/// `request_pending = false` and to (potentially) schedule an error
/// upcall. `self.run()` will itself also enter the grant region.
/// However, *Tock's grants are non-reentrant*. This means that trying
/// to enter a grant while it is already entered will fail!
fn run_next_pending(&self) {
    unimplemented!()
}
}
EXERCISE: Implement the
run_next_pendingmethod according to its specification. To schedule a process upcall, you can use the second argument passed into thegrant.enter()method (kernel_data):kernel_data.schedule_upcall( <upcall slot>, (<arg0>, <arg1>, <arg2>) )By convention, errors are reported in the first upcall argument (
arg0). You can convert anErrorCodeinto ausizewith the following method:kernel::errorcode::into_statuscode(<error code>)
run_next_pending should be invoked whenever we receive a new encryption /
decryption request from a process, so add it to the command() method
implementation:
  // Request the decryption operation:
- 1 => self
-     .process_grants
-     .enter(processid, |grant, _kernel_data| {
-         grant.request_pending = true;
-         CommandReturn::success()
-     })
-     .unwrap_or_else(|err| err.into()),
+ 1 => {
+     let res = self
+         .process_grants
+         .enter(processid, |grant, _kernel_data| {
+             grant.request_pending = true;
+             CommandReturn::success()
+         })
+         .unwrap_or_else(|err| err.into());
+
+     self.run_next_pending();
+
+     res
+ }
We store res temporarily, as Tock's grant regions are non-reentrant: we can't
invoke run_next_pending (which will attempt to enter grant regions), while
we're in a grant already.
CHECKPOINT:
encryption_oracle_chkpt4.rs
Now, to complete our encryption oracle capsule, we need to implement the
crypt_done() callback. This callback performs the following actions:
- copies the in-kernel destination buffer (
&'static mut [u8]) as passed tocrypt()into the process' destination buffer through its grant, and - attempts to invoke another encryption / decryption round by calling
run().- If calling
run()succeeds, anothercrypt_done()callback will be scheduled in the future. - If calling
run()fails with an error ofErrorCode::NOMEM, this indicates that the current operation has been completed. Invoke the process' upcall to signal this event, and use ourrun_next_pending()method to schedule the next operation.
- If calling
Similar to the run() method, we provide this snippet to you in
encryption_oracle_chkpt5.rs:
#![allow(unused)]
fn main() {
use kernel::processbuffer::WriteableProcessBuffer;

impl<'a, A: AES128<'a> + AES128Ctr> Client<'a> for EncryptionOracleDriver<'a, A> {
    fn crypt_done(&'a self, mut source: Option<&'static mut [u8]>, destination: &'static mut [u8]) {
	     // Copy in the provided code from `encryption_oracle_chkpt5.rs`
         unimplemented!()
    }
}
}
CHECKPOINT:
encryption_oracle_chkpt5.rs
Congratulations! You have written your first Tock capsule and userspace driver, and interfaced with Tock's asynchronous HILs. Your capsule should be ready to go now, go ahead and integrate it into your HOTP application! Don't forget to recompile your kernel such that it integrates the latest changes.
Integrating the Encryption Oracle Capsule into your libtock-c App
The encryption oracle capsule is compatible with the oracle.c and oracle.h
implementation in the libtock-c part of the tutorial, under
examples/tutorials/hotp/hotp_oracle_complete/.
You can try to integrate this with your application by using the interfaces
provided in oracle.h. The main.c file in this repository contains an example
of how these interfaces can be integrated into a fully-featured HOTP
application.
Security Key Application Access Control
With security-focused and privileged system resources, a board may wish to restrict which applications can access which system call resources. In this stage we will extend the Tock kernel to restrict access to the encryption capsule to only trusted (credentialed) apps.
Background
We need two Tock mechanisms to implement this feature. First, we need a way to identify the trusted app that we will give access to the encryption engine. We will do this by adding credentials to the app's TBF (Tock Binary Format file) and verifying those credentials when the application is loaded. This mechanism allows developers to sign apps, and then the kernel can verify those signatures.
The second mechanism is way to permit syscall access to only specific applications. The Tock kernel already has a hook that runs on each syscall to check if the syscall should be permitted. By default this just approves every syscall. We will need to implement a custom policy which permits access to the encryption capsule to only the trusted HOTP apps.
Module Overview
Our goal is to add credentials to Tock apps, verify those credentials in the kernel, and then permit only verified apps to use the encryption oracle API. To keep this simple we will use a simple SHA-256 hash as our credential, and verify that the hash is valid within the kernel.
Step 1: Credentialed Apps
To implement our access control policy we need to include an offline-computed SHA256 hash with the app TBF, and then check it when running the app. The SHA256 credential is simple to create, and serves as a stand-in for more useful credentials such as cryptographic signatures.
This will require a couple pieces:
- We need to actually include the hash in our app.
- We need a mechanism in the kernel to check the hash exists and is valid.
Signing Apps
We can use Tockloader to add a hash to a compiled app. This will require Tockloader version 1.10.0 or newer.
First, compile the app:
$ cd libtock-c/examples/blink
$ make
Now, add the hash credential:
$ tockloader tbf credential add sha256
It's fine to add to all architectures or you can specify which TBF to add it to.
To check that the credential was added, we can inspect the TAB:
$ tockloader inspect-tab
You should see output like the following:
$ tockloader inspect-tab
[INFO   ] No TABs passed to tockloader.
[STATUS ] Searching for TABs in subdirectories.
[INFO   ] Using: ['./build/blink.tab']
[STATUS ] Inspecting TABs...
TAB: blink
  build-date: 2023-06-09 21:52:59+00:00
  minimum-tock-kernel-version: 2.0
  tab-version: 1
  included architectures: cortex-m0, cortex-m3, cortex-m4, cortex-m7

 Which TBF to inspect further? cortex-m4

cortex-m4:
  version               : 2
  header_size           :        104         0x68
  total_size            :      16384       0x4000
  checksum              :              0x722e64be
  flags                 :          1          0x1
    enabled             : Yes
    sticky              : No
  TLV: Main (1)                                   [0x10 ]
    init_fn_offset      :         41         0x29
    protected_size      :          0          0x0
    minimum_ram_size    :       5068       0x13cc
  TLV: Program (9)                                [0x20 ]
    init_fn_offset      :         41         0x29
    protected_size      :          0          0x0
    minimum_ram_size    :       5068       0x13cc
    binary_end_offset   :       8360       0x20a8
    app_version         :          0          0x0
  TLV: Package Name (3)                           [0x38 ]
    package_name        : blink
  TLV: Kernel Version (8)                         [0x4c ]
    kernel_major        : 2
    kernel_minor        : 0
    kernel version      : ^2.0
  TLV: Persistent ACL (7)                         [0x54 ]
    Write ID            :          11          0xb
    Read IDs (1)        : 11
    Access IDs (1)      : 11

TBF Footers
  Footer
    footer_size         :       8024       0x1f58
  Footer TLV: Credentials (128)
    Type: SHA256 (3) ✓ verified
    Length: 32
  Footer TLV: Credentials (128)
    Type: Reserved (0)
    Length: 7976
Note at the bottom, there is a Footer TLV with SHA256 credentials! Because
tockloader was able to double-check the hash was correct there is ✓ verified
next to it.
SUCCESS: We now have an app with a hash credential!
Verifying Credentials in the Kernel
To have the kernel check that our hash credential is present and valid, we need to add a credential checker before the kernel starts each process.
To create the app checker, we'll edit the board's main.rs file in the kernel.
Tock includes a basic SHA256 credential checker, so we can use that. The
following code should be added to the main.rs file somewhere before the
platform setup occurs (probably right after the encryption oracle capsule from
the last module!).
#![allow(unused)]
fn main() {
//--------------------------------------------------------------------------
// CREDENTIALS CHECKING POLICY
//--------------------------------------------------------------------------

// Create the software-based SHA engine.
let sha = static_init!(capsules_extra::sha256::Sha256Software<'static>,
                       capsules_extra::sha256::Sha256Software::new());
kernel::deferred_call::DeferredCallClient::register(sha);

// Create the credential checker.
static mut SHA256_CHECKER_BUF: [u8; 32] = [0; 32];
let checker = static_init!(
    kernel::process_checker::basic::AppCheckerSha256,
    kernel::process_checker::basic::AppCheckerSha256::new(sha, &mut SHA256_CHECKER_BUF)
    );
kernel::hil::digest::Digest::set_client(sha, checker);
}
That code creates a checker object. We now need to modify the board so it
hangs on to that checker struct. To do so, we need to add this to our
Platform struct type definition near the top of the file:
#![allow(unused)]
fn main() {
struct Platform {
    ...
    credentials_checking_policy: &'static kernel::process_checker::basic::AppCheckerSha256,
}
}
Then when we create the platform object near the end of main(), we can add our
checker:
#![allow(unused)]
fn main() {
let platform = Platform {
    ...
    credentials_checking_policy: checker,
}
}
And we need the platform to provide access to that checker when requested by the
kernel for credentials-checking purposes. This goes in the KernelResources
implementation for the Platform type:
#![allow(unused)]
fn main() {
impl KernelResources for Platform {
    ...
    type CredentialsCheckingPolicy = kernel::process_checker::basic::AppCheckerSha256;
    ...
    fn credentials_checking_policy(&self) -> &'static Self::CredentialsCheckingPolicy {
        self.credentials_checking_policy
    }
    ...
}
}
Finally, we need to use the function that checks credentials when processes are
loaded (not just loads and executes them unconditionally). This should go at the
end of main(), replacing the existing call to
kernel::process::load_processes:
#![allow(unused)]
fn main() {
kernel::process::load_and_check_processes(
        board_kernel,
        &platform, // note this function requires providing the platform.
        chip,
        core::slice::from_raw_parts(
            &_sapps as *const u8,
            &_eapps as *const u8 as usize - &_sapps as *const u8 as usize,
        ),
        core::slice::from_raw_parts_mut(
            &mut _sappmem as *mut u8,
            &_eappmem as *const u8 as usize - &_sappmem as *const u8 as usize,
        ),
        &mut PROCESSES,
        &FAULT_RESPONSE,
        &process_management_capability,
    )
    .unwrap_or_else(|err| {
        debug!("Error loading processes!");
        debug!("{:?}", err);
    });
}
Compile and install the updated kernel.
SUCCESS: We now have a kernel that can check credentials!
Installing Apps and Verifying Credentials
Now, our kernel will only run an app if it has a valid SHA256 credential. To verify this, recompile and install the blink app but do not add credentials:
cd libtock-c/examples/blink
touch main.c
make
tockloader install --erase
Now, if we list the processes on the board with the process console. Note we
need to run the console-start command to active the tock process console.
$ tockloader listen
Initialization complete. Entering main loop
NRF52 HW INFO: Variant: AAF0, Part: N52840, Package: QI, Ram: K256, Flash: K1024
console-start
tock$
Now we can list the processes:
tock$ list
 PID    Name                Quanta  Syscalls  Restarts  Grants  State
 0      blink                    0         0         0   0/16   CredentialsFailed
tock$
Tip: You can re-disable the process console by using the
console-stopcommand.
You can see our app is in the state CredentialsFailed meaning it will not
execute (and the LEDs are not blinking).
To fix this, we can add the SHA256 credential.
cd libtock-c/examples/blink
tockloader tbf credential add sha256
tockloader install
Now when we list the processes, we see:
tock$ list
 PID    ShortID    Name                Quanta  Syscalls  Restarts  Grants  State
 0      0x3be6efaa blink                    0       323         0   1/16   Yielded
And we can verify the app is both running and now has a specifically assigned short ID.
Permitting Both Credentialed and Non-Credentialed Apps
The default operation is not quite what we want. We want all apps to run, but only credentialed apps to have access to the syscalls.
To allow all apps to run, even if they don't pass the credential check, we need to configure our checker. Doing that is actually quite simple. We just need to modify the credential checker we are using to not require credentials.
In tock/kernel/src/process_checker/basic.rs, modify the
require_credentials() function to not require credentials:
#![allow(unused)]
fn main() {
impl AppCredentialsChecker<'static> for AppCheckerSha256 {
    fn require_credentials(&self) -> bool {
        false // change from true to false
    }
    ...
}
}
Then recompile and install. Now even a non-credentialed process should run:
tock$ list
 PID    ShortID    Name                Quanta  Syscalls  Restarts  Grants  State
 0      Unique     c_hello                  0         8         0   1/16   Yielded
SUCCESS: We now can determine if an app is credentialed or not!
Step 2: Permitting Syscalls for only Credentialed Apps
Our second step is to implement a policy that permits syscall access to the encryption capsule only for credentialed apps. All other syscalls should be permitted.
Tock provides the SyscallFilter trait to do this. An object that implements
this trait is used on every syscall to check if that syscall should be executed
or not. By default all syscalls are permitted.
The interface looks like this:
#![allow(unused)]
fn main() {
pub trait SyscallFilter {
    // Return Ok(()) to permit the syscall, and any Err() to deny.
    fn filter_syscall(
        &self, process: &dyn process::Process, syscall: &syscall::Syscall,
    ) -> Result<(), errorcode::ErrorCode> {
        Ok(())
    }
}

}
We need to implement the single filter_syscall() function with out desired
behavior.
To do this, create a new file called syscall_filter.rs in the board's src/
directory. Then insert the code below as a starting point:
#![allow(unused)]
fn main() {
use kernel::errorcode;
use kernel::platform::SyscallFilter;
use kernel::process;
use kernel::syscall;

pub struct TrustedSyscallFilter {}

impl SyscallFilter for TrustedSyscallFilter {
    fn filter_syscall(
        &self,
        process: &dyn process::Process,
        syscall: &syscall::Syscall,
    ) -> Result<(), errorcode::ErrorCode> {

        // To determine if the process has credentials we can use the
        // `process.get_credentials()` function.

        // Now inspect the `syscall` the app is calling. If the `driver_numer`
        // is not XXXXXX, then return `Ok(())` to permit the call. Otherwise, if
        // the process is not credentialed, return `Err(ErrorCode::NOSUPPORT)`. If
        // the process is credentialed return `Ok(())`.
    }
}
}
Documentation for the Syscall type is
here.
Save this file and include it from the board's main.rs:
#![allow(unused)]
fn main() {
mod syscall_filter
}
Now to put our new policy into effect we need to use it when we configure the
kernel via the KernelResources trait.
#![allow(unused)]
fn main() {
impl KernelResources for Platform {
    ...
    type SyscallFilter = syscall_filter::TrustedSyscallFilter;
    ...
    fn syscall_filter(&self) -> &'static Self::SyscallFilter {
        self.sysfilter
    }
    ...
}
}
Also you need to instantiate the TrustedSyscallFilter:
#![allow(unused)]
fn main() {
let sysfilter = static_init!(
    syscall_filter::TrustedSyscallFilter,
    syscall_filter::TrustedSyscallFilter {}
);
}
and add it to the Platform struct:
#![allow(unused)]
fn main() {
struct Platform {
    ...
    sysfilter: &'static syscall_filter::TrustedSyscallFilter,
}
}
Then when we create the platform object near the end of main(), we can add our
checker:
#![allow(unused)]
fn main() {
let platform = Platform {
    ...
    sysfilter,
}
}
SUCCESS: We now have a custom syscall filter based on app credentials.
Verifying HOTP Now Needs Credentials
Now you should be able to install your HOTP app to the board without adding the SHA256 credential and verify that it is no longer able to access the encryption capsule. You should see output like this:
$ tockloader listen
Tock HOTP App Started. Usage:
* Press a button to get the next HOTP code for that slot.
* Hold a button to enter a new HOTP secret for that slot.
Flash read
Initialized state
ERROR cannot encrypt key
If you use tockloader to add credentials
(tockloader tbf credential add sha256) and then re-install your app it should
run as expected.
Wrap-up
You now have implemented access control on important kernel resources and enabled your app to use it. This provides platform builders robust flexibility in architecting the security framework for their devices.
Kernel Boot and Setup
The goal of this module is to make you comfortable with the Tock kernel, how it is structured, how the kernel is setup at boot, and how capsules provide additional kernel functionality.
During this you will:
- Learn how Tock uses Rust's memory safety to provide isolation for free
- Read the Tock boot sequence, seeing how Tock uses static allocation
- Learn about Tock's event-driven programming
The Tock Boot Sequence
The very first thing that runs on a Tock board is an assembly function called
initialize_ram_jump_to_main(). Rust requires that memory is configured before
any Rust code executes, so this must run first. As the function name implies,
control is then transferred to the main() function in the board's main.rs
file. Tock intentionally tries to give the board as much control over the
operation of the system as possible, hence why there is very little between
reset and the board's main function being called.
Open the main.rs file for your board in your favorite editor. This file
defines the board's platform: how it boots, what capsules it uses, and what
system calls it supports for userland applications.
How is everything organized?
Find the declaration of "platform" struct. This is typically called
struct Platform or named based on the name of the board (it's pretty early in
the file). This declares the structure representing the platform. It has many
fields, many of which are capsules that make up the board's platform. These
fields are resources that the board needs to maintain a reference to for future
use, for example for handling system calls or implementing kernel policies.
Recall that everything in the kernel is statically allocated. We can see that
here. Every field in the platform struct is a reference to an object with a
static lifetime.
Many capsules themselves take a lifetime as a parameter, which is currently
always 'static.
The boot process is primarily the construction of this platform structure. Once
everything is set up, the board will pass the constructed platform object to
kernel::kernel_loop and we're off to the races.
How do things get started?
After RAM initialization, the reset handler invokes the main() function in the
board main.rs file. main() is typically rather long as it must setup and
configure all of the drivers and capsules the board needs. Many capsules depend
on other, lower layer abstractions that need to be created and initialized as
well.
Take a look at the first few lines of main(). The boot sequence generally sets
up any low-level microcontroller configuration, initializes the MCU peripherals,
and sets up debugging capabilities.
How do capsules get created?
The bulk of main() create and initializes capsules which provide the main
functionality of the Tock system. For example, to provide userspace applications
with ability to display serial data, boards typically create a console
capsule. An example of this looks like:
pub unsafe fn main() {
    ...

    // Create a virtualizer on top of an underlying UART device. Use 115200 as
    // the baud rate.
    let uart_mux = components::console::UartMuxComponent::new(channel, 115200)
        .finalize(components::uart_mux_component_static!());

    // Instantiate the console capsule. This uses the virtualized UART provided
    // by the uart_mux.
    let console = components::console::ConsoleComponent::new(
        board_kernel,
        capsules_core::console::DRIVER_NUM,
        uart_mux,
    )
    .finalize(components::console_component_static!());

    ...
}
Eventually, once all of the capsules have been created, we will populate the platform structure with them:
pub unsafe fn main() {
    ...

    let platform = Platform {
        console: console,
        gpio: gpio,
        ...
    }

}
What Are Components?
When setting up the capsules (such as console), we used objects in the
components crate to help. In Tock, components are helper objects that make it
easier to correctly create and initialize capsules.
For example, if we look under the hood of the console component, the main
initialization of console looks like:
#![allow(unused)]
fn main() {
impl Component for ConsoleComponent {
    fn finalize(self, s: Self::StaticInput) -> Console {
        let grant_cap = create_capability!(capabilities::MemoryAllocationCapability);

        let write_buffer = static_init!([u8; DEFAULT_BUF_SIZE], [0; DEFAULT_BUF_SIZE]);
        let read_buffer = static_init!([u8; DEFAULT_BUF_SIZE], [0; DEFAULT_BUF_SIZE]);

        let console_uart = static_init!(
            UartDevice,
            UartDevice::new(self.uart_mux, true)
        );
        // Don't forget to call setup() to register our new UartDevice with the
        // mux!
        console_uart.setup();

        let console = static_init!(
            Console<'static>,
            console::Console::new(
                console_uart,
                write_buffer,
                read_buffer,
                self.board_kernel.create_grant(self.driver_num, &grant_cap),
            )
        );
        // Very easy to figure to set the client reference for callbacks!
        hil::uart::Transmit::set_transmit_client(console_uart, console);
        hil::uart::Receive::set_receive_client(console_uart, console);

        console
    }
}
}
Much of the code within components is boilerplate that is copied for each board and easy to subtlety miss an important setup step. Components encapsulate the setup complexity and can be reused on each board Tock supports.
The static_init! macro is simply an easy way to allocate a static variable
with a call to new. The first parameter is the type, the second is the
expression to produce an instance of the type.
Components end up looking somewhat complex because they can be re-used across multiple boards and different microcontrollers. More detail here.
A brief aside on buffers:
Notice that the console needs both a read and write buffer for it to use. These buffers have to have a
'staticlifetime. This is because low-level hardware drivers, especially those that use DMA, require'staticbuffers. Since we don't know exactly when the underlying operation will complete, and we must promise that the buffer outlives the operation, we use the one lifetime that is assured to be alive at the end of an operation:'static. Other code with buffers without a'staticlifetime, such as userspace processes, use capsules likeConsoleby copying data into internal'staticbuffers before passing them to the console. The buffer passing architecture looks like this:

Let's Make a Tock Board!
The code continues on, creating all of the other capsules that are needed by the
platform. Towards the end of main(), we've created all of the capsules we
need, and it's time to create the actual platform structure
(let platform = Platform {...}).
Boards must implement two traits to successfully run the Tock kernel:
SyscallDriverLookup and KernelResources.
SyscallDriverLookup
The first, SyscallDriverLookup, is how the kernel maps system calls from
userspace to the correct capsule within the kernel. The trait requires one
function:
#![allow(unused)]
fn main() {
trait SyscallDriverLookup {
    /// Mapping of syscall numbers to capsules.
    fn with_driver<F, R>(&self, driver_num: usize, f: F) -> R
    where
        F: FnOnce(Option<&dyn SyscallDriver>) -> R;
}
}
The with_driver() function executes the provided function f() by passing it
the correct capsule based on the provided driver_num. A brief example of an
implementation of SyscallDriverLookup looks like:
#![allow(unused)]
fn main() {
impl SyscallDriverLookup for Platform {
    fn with_driver<F, R>(&self, driver_num: usize, f: F) -> R
    where
        F: FnOnce(Option<&dyn kernel::syscall::SyscallDriver>) -> R,
    {
        match driver_num {
            capsules_core::console::DRIVER_NUM => f(Some(self.console)),
            capsules_core::gpio::DRIVER_NUM => f(Some(self.gpio)),
            ...
            _ => f(None),
        }
    }
}
}
Why require each board to provide this mapping? Why not implement this mapping centrally in the kernel? Tock requires boards to implement this mapping as we consider the assignment of driver numbers to specific capsules as a platform-specific decisions. While Tock does have a default mapping of driver numbers, boards are not obligated to use them. This flexibility allows boards to expose multiple copies of the same capsule to userspace, for example.
KernelResources
The KernelResources trait is the main method for configuring the operation of
the core Tock kernel. Policies such as the syscall mapping described above,
syscall filtering, and watchdog timers are configured through this trait. More
information is contained in a separate course module.
Loading processes
Once the platform is all set up, the board is responsible for loading processes into memory:
pub unsafe fn main() {
    ...

    kernel::process::load_processes(
        board_kernel,
        chip,
        core::slice::from_raw_parts(
            &_sapps as *const u8,
            &_eapps as *const u8 as usize - &_sapps as *const u8 as usize,
        ),
        core::slice::from_raw_parts_mut(
            &mut _sappmem as *mut u8,
            &_eappmem as *const u8 as usize - &_sappmem as *const u8 as usize,
        ),
        &mut PROCESSES,
        &FAULT_RESPONSE,
        &process_management_capability,
    )
    .unwrap_or_else(|err| {
        debug!("Error loading processes!");
        debug!("{:?}", err);
    });

    ...
}
A Tock process is represented by a kernel::Process struct. In principle, a
platform could load processes by any means. In practice, all existing platforms
write an array of Tock Binary Format (TBF) entries to flash. The kernel provides
the load_processes helper function that takes in a flash address and begins
iteratively parsing TBF entries and making Processes.
A brief aside on capabilities:
To call
load_processes(), the board had to provide a reference to a&process_management_capability. Theload_processes()function internally requires significant direct access to memory, and it should only be called in very specific places. To prevent its misuse (for example from within a capsule), calling it requires a capability to be passed in with the arguments. To create a capability, the calling code must be able to callunsafe, Code (i.e. capsules) which cannot useunsafetherefore has no way to create a capability and therefore cannot call the restricted function.
Starting the kernel
Finally, the board passes a reference to the current platform, the chip the platform is built on (used for interrupt and power handling), and optionally an IPC capsule to start the main kernel loop:
#![allow(unused)]
fn main() {
board_kernel.kernel_loop(&platform, chip, Some(&platform.ipc), &main_loop_capability);

}
From here, Tock is initialized, the kernel event loop takes over, and the system enters steady state operation.
Tock Kernel Policies
As a kernel for a security-focused operating system, the Tock kernel is responsible for implementing various policies on how the kernel should handle processes. Examples of the types of questions these policies help answer are: What happens when a process has a hardfault? Is the process restarted? What syscalls are individual processes allowed to call? Which process should run next? Different systems may need to answer these questions differently, and Tock includes a robust platform for configuring each of these policies.
Background on Relevant Tock Design Details
If you are new to this aspect of Tock, this section provides a quick primer on the key aspects of Tock which make it possible to implement process policies.
The KernelResources Trait
The central mechanism for configuring the Tock kernel is through the
KernelResources trait. Each board must implement KernelResources and provide
the implementation when starting the main kernel loop.
The general structure of the KernelResources trait looks like this:
#![allow(unused)]
fn main() {
/// This is the primary method for configuring the kernel for a specific board.
pub trait KernelResources<C: Chip> {
    /// How driver numbers are matched to drivers for system calls.
    type SyscallDriverLookup: SyscallDriverLookup;

    /// System call filtering mechanism.
    type SyscallFilter: SyscallFilter;

    /// Process fault handling mechanism.
    type ProcessFault: ProcessFault;

    /// Credentials checking policy.
    type CredentialsCheckingPolicy: CredentialsCheckingPolicy<'static> + 'static;

    /// Context switch callback handler.
    type ContextSwitchCallback: ContextSwitchCallback;

    /// Scheduling algorithm for the kernel.
    type Scheduler: Scheduler<C>;

    /// Timer used to create the timeslices provided to processes.
    type SchedulerTimer: scheduler_timer::SchedulerTimer;

    /// WatchDog timer used to monitor the running of the kernel.
    type WatchDog: watchdog::WatchDog;

    // Getters for each policy/mechanism.

    fn syscall_driver_lookup(&self) -> &Self::SyscallDriverLookup;
    fn syscall_filter(&self) -> &Self::SyscallFilter;
    fn process_fault(&self) -> &Self::ProcessFault;
    fn credentials_checking_policy(&self) -> &'static Self::CredentialsCheckingPolicy;
    fn context_switch_callback(&self) -> &Self::ContextSwitchCallback;
    fn scheduler(&self) -> &Self::Scheduler;
    fn scheduler_timer(&self) -> &Self::SchedulerTimer;
    fn watchdog(&self) -> &Self::WatchDog;
}
}
Many of these resources can be effectively no-ops by defining them to use the
() type. Every board that wants to support processes must provide:
- A
SyscallDriverLookup, which maps theDRIVERNUMin system calls to the appropriate driver in the kernel. - A
Scheduler, which selects the next process to execute. The kernel provides several common schedules a board can use, or boards can create their own.
Application Identifiers
The Tock kernel can implement different policies based on different levels of trust for a given app. For example, a trusted core app written by the board owner may be granted full privileges, while a third-party app may be limited in which system calls it can use or how many times it can fail and be restarted.
To implement per-process policies, however, the kernel must be able to establish a persistent identifier for a given process. To do this, Tock supports process credentials which are hashes, signatures, or other credentials attached to the end of a process's binary image. With these credentials, the kernel can cryptographically verify that a particular app is trusted. The kernel can then establish a persistent identifier for the app based on its credentials.
A specific process binary can be appended with zero or more credentials. The
per-board KernelResources::CredentialsCheckingPolicy then uses these
credentials to establish if the kernel should run this process and what
identifier it should have. The Tock kernel design does not impose any
restrictions on how applications or processes are identified. For example, it is
possible to use a SHA256 hash of the binary as an identifier, or a RSA4096
signature as the identifier. As different use cases will want to use different
identifiers, Tock avoids specifying any constraints.
However, long identifiers are difficult to use in software. To enable more
efficiently handling of application identifiers, Tock also includes mechanisms
for a per-process ShortID which is stored in 32 bits. This can be used
internally by the kernel to differentiate processes. As with long identifiers,
ShortIDs are set by KernelResources::CredentialsCheckingPolicy and are chosen
on a per-board basis. The only property the kernel enforces is that ShortIDs
must be unique among processes installed on the board. For boards that do not
need to use ShortIDs, the ShortID type includes a LocallyUnique option which
ensures the uniqueness invariant is upheld without the overhead of choosing
distinct, unique numbers for each process.
#![allow(unused)]
fn main() {
pub enum ShortID {
    LocallyUnique,
    Fixed(core::num::NonZeroU32),
}
}
Module Overview
In this module, we are going to experiment with using the KernelResources
trait to implement per-process restart policies. We will create our own
ProcessFaultPolicy that implements different fault handling behavior based on
whether the process included a hash in its credentials footer.
Custom Process Fault Policy
A process fault policy decides what the kernel does with a process when it crashes (i.e. hardfaults). The policy is implemented as a Rust module that implements the following trait:
#![allow(unused)]
fn main() {
pub trait ProcessFaultPolicy {
    /// `process` faulted, now decide what to do.
    fn action(&self, process: &dyn Process) -> process::FaultAction;
}
}
When a process faults, the kernel will call the action() function and then
take the returned action on the faulted process. The available actions are:
#![allow(unused)]
fn main() {
pub enum FaultAction {
    /// Generate a `panic!()` with debugging information.
    Panic,
    /// Attempt to restart the process.
    Restart,
    /// Stop the process.
    Stop,
}
}
Let's create a custom process fault policy that restarts signed processes up to a configurable maximum number of times, and immediately stops unsigned processes.
We start by defining a struct for this policy:
#![allow(unused)]
fn main() {
pub struct RestartTrustedAppsFaultPolicy {
	/// Number of times to restart trusted apps.
    threshold: usize,
}
}
We then create a constructor:
#![allow(unused)]
fn main() {
impl RestartTrustedAppsFaultPolicy {
    pub const fn new(threshold: usize) -> RestartTrustedAppsFaultPolicy {
        RestartTrustedAppsFaultPolicy { threshold }
    }
}
}
Now we can add a template implementation for the ProcessFaultPolicy trait:
#![allow(unused)]
fn main() {
impl ProcessFaultPolicy for RestartTrustedAppsFaultPolicy {
    fn action(&self, process: &dyn Process) -> process::FaultAction {
        process::FaultAction::Stop
    }
}
}
To determine if a process is trusted, we will use its ShortID. A ShortID is
a type as follows:
#![allow(unused)]
fn main() {
pub enum ShortID {
	/// No specific ID, just an abstract value we know is unique.
    LocallyUnique,
    /// Specific 32 bit ID number guaranteed to be unique.
    Fixed(core::num::NonZeroU32),
}
}
If the app has a short ID of ShortID::LocallyUnique then it is untrusted (i.e.
the kernel could not validate its signature or it was not signed). If the app
has a concrete number as its short ID (i.e. ShortID::Fixed(u32)), then we
consider the app to be trusted.
To determine how many times the process has already been restarted we can use
process.get_restart_count().
Putting this together, we have an outline for our custom policy:
#![allow(unused)]
fn main() {
use kernel::process;
use kernel::process::Process;
use kernel::process::ProcessFaultPolicy;

pub struct RestartTrustedAppsFaultPolicy {
	/// Number of times to restart trusted apps.
    threshold: usize,
}

impl RestartTrustedAppsFaultPolicy {
    pub const fn new(threshold: usize) -> RestartTrustedAppsFaultPolicy {
        RestartTrustedAppsFaultPolicy { threshold }
    }
}

impl ProcessFaultPolicy for RestartTrustedAppsFaultPolicy {
    fn action(&self, process: &dyn Process) -> process::FaultAction {
    	let restart_count = process.get_restart_count();
    	let short_id = process.short_app_id();

    	// Check if the process is trusted. If so, return the restart action
    	// if the restart count is below the threshold. Otherwise return stop.

    	// If the process is not trusted, return stop.
        process::FaultAction::Stop
    }
}
}
TASK: Finish implementing the custom process fault policy.
Save your completed custom fault policy in your board's src/ directory as
trusted_fault_policy.rs. Then add mod trusted_fault_policy; to the top of
the board's main.rs file.
Testing Your Custom Fault Policy
First we need to configure your kernel to use your new fault policy.
-
Find where your
fault_policywas already defined. Update it to use your new policy:#![allow(unused)] fn main() { let fault_policy = static_init!( trusted_fault_policy::RestartTrustedAppsFaultPolicy, trusted_fault_policy::RestartTrustedAppsFaultPolicy::new(3) ); } -
Now we need to configure the process loading mechanism to use this policy for each app.
#![allow(unused)] fn main() { kernel::process::load_processes( board_kernel, chip, flash, memory, &mut PROCESSES, fault_policy, // this is where we provide our chosen policy &process_management_capability, ) } -
Now we can compile the updated kernel and flash it to the board:
# in your board directory:
make install
Now we need an app to actually crash so we can observe its behavior. Tock has a
test app called crash_dummy that causes a hardfault when a button is pressed.
Compile that and load it on to the board:
-
Compile the app:
cd libtock-c/examples/tests/crash_dummy make -
Install it on the board:
tockloader install
With the new kernel installed and the test app loaded, we can inspect the status of the board. Use tockloader to connect to the serial port:
tockloader listen
Note: if multiple serial port options appear, generally the lower numbered port is what you want to use.
Now we can use the onboard console to inspect which processes we have on the board. Run the list command:
tock$ list
 PID    Name                Quanta  Syscalls  Restarts  Grants  State
 0      crash_dummy              0         6         0   1/15   Yielded
Note that crash_dummy is in the Yielded state. This means it is just waiting
for a button press.
Press the first button on your board (it is "Button 1" on the nRF52840-dk). This will cause the process to fault. You won't see any output, and since the app was not signed it was just stopped. Now run the list command again:
tock$ list
 PID    Name                Quanta  Syscalls  Restarts  Grants  State
 0      crash_dummy              0         6         0   0/15   Faulted
Now the process is in the Faulted state! This means the kernel will not try to
run it. Our policy is working! Next we have to verify signed apps so that we can
restart trusted apps.
App Credentials
With our custom fault policy, we can implement different responses based on whether an app is trusted or not. Now we need to configure the kernel to verify apps, and check if we trust them or not. For this example we will use a simple credential: a sha256 hash. This credential is simple to create, and serves as a stand-in for more useful credentials such as cryptographic signatures.
This will require a couple pieces:
- We need to actually include the hash in our app.
- We need a mechanism in the kernel to check the hash exists and is valid.
Signing Apps
We can use Tockloader to add a hash to a compiled app.
First, compile the app:
$ cd libtock-c/examples/blink
$ make
Now, add the hash credential:
$ tockloader tbf credential add sha256
It's fine to add to all architectures or you can specify which TBF to add it to.
To check that the credential was added, we can inspect the TAB:
$ tockloader inspect-tab
You should see output like the following:
$ tockloader inspect-tab
[INFO   ] No TABs passed to tockloader.
[STATUS ] Searching for TABs in subdirectories.
[INFO   ] Using: ['./build/blink.tab']
[STATUS ] Inspecting TABs...
TAB: blink
  build-date: 2023-06-09 21:52:59+00:00
  minimum-tock-kernel-version: 2.0
  tab-version: 1
  included architectures: cortex-m0, cortex-m3, cortex-m4, cortex-m7

 Which TBF to inspect further? cortex-m4

cortex-m4:
  version               : 2
  header_size           :        104         0x68
  total_size            :      16384       0x4000
  checksum              :              0x722e64be
  flags                 :          1          0x1
    enabled             : Yes
    sticky              : No
  TLV: Main (1)                                   [0x10 ]
    init_fn_offset      :         41         0x29
    protected_size      :          0          0x0
    minimum_ram_size    :       5068       0x13cc
  TLV: Program (9)                                [0x20 ]
    init_fn_offset      :         41         0x29
    protected_size      :          0          0x0
    minimum_ram_size    :       5068       0x13cc
    binary_end_offset   :       8360       0x20a8
    app_version         :          0          0x0
  TLV: Package Name (3)                           [0x38 ]
    package_name        : kv_interactive
  TLV: Kernel Version (8)                         [0x4c ]
    kernel_major        : 2
    kernel_minor        : 0
    kernel version      : ^2.0
  TLV: Persistent ACL (7)                         [0x54 ]
    Write ID            :          11          0xb
    Read IDs (1)        : 11
    Access IDs (1)      : 11

TBF Footers
  Footer
    footer_size         :       8024       0x1f58
  Footer TLV: Credentials (128)
    Type: SHA256 (3) ✓ verified
    Length: 32
  Footer TLV: Credentials (128)
    Type: Reserved (0)
    Length: 7976
Note at the bottom, there is a Footer TLV with SHA256 credentials! Because
tockloader was able to double-check the hash was correct there is ✓ verified
next to it.
SUCCESS: We now have an app with a hash credential!
Verifying Credentials in the Kernel
To have the kernel check that our hash credential is present and valid, we need to add a credential checker before the kernel starts each process.
In main.rs, we need to create the app checker. Tock includes a basic SHA256
credential checker, so we can use that:
#![allow(unused)]
fn main() {
use capsules_extra::sha256::Sha256Software;
use kernel::process_checker::basic::AppCheckerSha256;

// Create the software-based SHA engine.
let sha = static_init!(Sha256Software<'static>, Sha256Software::new());
kernel::deferred_call::DeferredCallClient::register(sha);

// Create the credential checker.
static mut SHA256_CHECKER_BUF: [u8; 32] = [0; 32];
let checker = static_init!(
    AppCheckerSha256,
    AppCheckerSha256::new(sha, &mut SHA256_CHECKER_BUF)
);
sha.set_client(checker);
}
Then we need to add this to our Platform struct:
#![allow(unused)]
fn main() {
struct Platform {
    ...
    credentials_checking_policy: &'static AppCheckerSha256,
}
}
Add it when create the platform object:
#![allow(unused)]
fn main() {
let platform = Platform {
    ...
    credentials_checking_policy: checker,
}
}
And configure our kernel to use it:
#![allow(unused)]
fn main() {
impl KernelResources for Platform {
    ...
    type CredentialsCheckingPolicy = AppCheckerSha256;
    ...
    fn credentials_checking_policy(&self) -> &'static Self::CredentialsCheckingPolicy {
        self.credentials_checking_policy
    }
    ...
}
}
Finally, we need to use the function that checks credentials when processes are loaded (not just loads and executes them unconditionally):
#![allow(unused)]
fn main() {
kernel::process::load_and_check_processes(
        board_kernel,
        &platform, // note this function requires providing the platform.
        chip,
        core::slice::from_raw_parts(
            &_sapps as *const u8,
            &_eapps as *const u8 as usize - &_sapps as *const u8 as usize,
        ),
        core::slice::from_raw_parts_mut(
            &mut _sappmem as *mut u8,
            &_eappmem as *const u8 as usize - &_sappmem as *const u8 as usize,
        ),
        &mut PROCESSES,
        &FAULT_RESPONSE,
        &process_management_capability,
    )
    .unwrap_or_else(|err| {
        debug!("Error loading processes!");
        debug!("{:?}", err);
    });
}
(Instead of just kernel::process::load_processes(...).)
Compile and install the updated kernel.
SUCCESS: We now have a kernel that can check credentials!
Installing Apps and Verifying Credentials
Now, our kernel will only run an app if it has a valid SHA256 credential. To verify this, recompile and install the blink app but do not add credentials:
cd libtock-c/examples/blink
touch main.c
make
tockloader install --erase
Now, if we list the processes on the board with the process console:
$ tockloader listen
Initialization complete. Entering main loop
NRF52 HW INFO: Variant: AAF0, Part: N52840, Package: QI, Ram: K256, Flash: K1024
tock$ list
 PID    Name                Quanta  Syscalls  Restarts  Grants  State
 0      blink                    0         0         0   0/16   CredentialsFailed
tock$
You can see our app is in the state CredentialsFailed meaning it will not
execute (and the LEDs are not blinking).
To fix this, we can add the SHA256 credential.
cd libtock-c/examples/blink
tockloader tbf credential add sha256
tockloader install
Now when we list the processes, we see:
tock$ list
 PID    ShortID    Name                Quanta  Syscalls  Restarts  Grants  State
 0      0x3be6efaa blink                    0       323         0   1/16   Yielded
And we can verify the app is both running and now has a specifically assigned short ID.
Implementing the Privileged Behavior
The default operation is not quite what we want. We want all apps to run, but only credentialed apps to be restarted.
First, we need to allow all apps to run, even if they don't pass the credential check. Doing that is actually quite simple. We just need to modify the credential checker we are using to not require credentials.
In tock/kernel/src/process_checker/basic.rs, modify the
require_credentials() function to not require credentials:
#![allow(unused)]
fn main() {
impl AppCredentialsChecker<'static> for AppCheckerSha256 {
    fn require_credentials(&self) -> bool {
        false // change from true to false
    }
    ...
}
}
Then recompile and install. Now both processes should run:
tock$ list
 PID    ShortID    Name                Quanta  Syscalls  Restarts  Grants  State
 0      0x3be6efaa blink                    0       193         0   1/16   Yielded
 1      Unique     c_hello                  0         8         0   1/16   Yielded
But note, only the credential app (blink) has a specific short ID.
Second, we need to use the presence of a specific short ID in our fault policy to only restart credentials apps. We just need to check if the short ID is fixed or not:
#![allow(unused)]
fn main() {
impl ProcessFaultPolicy for RestartTrustedAppsFaultPolicy {
    fn action(&self, process: &dyn Process) -> process::FaultAction {
        let restart_count = process.get_restart_count();
        let short_id = process.short_app_id();

        // Check if the process is trusted based on whether it has a fixed short
        // ID. If so, return the restart action if the restart count is below
        // the threshold. Otherwise return stop.
        match short_id {
            kernel::process::ShortID::LocallyUnique => process::FaultAction::Stop,
            kernel::process::ShortID::Fixed(_) => {
                if restart_count < self.threshold {
                    process::FaultAction::Restart
                } else {
                    process::FaultAction::Stop
                }
            }
        }
    }
}
}
That's it! Now we have the full policy: we verify application credentials, and handle process faults accordingly.
Task
Compile and install multiple applications, including the crash dummy app, and verify that only credentialed apps are successfully restarted.
SUCCESS: We now have implemented an end-to-end security policy in Tock!
TicKV Key-Value Store
TicKV is a flash-optimized key-value store written in Rust. Tock supports using TicKV within the OS to enable the kernel and processes to store and retrieve key-value objects in local flash memory.
TicKV and Key-Value Design
This section provides a quick overview of the TicKV and Key-Value stack in Tock.
TicKV Structure and Format
TicKV can store 8 byte keys and values up to 2037 bytes. TicKV is page-based, meaning that each object is stored entirely on a single page in flash.
Note: for familiarity, we use the term "page", but in actuality TicKV uses the size of the smallest erasable region, not necessarily the actual size of a page in the flash memory.
Each object is assigned to a page based on the lowest 16 bits of the key:
object_page_index = (key & 0xFFFF) % <number of pages>
Each object in TicKV has the following structure:
0        3            11                  (bytes)
---------------------------------- ... -
| Header | Key        | Value          |
---------------------------------- ... -
The header has this structure:
0 1 2 3 4 5 6 7 8 9 0 1 2 3 4 5 6 7 8 9 0 1 2 3 4    (bits)
-------------------------------------------------
| Version=1     |V| res | Length                |
-------------------------------------------------
Version: Format of the object, currently this is always 1.Valid (V): 1 if this object is valid, 0 otherwise. This is set to 0 to delete an object.Length (Len): The total length of the object, including the length of the header (3 bytes), key (8 bytes), and value.
Subsequent keys either start at the first byte of a page or immediately after
another object. If a key cannot fit on the page assigned by the
object_page_index, it is stored on the next page with sufficient room.
Objects are updated in TicKV by invalidating the existing object (setting the
V flag to 0) and then writing the new value as a new object. This removes the
need to erase and re-write an entire page of flash to update a specific value.
TicKV on Tock Format
The previous section describes the generic format of TicKV. Tock builds upon this format by adding a header to the value buffer to add additional features.
The full object format for TicKV objects in Tock has the following structure:
0        3            11  12       16       20              (bytes)
------------------------------------------------ ... ----
| TicKV  | Key        |Ver| Length | Write  |   Value   |
| Header |            |   |        |  ID    |           |
------------------------------------------------ ... ----
<--TicKV Header+Key--><--Tock TicKV Header+Value-...---->
Version (Ver): One byte version of the Tock header. Currently 0.Length: Four byte length of the value.Write ID: Four byte identifier for restricting access to this object.
The central addition is the Write ID, which is a u32 indicating the
identifier of the writer that added the key-value object. The write ID of 0 is
reserved for the kernel to use. Each process can be assigned using TBF headers
its own write ID to use for storing state, such as in a TicKV database. Each
process and the kernel can then be granted specific read and update permissions,
based on the stored write ID. If a process has read permissions for the specific
ID stored in the Write ID field, then it can access that key-value object. If
a process has update permissions for the specific ID stored in the Write ID
field, then it can change the value of that key-value object.
Tock Key-Value APIs
Tock supports two key-value orientated APIs: an upper and lower API. The lower API expects hashed keys and is designed with flash as the underlying storage in mind. The upper API is a more traditional K-V interface.
The lower interface looks like this. Note, this version is simplified for illustration, the actual version is complete Rust.
#![allow(unused)]
fn main() {
pub trait KVSystem {
    /// The type of the hashed key. For example `[u8; 8]`.
    type K: KeyType;

    /// Create the hashed key.
    fn generate_key(&self, unhashed_key: [u8], key: K) -> Result<(), (K, buffer,ErrorCode)>;

    /// Add a K-V object to the store. Error on collision.
    fn append_key(&self, key: K, value: [u8]) -> Result<(), (K, buffer, ErrorCode)>;

    /// Retrieve a value from the store.
    fn get_value(&self, key: K, value: [u8]) -> Result<(), (K, buffer, ErrorCode)>;

    /// Mark a K-V object as deleted.
    fn invalidate_key(&self, key: K) -> Result<(), (K, ErrorCode)>;

    /// Cleanup the store.
    fn garbage_collect(&self) -> Result<(), ErrorCode>;
}
}
(You can find the full definition in tock/kernel/src/hil/kv_system.rs.)
In terms of TicKV, the KVSystem interface only uses the TicKV header. The Tock
header is only used in the upper level API.
#![allow(unused)]
fn main() {
pub trait KVStore {
    /// Get key-value object.
    pub fn get(&self, key: [u8], value: [u8], perms: StoragePermissions) -> Result<(), (buffer, buffer, ErrorCode)>;

    /// Set or update a key-value object.
    pub fn set(&self, key: [u8], value: [u8], perms: StoragePermissions) -> Result<(), (buffer, buffer, ErrorCode)>;

    /// Delete a key-value object.
    pub fn delete(&self, key: [u8], perms: StoragePermissions) -> Result<(), (buffer, ErrorCode)>;
}
}
As you can see, each of these APIs requires a StoragePermissions so the
capsule can verify that the requestor has access to the given K-V object.
Key-Value in Userspace
Userspace applications have access to the K-V store via the kv_driver.rs
capsule. This capsule provides an interface for applications to use the upper
layer get-set-delete API.
However, applications need permission to use persistent storage. This is granted via headers in the TBF header for the application.
Applications have three fields for permissions: a write ID, multiple read IDs, and multiple modify IDs.
write_id: u32: This u32 specifies the ID used when the application creates a new K-V object. If this is 0, then the application does not have write access. (Awrite_idof 0 is reserved for the kernel.)read_ids: [u32]: These read IDs specify which k-v objects the application can callget()on. If this is empty or does not include the application'swrite_id, then the application will not be able to retrieve its own objects.modify_ids: [u32]: These modify IDs specify which k-v objects the application can edit, either by replacing or deleting. Again, if this is empty or does not include the application'swrite_id, then the application will not be able to update or delete its own objects.
These headers can be added at compilation time with elf2tab or after the TAB
has been created using Tockloader.
To have elf2tab add the header, it needs to be run with additional flags:
elf2tab ... --write_id 10 --read_ids 10,11,12 --access_ids 10,11,12 <list of ELFs>
To add it with tockloader (run in the app directory):
tockloader tbf tlv add persistent_acl 10 10,11,12 10,11,12
Using K-V Storage
To use the K-V storage, load the kv-interactive app:
cd libtock-c/examples/tests/kv_interactive
make
tockloader tbf tlv add persistent_acl 10 10,11,12 10,11,12
tockloader install
Now via the terminal, you can create and view k-v objects by typing set,
get, or delete.
$ tockloader listen
set mykey hello
Setting mykey=hello
Set key-value
get mykey
Getting mykey
Got value: hello
delete mykey
Deleting mykey
Managing TicKV Database on your Host Computer
You can interact with a board's k-v store via tockloader on your host computer.
View the Contents
To view the entire DB:
tockloader tickv dump
Which should give something like:
[INFO   ] Using jlink channel to communicate with the board.
[INFO   ] Using settings from KNOWN_BOARDS["nrf52dk"]
[STATUS ] Dumping entire TicKV database...
[INFO   ] Using settings from KNOWN_BOARDS["nrf52dk"]
[INFO   ] Dumping entire contents of Tock-style TicKV database.
REGION 0
TicKV Object hash=0xbbba2623865c92c0 version=1 flags=8 length=24 valid=True checksum=0xe83988e0
  Value: 00000000000b000000
  TockTicKV Object version=0 write_id=11 length=0
    Value:

REGION 1
TicKV Object hash=0x57b15d172140dec1 version=1 flags=8 length=28 valid=True checksum=0x32542292
  Value: 00040000000700000038313931
  TockTicKV Object version=0 write_id=7 length=4
    Value: 38313931

REGION 2
TicKV Object hash=0x71a99997e4830ae2 version=1 flags=8 length=28 valid=True checksum=0xbdc01378
  Value: 000400000000000000000000ca
  TockTicKV Object version=0 write_id=0 length=4
    Value: 000000ca

REGION 3
TicKV Object hash=0x3df8e4a919ddb323 version=1 flags=8 length=30 valid=True checksum=0x70121c6a
  Value: 0006000000070000006b6579313233
  TockTicKV Object version=0 write_id=7 length=6
    Value: 6b6579313233

REGION 4
TicKV Object hash=0x7bc9f7ff4f76f244 version=1 flags=8 length=15 valid=True checksum=0x1d7432bb
  Value:
TicKV Object hash=0x9efe426e86d82864 version=1 flags=8 length=79 valid=True checksum=0xd2ac393f
  Value: 001000000000000000a2a4a6a6a8aaacaec2c4c6c6c8caccce000000000000000000000000000000000000000000000000000000000000000000000000000000
  TockTicKV Object version=0 write_id=0 length=16
    Value: a2a4a6a6a8aaacaec2c4c6c6c8caccce

REGION 5
TicKV Object hash=0xa64cf33980ee8805 version=1 flags=8 length=29 valid=True checksum=0xa472da90
  Value: 0005000000070000006d796b6579
  TockTicKV Object version=0 write_id=7 length=5
    Value: 6d796b6579

REGION 6
TicKV Object hash=0xf17b4d392287c6e6 version=1 flags=8 length=79 valid=True checksum=0x854d8de0
  Value: 00030000000700000033343500000000000000000000000000000000000000000000000000000000000000000000000000000000000000000000000000000000
  TockTicKV Object version=0 write_id=7 length=3
    Value: 333435

...

[INFO   ] Finished in 3.468 seconds
You can see all of the hashed keys and stored values, as well as their headers.
Add a Key-Value Object
You can add a k-v object using tockloader:
tockloader tickv append newkey newvalue
Note that by default tockloader uses a write_id of 0, so that k-v object will
only be accessible to the kernel. To specify a specific write_id so an app can
access it:
tockloader tickv append appkey appvalue --write-id 10
Wrap-Up
You now know how to use a Key-Value store in your Tock apps as well as in the kernel. Tock's K-V stack supports access control on stored objects, and can be used simultaneously by both the kernel and userspace applications.
Write an environment sensing application
Process overview, relocation model and system call API
In this section, we're going to learn about processes (a.k.a applications) in Tock, and build our own applications in C.
Get a C application running on your board
You'll find the outline of a C application in the directory exercises/app.
Take a look at the code in main.c. So far, this application merely prints
"Hello, World!".
The code uses the standard C library routine printf to compose a message using
a format string and print it to the console. Let's break down what the code
layers are here:
-
printfis provided by the C standard library (implemented by newlib). It takes the format string and arguments, and generates an output string from them. To actually write the string to standard out,printfcalls_write. -
_write(inlibtock-c'ssys.c) is a wrapper for actually writing to output streams (in this case, standard out a.k.a. the console). It calls the Tock-specific console writing functionputnstr. -
putnstr(inlibtock-c'sconsole.c) is a buffers data to be written, callsputnstr_async, and acts as a synchronous wrapper, yielding until the operation is complete. -
Finally,
putnstr_async(inlibtock-c'sconsole.c) performs the actual system calls, calling toallow,subscribe, andcommandto enable the kernel to access the buffer, request a callback when the write is complete, and begin the write operation respectively.
The application could accomplish all of this by invoking Tock system calls directly, but using libraries makes for a much cleaner interface and allows users to not need to know the inner workings of the OS.
Loading an application
Okay, let's build and load this simple program.
-
Erase all other applications from the development board:
$ tockloader erase-apps -
Build the application and load it (Note:
tockloader installautomatically searches the current working directory and its subdirectories for Tock binaries.)$ tockloader install --make -
Check that it worked:
$ tockloader listenThe output should look something like:
$ tockloader listen
No device name specified. Using default "tock"
Using "/dev/cu.usbserial-c098e5130012 - Hail IoT Module - TockOS"

Listening for serial output.
Hello, World!
Creating your own application
Now that you've got a basic app working, modify it so that it continuously
prints out Hello World twice per second. You'll want to use the user library's
timer facilities to manage this:
Timer
You'll find the interface for timers in libtock/timer.h. The function you'll
find useful today is:
#include <timer.h>
void delay_ms(uint32_t ms);
This function sleeps until the specified number of milliseconds have passed, and then returns. So we call this function "synchronous": no further code will run until the delay is complete.
Write an app that periodically samples the on-board sensors
Now that we have the ability to write applications, let's do something a little more complex. The development board you are using has several sensors on it. These sensors include a light sensor, a humidity sensor, and a temperature sensor. Each sensing medium can be accessed separately via the Tock user library. We'll just be using the light and temperature for this exercise.
Light
The interface in libtock/ambient_light.h is used to measure ambient light
conditions in lux. imix uses the
ISL29035
sensor, but the userland library is abstracted from the details of particular
sensors. It contains the function:
#include <ambient_light.h>
int ambient_light_read_intensity_sync(int* lux);
Note that the light reading is written to the location passed as an argument, and the function returns non-zero in the case of an error.
Temperature
The interface in libtock/temperature.h is used to measure ambient temperature
in degrees Celsius, times 100. imix uses the
SI7021
sensor. It contains the function:
#include <temperature.h>
int temperature_read_sync(int* temperature);
Again, this function returns non-zero in the case of an error.
Read sensors in a Tock application
Using the example program you're working on, write an application that reads all of the sensors on your development board and reports their readings over the serial port.
As a bonus, experiment with toggling an LED when readings are above or below a certain threshold:
LED
The interface in libtock/led.h is used to control lights on Tock boards. On
the Hail board, there are three LEDs which can be controlled: Red, Blue, and
Green. The functions in the LED module are:
#include <led.h>
int led_count(void);
Which returns the number of LEDs available on the board.
int led_on(int led_num);
Which turns an LED on, accessed by its number.
int led_off(int led_num);
Which turns an LED off, accessed by its number.
int led_toggle(int led_num);
Which toggles the state of an LED, accessed by its number.
Graduation
Now that you have the basics of Tock down, we encourage you to continue to explore and develop with Tock! This book includes a "slimmed down" version of Tock to make it easy to get started, but you will likely want to get a more complete development environment setup to continue. Luckily, this shouldn't be too difficult since you have the tools installed already.
Using the latest kernel
The Tock kernel is actively developed, and you likely want to build upon the latest features. To do this, you should get the Tock source from the repository:
$ git clone https://github.com/tock/tock
While the master branch tends to be relatively stable, you may want to use the
latest release instead. Tock is
thoroughly tested before a release, so this should be a reliable place to start.
To select a release, you should checkout the correct tag. For example, for the
1.4 release this looks like:
$ cd tock
$ git checkout release-1.4
You should use the latest release. Check the releases page for the name of the latest release.
Now, you can compile the board-specific kernel in the Tock repository. For example, to compile the kernel for imix:
$ cd boards/imix
$ make
All of the operations described in the course should work the same way on the main repository.
Using the full selection of apps
The book includes some very minimal apps, and many more can be found in the
libtock-c repository. To use this, you should start by cloning the repository:
$ git clone https://github.com/tock/libtock-c
Now you can compile and run apps inside of the examples folder. For instance, you can install the basic "Hello World!" app:
$ cd libtock-c/examples/c_hello
$ make
$ tockloader install
With the libtock-c repository you have access to the full suite of Tock apps,
and additional libraries include BLE and Lua support.
Deprecated Course Modules
These modules were previously developed but may not quite match the current Tock code at this point. That is, the general ideas are still relevant and correct, but the specific code might be somewhat outdated.
We keep these for interested readers, but want to note that it might take a bit more problem solving/updating to follow these steps than originally intended.
Keep the client happy
You, an engineer newly added to a top-secret project in your organization, have been directed to commission a new imix node for your most important client. The directions you receive are terse, but helpful:
On Sunday, Nov 4, 2018, Director Hines wrote:

Welcome to the team, need you to get started right away. The client needs an
imix setup with their two apps -- ASAP. Make sure it is working, we need to keep
this client happy.

- DH
Hmm, ok, not a lot to go on, but luckily in orientation you learned how to flash a kernel and apps on to the imix board, so you are all set for your first assignment.
Poking around, you notice a folder called "important-client". While that is a good start, you also notice that it has two apps inside of it! "Alright!" you are thinking, "My first day is shaping up to go pretty smoothly."
After installing those two apps, which are a little mysterious still, you decide
that it would also be a good idea to install an app you are more familiar with:
the "blink" app. After doing all of that, you run tockloader list and see the
following:
$ tockloader list

No device name specified. Using default "tock"
Using "/dev/ttyUSB1 - imix IoT Module - TockOS"

[App 0]
  Name:                  app2
  Enabled:               True
  Sticky:                False
  Total Size in Flash:   16384 bytes


[App 1]
  Name:                  app1
  Enabled:               True
  Sticky:                False
  Total Size in Flash:   8192 bytes


[App 2]
  Name:                  blink
  Enabled:               True
  Sticky:                False
  Total Size in Flash:   2048 bytes


Finished in 1.959 seconds
Checkpoint
Make sure you have these apps installed correctly and
tockloader listproduces similar output as shown here.
Great! Now you check that the LED is blinking, and sure enough, no problems
there. The blink app was just for testing, so you tockloader uninstall blink
to remove that. So far, so good, Tock! But, before you prepare to head home
after a successful day, you start to wonder if maybe this was a little too easy.
Also, if you get this wrong, it's not going to look good as the new person on
the team.
Looking in the folders for the two applications, you notice a brief description of the apps, and a URL. Ok, maybe you can check if everything is working. After trying things for a little bit, everything seems to be in order. You tell the director the board is ready and head home a little early—you did just successfully complete your first project for a major client after all.
Back at Work the Next Day
Expecting a more challenging project after how well things went yesterday, you are instead greeted by this email:
On Monday, Nov 5, 2018, Director Hines wrote:

I know you are new, but what did you do?? I've been getting calls all morning
from the client, the imix board you gave them ran out battery already!! Are you
sure you set up the board correctly? Fix it, and get it back to me later today.

- DH
Well, that's not good. You already removed the blink app, so it can't be that. What you need is some way to inspect the board and see if something looks like it is going awry. You first try:
$ tockloader listen
to see if any debugging information is being printed. A little, but nothing helpful. Before trying to look around the code, you decided to try sending the board a plea for help:
help
and, surprisingly, it responded!
Welcome to the process console.
Valid commands are: help status list stop start
Ok! Maybe the process console can help. Try the status command:
Total processes: 2
Active processes: 2
Timeslice expirations: 4277
It seems this tool is actually able to inspect the current system and the active processes! But hmmm, it seems there are a lot of "timeslice expirations". From orientation, you remember that processes are allocated only a certain quantum of time to execute, and if they exceed that the kernel forces a context switch back to the kernel. If that is happening a lot, then the board is likely unable to go to sleep! That could explain why the battery is draining so fast!
But which process is at fault? Perhaps we should try another command. Maybe
list:
 PID    Name                Quanta  Syscalls  Dropped Callbacks    State
  00	app2                     0       336                  0  Yielded
  01	app1                  8556   1439951                  0  Running
Ok! Now we have the status of individual applications. And aha! We can clearly
see the faulty application. From our testing we know that one app detects button
presses and one app is transmitting sensor data. Let's see if we can disable the
faulty app somehow and see which data packets we are still getting. Going back
to the help command, the stop command seems promising:
stop <app name>
Time to Fix the App
After debugging, we now know a couple things about the issue:
- The name of the faulty app.
- That it is functionally correct but is for some reason consuming excess CPU cycles.
Using this information, dig into the the faulty app.
A Quick Fix
To get the director off your back, you should be able to introduce a simple fix that will reduce wakeups by waiting a bit between samples.
A Better Way
While the quick fix will slow the number of wakeups, you know that you can do better than polling for something like a button press! Tock supports asynchronous operations allowing user processes to subscribe to interrupts.
Looking at the button interface (in button.h), it looks like we'll first have to enable interrupts and then sign up to listen to them.
Once this energy-optimal patch is in place, it'll be time to kick off a triumphant e-mail to the director, and then off to celebrate!
Create a "Hello World" capsule
Now that you've seen how Tock initializes and uses capsules, you're going to write a new one. At the end of this section, your capsule will sample the humidity sensor once a second and print the results as serial output. But you'll start with something simpler: printing "Hello World" to the debug console once on boot.
The imix board configuration you've looked through has a capsule for the this
tutorial already set up. The capsule is a separate Rust crate located in
exercises/capsule. You'll complete this exercise by filling it in.
In addition to a constructor, Our capsule has start function defined that is
currently empty. The board configuration calls this function once it has
initialized the capsule.
Eventually, the start method will kick off a state machine for periodic
humidity readings, but for now, let's just print something to the debug console
and return:
#![allow(unused)]
fn main() {
debug!("Hello from the kernel!");
}
$ cd [PATH_TO_BOOK]/imix
$ make program
$ tockloader listen
No device name specified.
Using default "tock"
Using "/dev/ttyUSB0 - Imix IoT Module - TockOS"
Listening for serial output.
Hello from the kernel!
Extend your capsule to print "Hello World" every second
In order for your capsule to keep track of time, it will need to depend on another capsule that implements the Alarm interface. We'll have to do something similar for reading the accelerometer, so this is good practice.
The Alarm HIL includes several traits, Alarm, Client, and Frequency, all
in the kernel::hil::time module. You'll use the set_alarm and now methods
from the Alarm trait to set an alarm for a particular value of the clock. Note
that both methods accept arguments in the alarm's native clock frequency, which
is available using the Alarm trait's associated Frequency type:
#![allow(unused)]
fn main() {
// native clock frequency in Herz
let frequency = <A::Frequency>::frequency();
}
Your capsule already implements the alarm::Client trait so it can receive
alarm events. The alarm::Client trait has a single method:
#![allow(unused)]
fn main() {
fn fired(&self)
}
Your capsule should now set an alarm in the start method, print the debug
message and set an alarm again when the alarm fires.
Compile and program your new kernel:
$ make program
$ tockloader listen
No device name specified. Using default "tock"                                                                         Using "/dev/ttyUSB0 - Imix IoT Module - TockOS"
Listening for serial output.
TOCK_DEBUG(0): /home/alevy/hack/helena/rustconf/tock/boards/imix/src/accelerate.rs:31: Hello World
TOCK_DEBUG(0): /home/alevy/hack/helena/rustconf/tock/boards/imix/src/accelerate.rs:31: Hello World
TOCK_DEBUG(0): /home/alevy/hack/helena/rustconf/tock/boards/imix/src/accelerate.rs:31: Hello World
TOCK_DEBUG(0): /home/alevy/hack/helena/rustconf/tock/boards/imix/src/accelerate.rs:31: Hello World
Extend your capsule to sample the humidity once a second
The steps for reading an accelerometer from your capsule are similar to using
the alarm. You'll use a capsule that implements the humidity HIL, which includes
the HumidityDriver and HumidityClient traits, both in
kernel::hil::sensors.
The HumidityDriver trait includes the method read_accelerometer which
initiates an accelerometer reading. The HumidityClient trait has a single
method for receiving readings:
#![allow(unused)]
fn main() {
fn callback(&self, humidity: usize);
}
Implement logic to initiate a accelerometer reading every second and report the results.

Compile and program your kernel:
$ make program
$ tockloader listen
No device name specified. Using default "tock"                                                                         Using "/dev/ttyUSB0 - Imix IoT Module - TockOS"
Listening for serial output.
Humidity 2731
Humidity 2732
Some further questions and directions to explore
Your capsule used the si7021 and virtual alarm. Take a look at the code behind each of these services:
-
Is the humidity sensor on-chip or a separate chip connected over a bus?
-
What happens if you request two humidity sensors back-to-back?
-
Is there a limit on how many virtual alarms can be created?
-
How many virtual alarms does the imix boot sequence create?
Extra credit: Write a virtualization capsule for humidity sensor (∞)
If you have extra time, try writing a virtualization capsule for the Humidity
HIL that will allow multiple clients to use it. This is a fairly open ended
task, but you might find inspiration in the virtua_alarm and virtual_i2c
capsules.
Tock Mini Tutorials
These tutorials walk through how to use some various features of Tock. They are narrower in scope than the course, but try to explain in detail how various Tock apps work.
You will need the libtock-c repository to run these tutorials. You should
check out a copy of libtock-c by running:
$ git clone https://github.com/tock/libtock-c
libtock-c contains many example Tock applications as well as the library
support code for running C and C++ apps on Tock. If you are looking to develop
Tock applications you will likely want to start with an existing app in
libtock-c and modify it.
Setup
You need to be able to compile and load the Tock kernel and Tock applications. See the getting started guide on how to get setup.
You also need hardware that supports Tock.
The tutorials assume you have a Tock kernel loaded on your hardware board. To get a kernel installed, follow these steps.
-
Obtain the Tock Source. You can clone a copy of the Tock repository to get the kernel source:
$ git clone https://github.com/tock/tock $ cd tock -
Compile Tock. In the root of the Tock directory, compile the kernel for your hardware platform. You can find a list of boards by running
make list. For example if your board isimixthen:$ make list $ cd boards/imix $ makeIf you have another board just replace "imix" with
<your-board>This will create binaries of the Tock kernel. Tock is compiled with Cargo, a package manager for Rust applications. The first time Tock is built all of the crates must be compiled. On subsequent builds, crates that haven't changed will not have to be rebuilt and the compilation will be faster.
-
Load the Tock Kernel. The next step is to program the Tock kernel onto your hardware. To load the kernel, run:
$ make installin the board directory. Now you have the kernel loaded onto the hardware. The kernel configures the hardware and provides drivers for many hardware resources, but does not actually include any application logic. For that, we need to load an application.
Note, you only need to program the kernel once. Loading applications does not alter the kernel, and applications can be re-programed without re-programming the kernel.
With the kernel setup, you are ready to try the mini tutorials.
Tutorials
- Blink an LED: Get your first Tock app running.
- Button to Printf(): Print to terminal in response to button presses.
- BLE Advertisement Scanning: Sense nearby BLE packets.
- Sample Sensors and Use Drivers: Use syscalls to interact with kernel drivers.
- Inter-process Communication: Tock's IPC mechanism.
Board compatiblity matrix
| Tutorial # | Supported boards |
|---|---|
| 1 | All |
| 2 | All Cortex-M based boards |
| 3 | Hail and imix |
| 4 | Hail and imix |
| 5 | All that support IPC |
Blink: Running Your First App
This guide will help you get the blink app running on top of Tock kernel.
Instructions
-
Erase any existing applications. First, we need to remove any applications already on the board. Note that Tockloader by default will install any application in addition to whatever is already installed on the board.
$ tockloader erase-apps -
Install Blink. Tock supports an "app store" of sorts. That is, tockloader can install apps from a remote repository, including Blink. To do this:
$ tockloader install blinkYou will have to tell Tockloader that you are OK with fetching the app from the Internet.
Your specific board may require additional arguments, please see the readme in the
boards/folder for more details. -
Compile and Install Blink. We can also compile the blink app and load our compiled version. The basic C version of blink is located in the libtock-c repository.
-
Clone that repository:
$ cd tock-book $ git clone https://github.com/tock/libtock-c -
Then navigate to
examples/blink:$ cd libtock-c/examples/blink -
From there, you should be able to compile it and install it by:
$ make
$ tockloader install
When the blink app is installed you should see the LEDs on the board blinking. Congratulations! You have just programmed your first Tock application.
-
Say "Hello!" On Every Button Press
This tutorial will walk you through calling printf() in response to a button
press.
-
Start a new application. A Tock application in C looks like a typical C application. Lets start with the basics:
#include <stdio.h>

int main(void) {
  return 0;
}
You also need a makefile. Copying a makefile from an existing app is the easiest way to get started.
-
Setup a button callback handler. A button press in Tock is treated as an interrupt, and in an application this translates to a function being called, much like in any other event-driven system. To listen for button presses, we first need to define a callback function, then tell the kernel that the callback exists.
#include <stdio.h>
#include <button.h>

// Callback for button presses.
//   btn_num: The index of the button associated with the callback
//   val:     1 if pressed, 0 if depressed
static void button_callback(int btn_num,
                            int val,
                            int arg2 __attribute__ ((unused)),
                            void *user_data __attribute__ ((unused)) ) {
}

int main(void) {
  button_subscribe(button_callback, NULL);

  return 0;
}
All callbacks from the kernel are passed four arguments, and the meaning of the four arguments depends on the driver. The first three are integers, and can be used to represent buffer lengths, pin numbers, button numbers, and other simple data. The fourth argument is a pointer to user defined object. This pointer is set in the subscribe call (in this example it is set to
NULL), and returned when the callback fires. -
Enable the button interrupts. By default, the interrupts for the buttons are not enabled. To enable them, we make a syscall. Buttons, like other drivers in Tock, follow the convention that applications can ask the kernel how many there are. This is done by calling
button_count().#include <stdio.h> #include <button.h> // Callback for button presses. // btn_num: The index of the button associated with the callback // val: 1 if pressed, 0 if depressed static void button_callback(int btn_num, int val, int arg2 __attribute__ ((unused)), void *user_data __attribute__ ((unused)) ) { } int main(void) { button_subscribe(button_callback, NULL); // Ensure there is a button to use. int count = button_count(); if (count < 1) { // There are no buttons on this platform. printf("Error! No buttons on this platform."); } else { // Enable an interrupt on the first button. button_enable_interrupt(0); } // Can just return here. The application will continue to execute. return 0; }The button count is checked, and the app only continues if there exists at least one button. To enable the button interrupt,
button_enable_interrupt()is called with the index of the button to use. In this example we just use the first button. -
Call
printf()on button press. To print a message, we callprintf()in the callback.#include <stdio.h> #include <button.h> // Callback for button presses. // btn_num: The index of the button associated with the callback // val: 1 if pressed, 0 if depressed static void button_callback(int btn_num, int val, int arg2 __attribute__ ((unused)), void *user_data __attribute__ ((unused)) ) { // Only print on the down press. if (val == 1) { printf("Hello!\n"); } } int main(void) { button_subscribe(button_callback, NULL); // Ensure there is a button to use. int count = button_count(); if (count < 1) { // There are no buttons on this platform. printf("Error! No buttons on this platform.\n"); } else { // Enable an interrupt on the first button. button_enable_interrupt(0); } // Can just return here. The application will continue to execute. return 0; } -
Run the application. To try this tutorial application, you can find it in the tutorials app folder. See the first tutorial for details on how to compile and install a C application.
Once installed, when you press the button, you should see "Hello!" printed to the terminal!
Look! A Wild BLE Packet Appeared!
Note! This tutorial will only work on Hail and imix boards.
This tutorial will walk you through getting an app running that scans for BLE advertisements. Most BLE devices typically broadcast advertisements periodically (usually once a second) to allow smartphones and other devices to discover them. The advertisements typically contain the BLE device's ID and name, as well as as which services the device provides, and sometimes raw data as well.
To provide BLE connectivity, several Tock boards use the Nordic nRF51822 as a BLE co-processor. In this configuration, the nRF51822 runs all of the BLE operations and exposes a command interface over a UART bus. Luckily for us, Nordic has defined and implemented the entire interface. Better yet, they made it interoperable with their nRF51 SDK. What this means is any BLE app that would run on the nRF51822 directly can be compiled to run on a different microcontroller, and any function calls that would have interacted with the BLE hardware are instead packaged and sent to the nRF51822 co-processor. Nordic calls this tool "BLE Serialization", and Tock has a port of the serialization libraries that Tock applications can use.
So, with that introduction, lets get going.
-
Initialize the BLE co-processor. The first step a BLE serialization app must do is initialize the BLE stack on the co-processor. This can be done with Nordic's SDK, but to simplify things Tock supports the Simple BLE library. The goal of
simple_ble.cis to wrap the details of the nRF5 SDK and the intricacies of BLE in an easy-to-use library so you can get going with creating BLE devices and not learning the entire spec.#include <simple_ble.h> // Intervals for advertising and connections. // These are some basic settings for BLE devices. However, since we are // only interesting in scanning, these are not particularly relevant. simple_ble_config_t ble_config = { .platform_id = 0x00, // used as 4th octet in device BLE address .device_id = DEVICE_ID_DEFAULT, .adv_name = "Tock", .adv_interval = MSEC_TO_UNITS(500, UNIT_0_625_MS), .min_conn_interval = MSEC_TO_UNITS(1000, UNIT_1_25_MS), .max_conn_interval = MSEC_TO_UNITS(1250, UNIT_1_25_MS) }; int main () { printf("[Tutorial] BLE Scanning\n"); // Setup BLE. simple_ble_init(&ble_config); } -
Scan for advertisements. With
simple_blethis is pretty straightforward.int main () { printf("[Tutorial] BLE Scanning\n"); // Setup BLE. simple_ble_init(&ble_config); // Scan for advertisements. simple_ble_scan_start(); } -
Handle the advertisement received event. Just as the main Tock microcontroller can send commands to the nRF co-processor, the co-processor can send events back. When these occur, a variety of callbacks are generated in
simple_bleand then passed to users of the library. In this case, we only care aboutble_evt_adv_report()which is called on each advertisement reception.// Called when each advertisement is received. void ble_evt_adv_report (ble_evt_t* p_ble_evt) { ble_gap_evt_adv_report_t* adv = (ble_gap_evt_adv_report_t*) &p_ble_evt->evt.gap_evt.params.adv_report; }The
ble_evt_adv_report()function is passed a pointer to able_evt_tstruct. This is a type from the Nordic nRF51 SDK, and more information can be found in the SDK documentation. -
Display a message for each advertisement. Once we have the advertisement callback, we can use
printf()like normal.#include <stdio.h> #include <led.h> // Called when each advertisement is received. void ble_evt_adv_report (ble_evt_t* p_ble_evt) { ble_gap_evt_adv_report_t* adv = (ble_gap_evt_adv_report_t*) &p_ble_evt->evt.gap_evt.params.adv_report; // Print some details about the discovered advertisement. printf("Recv Advertisement: [%02x:%02x:%02x:%02x:%02x:%02x] RSSI: %d, Len: %d\n", adv->peer_addr.addr[5], adv->peer_addr.addr[4], adv->peer_addr.addr[3], adv->peer_addr.addr[2], adv->peer_addr.addr[1], adv->peer_addr.addr[0], adv->rssi, adv->dlen); // Also toggle the first LED. led_toggle(0); } -
Handle some BLE annoyances. The last step to getting a working app is to handle some annoyances using BLE serialization with the
simple_blelibrary. Typically errors generated by the nRF51 SDK are severe and mean there is a significant bug in the code. With serialization, however, messages between the two processors can be corrupted or misframed, causing parsing errors. We can ignore these errors safely and just drop the corrupted packet.Additionally, the
simple_blelibrary makes it easy to set the address of a BLE device. However, this functionality only works when running on an actual nRF51822. To disable this, we override the weakly definedble_address_set()function with an empty function.void app_error_fault_handler(uint32_t error_code, uint32_t line_num, uint32_t info) { } void ble_address_set () { } -
Run the app and see the packets! To try this tutorial application, you can find it in the tutorials app folder.
For any new applications, ensure that the following is in the makefile so that the BLE serialization library is included.
include $(TOCK_USERLAND_BASE_DIR)/libnrfserialization/Makefile.app
Details
This section contains a few notes about the specific versions of BLE serialization used.
Tock currently supports the S130 softdevice version 2.0.0 and SDK 11.0.0.
Reading Sensors From Scratch
Note! This tutorial will only work on Hail and imix boards.
In this tutorial we will cover how to use the syscall interface from applications to kernel drivers, and guide things based on reading the ISL29035 digital light sensor and printing the readings over UART.
OK, lets get started.
-
Setup a generic app for handling asynchronous events. As with most sensors, the ISL29035 is read asynchronously, and a callback is generated from the kernel to userspace when the reading is ready. Therefore, to use this sensor, our application needs to do two things: 1) setup a callback the kernel driver can call when the reading is ready, and 2) instruct the kernel driver to start the measurement. Lets first sketch this out:
#include <tock.h> #define DRIVER_NUM 0x60002 // Callback when the ISL29035 has a light intensity measurement ready. static void isl29035_callback(int intensity, int unused1, int unused2, void* ud) { } int main() { // Tell the kernel about the callback. // Instruct the ISL29035 driver to begin a reading. // Wait until the reading is complete. // Print the resulting value. return 0; } -
Fill in the application with syscalls. The standard Tock syscalls can be used to actually implement the sketch we made above. We first use the
subscribesyscall to inform the kernel about the callback in our application. We then use thecommandsyscall to start the measurement. To wait, we use theyieldcall to wait for the callback to actually fire. We do not need to useallowfor this application, and typically it is not required for reading sensors.For all syscalls that interact with drivers, the major number is set by the platform. In the case of the ISL29035, it is
0x60002. The minor numbers are set by the driver and are specific to the particular driver.To save the value from the callback to use in the print statement, we will store it in a global variable.
#include <stdio.h> #include <tock.h> #define DRIVER_NUM 0x60002 static int isl29035_reading; // Callback when the ISL29035 has a light intensity measurement ready. static void isl29035_callback(int intensity, int unused1, int unused2, void* ud) { // Save the reading when the callback fires. isl29035_reading = intensity; } int main() { // Tell the kernel about the callback. subscribe(DRIVER_NUM, 0, isl29035_callback, NULL); // Instruct the ISL29035 driver to begin a reading. command(DRIVER_NUM, 1, 0); // Wait until the reading is complete. yield(); // Print the resulting value. printf("Light intensity reading: %d\n", isl29035_reading); return 0; } -
Be smarter about waiting for the callback. While the above application works, it's really relying on the fact that we are only sampling a single sensor. In the current setup, if instead we had two sensors with outstanding commands, the first callback that fired would trigger the
yield()call to return and then theprintf()would execute. If, for example, sampling the ISL29035 takes 100 ms, and the new sensor only needs 10 ms, the new sensor's callback would fire first and theprintf()would execute with an incorrect value.To handle this, we can instead use the
yield_for()call, which takes a flag and only returns when that flag has been set. We can then set this flag in the callback to make sure that ourprintf()only occurs when the light reading has completed.#include <stdio.h> #include <stdbool.h> #include <tock.h> #define DRIVER_NUM 0x60002 static int isl29035_reading; static bool isl29035_done = false; // Callback when the ISL29035 has a light intensity measurement ready. static void isl29035_callback(int intensity, int unused1, int unused2, void* ud) { // Save the reading when the callback fires. isl29035_reading = intensity; // Mark our flag true so that the `yield_for()` returns. isl29035_done = true; } int main() { // Tell the kernel about the callback. subscribe(DRIVER_NUM, 0, isl29035_callback, NULL); // Instruct the ISL29035 driver to begin a reading. command(DRIVER_NUM, 1, 0); // Wait until the reading is complete. yield_for(&isl29035_done); // Print the resulting value. printf("Light intensity reading: %d\n", isl29035_reading); return 0; } -
Use the
libtocklibrary functions. Normally, applications don't use the barecommandandsubscribesyscalls. Typically, these are wrapped together into helpful commands inside oflibtockand come with a function that hides theyield_for()to a make a synchronous function which is useful for developing applications quickly. Lets port the ISL29035 sensing app to use the Tock Standard Library:#include <stdio.h> #include <isl29035.h> int main() { // Take the ISL29035 measurement synchronously. int isl29035_reading = isl29035_read_light_intensity(); // Print the resulting value. printf("Light intensity reading: %d\n", isl29035_reading); return 0; } -
Explore more sensors. This tutorial highlights only one sensor. See the sensors app for a more complete sensing application.
Friendly Apps Share Data
This tutorial covers how to use Tock's IPC mechanism to allow applications to communicate and share memory.
Tock IPC Basics
IPC in Tock uses a client-server model. Applications can provide a service by telling the Tock kernel that they provide a service. Each application can only provide a single service, and that service's name is set to the name of the application. Other applications can then discover that service and explicitly share a buffer with the server. Once a client shares a buffer, it can then notify the server to instruct the server to somehow interact with the shared buffer. The protocol for what the server should do with the buffer is service specific and not specified by Tock. Servers can also notify clients, but when and why servers notify clients is service specific.
Example Application
To provide an overview of IPC, we will build an example system consisting of three apps: a random number service, a LED control service, and a main application that uses the two services. While simple, this example both demonstrates the core aspects of the IPC mechanism and should run on any hardware platform.
LED Service
Lets start with the LED service. The goal of this service is to allow other applications to use the shared buffer as a command message to instruct the LED service on how to turn on or off the system's LEDs.
-
We must tell the kernel that our app wishes to provide a service. All that we have to do is call
ipc_register_svc().#include "ipc.h" int main(void) { ipc_register_svc(ipc_callback, NULL); return 0; } -
We also need that callback (
ipc_callback) to handle IPC requests from other applications. This callback will be called when the client app notifies the service.static void ipc_callback(int pid, int len, int buf, void* ud) { // pid: An identifier for the app that notified us. // len: How long the buffer is that the client shared with us. // buf: Pointer to the shared buffer. } -
Now lets fill in the callback for the LED application. This is a simplified version for illustration. The full example can be found in the
examples/tutorialsfolder.#include "led.h" static void ipc_callback(int pid, int len, int buf, void* ud) { uint8_t* buffer = (uint8_t*) buf; // First byte is the command, second byte is the LED index to set, // and the third byte is whether the LED should be on or off. uint8_t command = buffer[0]; if (command == 1) { uint8_t led_id = buffer[1]; uint8_t led_state = buffer[2] > 0; if (led_state == 0) { led_off(led_id); } else { led_on(led_id); } // Tell the client that we have finished setting the specified LED. ipc_notify_client(pid); break; } }
RNG Service
The RNG service returns the requested number of random bytes in the shared folder.
-
Again, register that this service exists.
int main(void) { ipc_register_svc(ipc_callback, NULL); return 0; } -
Also need a callback function for when the client signals the service. The client specifies how many random bytes it wants by setting the first byte of the shared buffer before calling notify.
#include <rng.h>

static void ipc_callback(int pid, int len, int buf, void* ud) {
  uint8_t* buffer = (uint8_t*) buf;
  uint8_t rng[len];

  uint8_t number_of_bytes = buffer[0];

  // Fill the buffer with random bytes.
  int number_of_bytes_received = rng_sync(rng, len, number_of_bytes);
  memcpy(buffer, rng, number_of_bytes_received);

  // Signal the client that we have the number of random bytes requested.
  ipc_notify_client(pid);
}
This is again not a complete example but illustrates the key aspects.
Main Logic Client Application
The third application uses the two services to randomly control the LEDs on the board. This application is not a server but instead is a client of the two service applications.
-
When using an IPC service, the first step is to discover the service and record its identifier. This will allow the application to share memory with it and notify it. Services are discovered by the name of the application that provides them. Currently these are set in the application Makefile or by default based on the folder name of the application. The examples in Tock commonly use a Java style naming format.
int main(void) {
  int led_service = ipc_discover("org.tockos.tutorials.ipc.led");
  int rng_service = ipc_discover("org.tockos.tutorials.ipc.rng");

  return 0;
}
If the services requested are valid and exist the return value from
ipc_discoveris the identifier of the found service. If the service cannot be found an error is returned. -
Next we must share a buffer with each service (the buffer is the only way to share between processes), and setup a callback that is called when the server notifies us as a client. Once shared, the kernel will permit both applications to read/modify that memory.
char led_buf[64] __attribute__((aligned(64))); char rng_buf[64] __attribute__((aligned(64))); int main(void) { int led_service = ipc_discover("org.tockos.tutorials.ipc.led"); int rng_service = ipc_discover("org.tockos.tutorials.ipc.rng"); // Setup IPC for LED service ipc_register_client_cb(led_service, ipc_callback, NULL); ipc_share(led_service, led_buf, 64); // Setup IPC for RNG service ipc_register_client_cb(rng_service, ipc_callback, NULL); ipc_share(rng_service, rng_buf, 64); return 0; } -
We of course need the callback too. For this app we use the
yield_forfunction to implement the logical synchronously, so all the callback needs to do is set a flag to signal the end of theyield_for.bool done = false; static void ipc_callback(int pid, int len, int arg2, void* ud) { done = true; } -
Now we use the two services to implement our application.
#include <timer.h>

void app() {
  while (1) {
    // Get two random bytes from the RNG service
    done = false;
    rng_buf[0] = 2; // Request two bytes.
    ipc_notify_svc(rng_service);
    yield_for(&done);

    // Control the LEDs based on those two bytes.
    done = false;
    led_buf[0] = 1;                     // Control LED command.
    led_buf[1] = rng_buf[0] % NUM_LEDS; // Choose the LED index.
    led_buf[2] = rng_buf[1] & 0x01;     // On or off.
    ipc_notify_svc(led_service);        // Notify to signal LED service.
    yield_for(&done);

    delay_ms(500);
  }
}
Try It Out
To test this out, see the complete apps in the IPC tutorial example folder.
To install all of the apps on a board:
$ cd examples/tutorials/05_ipc
$ tockloader erase-apps
$ pushd led && make && tockloader install && popd
$ pushd rng && make && tockloader install && popd
$ pushd logic && make && tockloader install && popd
You should see the LEDs randomly turning on and off!
Kernel Development Guides
These guides provide walkthroughs for specific kernel development tasks. For example, there is a guide on how to add a new syscall interface for userspace applications. The guides are intended to be general and provide high-level instructions which will have to be adapted for the specific functionality to be added.
Overtime, these guides will inevitably become out-of-date in that the specific code examples will fail to compile. However, the general design aspects and considerations should still be relevant even if the specific code details have changed. You are encourage to use these guides as just that, a general guide, and to copy from up-to-date examples contained in the Tock repository.
Implementing a Chip Peripheral Driver
This guide covers how to implement a peripheral driver for a particular microcontroller (MCU). For example, if you wanted to add an analog to digital converter (ADC) driver for the Nordic nRF52840 MCU, you would follow the general steps described in this guide.
Overview
The general steps you will follow are:
- Determine the HIL you will implement.
- Create a register mapping for the peripheral.
- Create a struct for the peripheral.
- Implement the HIL interface for the peripheral.
- Create the peripheral driver object and cast the registers to the correct memory location.
The guide will walk through how to do each of these steps.
Background
Implementing a chip peripheral driver increases Tock's support for a particular microcontroller and allows capsules and userspace apps to take more advantage of the hardware provided by the MCU. Peripheral drivers for an MCU are generally implemented on an as-needed basis to support a particular use case, and as such the chips in Tock generally do not have all of the peripheral drivers implemented already.
Peripheral drivers are included in Tock as "trusted code" in the kernel. This
means that they can use the unsafe keyword (in fact, they must). However, it
also means more care must be taken to ensure they are correct. The use of
unsafe should be kept to an absolute minimum and only used where absolutely
necessary. This guide explains the one use of unsafe that is required. All
other uses of unsafe in a peripheral driver will likely be very scrutinized
during the pull request review period.
Step-by-Step Guide
The steps from the overview are elaborated on here.
-
Determine the HIL you will implement.
The HILs in Tock are the contract between the MCU-specific hardware and the more generic capsules which use the hardware resources. They provide a common interface that is consistent between different microcontrollers, enabling code higher in the stack to use the interfaces without needing to know any details about the underlying hardware. This common interface also allows the same higher-level code to be portable across different microcontrollers. HILs are implemented as traits in Rust.
All HILs are defined in the
kernel/src/hildirectory. You should find a HIL that exposes the interface the peripheral you are writing a driver for can provide. There should only be one HIL that matches your peripheral.Note: As of Dec 2019, the
hildirectory also contains interfaces that are only provided by capsules for other capsules. For example, the ambient light HIL interface is likely not something an MCU would implement.It is possible Tock does not currently include a HIL that matches the peripheral you are implementing a driver for. In that case you will also need to create a HIL, which is explained in a different development guide.
Checkpoint: You have identified the HIL your driver will implement.
-
Create a register mapping for the peripheral.
To start implementing the peripheral driver, you must create a new source file within the MCU-specific directory inside of
chips/srcdirectory. The name of this file generally should match the name of the peripheral in the the MCU's datasheet.Include the name of this file inside of the
lib.rs(or potentiallymod.rs) file inside the same directory. This should look like:#![allow(unused)] fn main() { pub mod ast; }Inside of the new file, you will first need to define the memory-mapped input/output (MMIO) registers that correspond to the peripheral. Different embedded code ecosystems have devised different methods for doing this, and Tock is no different. Tock has a special library and set of Rust macros to make defining the register map straightforward and using the registers intuitive.
The full register library is here, but to get started, you will first create a structure like this:
#![allow(unused)]
fn main() {
use tock_registers::registers::{ReadOnly, ReadWrite, WriteOnly};

register_structs! {
    XyzPeripheralRegisters {
        /// Control register.
        /// The 'Control' parameter constrains this register to only use
        /// fields from a certain group (defined below in the bitfields
        /// section).
        (0x000 => cr: ReadWrite<u32, Control::Register>),
        // Status register.
        (0x004 => s: ReadOnly<u8, Status::Register>),
        /// spacing between registers in memory
        (0x008 => _reserved),
        /// Another register with no meaningful fields.
        (0x014 => word: ReadWrite<u32>),

        // Etc.

        // The end of the struct is marked as follows.
        (0x100 => @END),
    }
}
}
You should replace
XyzPeripheralwith the name of the peripheral you are writing a driver for. Then, for each register defined in the datasheet, you must specify an entry in the macro. For example, a register is defined like:#![allow(unused)] fn main() { (0x000 => cr: ReadWrite<u32, Control::Register>), }where:
0x000is the offset (in bytes) of the register from the beginning of the register map.cris the name of the register in the datasheet.ReadWriteis the access control of the register as defined in the datasheet.u32is the size of the register.Control::Registermaps to the actual bitfields used in the register. You will create this type for this particular peripheral, so you can name this whatever makes sense at this point. Note that it will always end with::Registerdue to how Rust macros work. If it doesn't make sense to define the specific bitfields in this register, you can omit this field. For example, an esoteric field in the register map that the implementation does not use likely does not need its bitfields mapped.
Once the register map is defined, you must specify the bitfields for any registers that you gave a specific type to. This looks like the following:
#![allow(unused)]
fn main() {
register_bitfields! [
    // First parameter is the register width for the bitfields. Can be u8,
    // u16, u32, or u64.
    u32,

    // Each subsequent parameter is a register abbreviation, its descriptive
    // name, and its associated bitfields. The descriptive name defines this
    // 'group' of bitfields. Only registers defined as
    // ReadWrite<_, Control::Register> can use these bitfields.
    Control [
        // Bitfields are defined as:
        // name OFFSET(shift) NUMBITS(num) [ /* optional values */ ]

        // This is a two-bit field which includes bits 4 and 5
        RANGE OFFSET(4) NUMBITS(3) [
            // Each of these defines a name for a value that the bitfield
            // can be written with or matched against. Note that this set is
            // not exclusive--the field can still be written with arbitrary
            // constants.
            VeryHigh = 0,
            High = 1,
            Low = 2
        ],

        // A common case is single-bit bitfields, which usually just mean
        // 'enable' or 'disable' something.
        EN  OFFSET(3) NUMBITS(1) [],
        INT OFFSET(2) NUMBITS(1) []
    ],

    // Another example:
    // Status register
    Status [
        TXCOMPLETE  OFFSET(0) NUMBITS(1) [],
        TXINTERRUPT OFFSET(1) NUMBITS(1) [],
        RXCOMPLETE  OFFSET(2) NUMBITS(1) [],
        RXINTERRUPT OFFSET(3) NUMBITS(1) [],
        MODE        OFFSET(4) NUMBITS(3) [
            FullDuplex = 0,
            HalfDuplex = 1,
            Loopback = 2,
            Disabled = 3
        ],
        ERRORCOUNT OFFSET(6) NUMBITS(3) []
    ],
]
}
The name in each entry of the
register_bitfields! []list must match the register type provided in the register map declaration. Each register that is used in the driver implementation should have its bitfields declared.Checkpoint: The register map is correctly described in the driver source file.
-
Create a struct for the peripheral.
Each peripheral driver is implemented with a struct which is later used to create an object that can be passed to code that will use this peripheral driver. The actual fields of the struct are very peripheral specific, but should contain any state that the driver needs to correctly function.
An example struct looks for a timer peripheral called the AST by the MCU datasheet looks like:
#![allow(unused)]
fn main() {
pub struct Ast<'a> {
    registers: StaticRef<AstRegisters>,
    callback: OptionalCell<&'a dyn hil::time::AlarmClient>,
}
}
The struct should contain a reference to the registers defined above (we will explain the
StaticReflater). Typically, many drivers respond to certain events (like in this case a timer firing) and therefore need a reference to a client to notify when that event occurs. Notice that the type of the callback handler is specified in the HIL interface.Peripheral structs typically need a lifetime for references like the callback client reference. By convention Tock peripheral structs use
'afor this lifetime, and you likely want to copy that as well.Think of what state your driver might need to keep around. This could include a direct memory access (DMA) reference, some configuration flags like the baud rate, or buffer indices. See other Tock peripheral drivers for more examples.
Note: you will most likely need to update this struct as you implement the driver, so to start with this just has to be a best guess.
Hint: you should avoid keeping any state in the peripheral driver struct that is already stored by the hardware itself. For example, if there is an "enabled" bit in a register, then you do not need an "enabled" flag in the struct. Replicating this state leads to bugs when those values get out of sync, and makes it difficult to update the driver in the future.
Peripheral driver structs make extensive use of different "cell" types to hold references to various shared state. The general wisdom is that if the value will ever need to be updated, then it needs to be contained in a cell. See the Tock cell documentation for more details on the cell types and when to use which one. In this example, the callback is stored in an
OptionalCell, which can contain a value or not (if the callback is not set), and can be updated if the callback needs to change.With the struct defined, you should next create a
new()function for that struct. This will look like:#![allow(unused)] fn main() { impl Ast { const fn new(registers: StaticRef<AstRegisters>) -> Ast { Ast { registers: registers, callback: OptionalCell::empty(), } } } }Checkpoint: There is a struct for the peripheral that can be created.
-
Implement the HIL interface for the peripheral.
With the peripheral driver struct created, now the main work begins. You can now write the actual logic for the peripheral driver that implements the HIL interface you identified earlier. Implementing the HIL interface is done just like implementing a trait in Rust. For example, to implement the
TimeHIL for the AST:#![allow(unused)] fn main() { impl hil::time::Time for Ast<'a> { type Frequency = Freq16KHz; fn now(&self) -> u32 { self.get_counter() } fn max_tics(&self) -> u32 { core::u32::MAX } } }You should include all of the functions from the HIL and decide how to implement them.
Some operations will be shared among multiple HIL functions. These should be implemented as functions for the original struct. For example, in the
Astexample the HIL functionnow()uses theget_counter()function. This should be implemented on the mainAststruct:#![allow(unused)] fn main() { impl Ast { const fn new(registers: StaticRef<AstRegisters>) -> Ast { Ast { registers: registers, callback: OptionalCell::empty(), } } fn get_counter(&self) -> u32 { let regs = &*self.registers; while self.busy() {} regs.cv.read(Value::VALUE) } } }Note the
get_counter()function also illustrates how to use the register reference and the Tock register library. The register library includes much more detail on the various register operations enabled by the library.Checkpoint: All of the functions in the HIL interface have MCU peripheral-specific implementations.
-
Create the peripheral driver object and cast the registers to the correct memory location.
The last step is to actually create the object so that the peripheral driver can be used by other code. Start by casting the register map to the correct memory address where the registers are actually mapped to. For example:
#![allow(unused)] fn main() { use kernel::common::StaticRef; const AST_BASE: StaticRef<AstRegisters> = unsafe { StaticRef::new(0x400F0800 as *const AstRegisters) }; }StaticRefis a type in Tock designed explicitly for this operation of casting register maps to the correct location in memory. The0x400F0800is the address in memory of the start of the registers and this location will be specified by the datasheet.Note that creating the
StaticRefrequires using theunsafekeyword. This is because doing this cast is a fundamentally memory-unsafe operation: this allows whatever is at that address in memory to be accessed through the register interface (which is exposed as a safe interface). In the normal case where the correct memory address is provided there is no concern for system safety as the register interface faithfully represents the underlying hardware. However, suppose an incorrect address was used, and that address actually points to live memory used by the Tock kernel. Now kernel data structures could be altered through the register interface, and this would violate memory safety.With the address reference created, we can now create the actual driver object:
#![allow(unused)]
fn main() {
pub static mut AST: Ast = Ast::new(AST_BASE);
}
This object will be used by a board's main.rs file to pass, in this case, the driver for the timer hardware to various capsules and other code that needs the underlying timer hardware.
Wrap-Up
Congratulations! You have implemented a peripheral driver for a microcontroller in Tock! We encourage you to submit a pull request to upstream this to the Tock repository.
Implementing a Sensor Driver
This guide describes the steps necessary to implement a capsule in Tock that interfaces with an external IC, like a sensor, memory chip, or display. These are devices which are not part of the same chip as the main microcontroller (MCU), but are on the same board and connected via some physical connection.
Note: to attempt to be generic, this guide will use the term "IC" to refer to the device the driver is for.
Note: "driver" is a bit of an overloaded term in Tock. In this guide, "driver" is used in the generic sense to mean code that interfaces with the external IC.
To illustrate the steps, this guide will use a generic light sensor as the running example. You will need to adapt the generic steps for your particular use case.
Often the goal of an IC driver is to expose an interface to that sensor or other IC to userspace applications. This guide does not cover creating that userspace interface as that is covered in a different guide.
Background
As mentioned, this guide describes creating a capsule. Capsules in Tock are
units of Rust code that extend the kernel to add interesting features, like
interfacing with new sensors. Capsules are "untrusted", meaning they cannot call
unsafe code in Rust and cannot use the unsafe keyword.
Overview
The high-level steps required are:
- Create a struct for the IC driver.
- Implement the logic to interface with the IC.
Optional:
- Provide a HIL interface for the IC driver.
- Provide a userspace interface for the IC driver.
Step-by-Step Guide
The steps from the overview are elaborated on here.
-
Create a struct for the IC driver.
The driver will be implemented as a capsule, so the first step is to create a new file in the
capsules/srcdirectory. The name of this file should be[chipname].rswhere[chipname]is the part number of the IC you are writing the driver for. There are several other examples in the capsules folder.For our example we will assume the part number is
ls1234.You then need to add the filename to
capsules/src/lib.rslike:#![allow(unused)] fn main() { pub mod ls1234; }Now inside of the new file you should create a struct with the fields necessary to implement the driver for the IC. In our example we will assume the IC is connected to the MCU with an I2C bus. Your IC might use SPI, UART, or some other standard interface. You will need to adjust how you create the struct based on the interface. You should be able to find examples in the capsules directory to copy from.
The struct will look something like:
#![allow(unused)]
fn main() {
pub struct Ls1234 {
    i2c: &'a dyn I2CDevice,
    state: Cell<State>,
    buffer: TakeCell<'static, [u8]>,
    client: OptionalCell<&'a dyn Ls1234Client>,
}
}
You can see the resources this driver requires to successfully interface with the light sensor:
-
i2c: This is a reference to the I2C bus that the driver will use to communicate with the IC. Notice in Tock the type isI2CDevice, and no address is provided. This is because theI2CDevicetype wraps the address in internally, so that the driver code can only communicate with the correct address. -
state: Often drivers will iterate through various states as they communicate with the IC, and it is common for drivers to keep some state variable to manage this. OurStateis defined as an enum, like so:#![allow(unused)] fn main() { #[derive(Copy, Clone, PartialEq)] enum State { Disabled, Enabling, ReadingLight, } }Also note that the
statevariable uses aCell. This is so that the driver can update the state. -
buffer: This holds a reference to a buffer of memory the driver will use to send messages over the I2C bus. By convention, these buffers are defined statically in the same file as the driver, but then passed to the driver when the board boots. This provides the board flexibility on the buffer to use, while still allowing the driver to hint at the size required for successful operation. In our case the static buffer is defined as:#![allow(unused)] fn main() { pub static mut BUF: [u8; 3] = [0; 3]; }Note the buffer is wrapped in a
TakeCellsuch that it can be passed to the I2C hardware when necessary, and re-stored in the driver struct when the I2C code returns the buffer. -
client: This is the callback that will be called after the driver has received a reading from the sensor. All execution is event-based in Tock, so the caller will not block waiting for a sample, but instead will expect a callback via the client when the same is ready. The driver has to define the type of the callback by defining theLs1234Clienttrait in this case:#![allow(unused)] fn main() { pub trait Ls1234Client { fn callback(light_reading: usize); } }Note that the client is stored in an
OptionalCell. This allows the callback to not be set initially, and configured at bootup.
Your driver may require other state to be stored as well. You can update this struct as needed to for state required to successfully implement the driver. Note that if the state needs to be updated at runtime it will need to be stored in a cell type. See the cell documentation for more information on the various cell types in Tock.
Note: your driver should not keep any state in the struct that is also stored by the hardware. This easily leads to bugs when that state becomes out of sync, and makes further development on the driver difficult.
The last step is to write a function that enables creating an instance of your driver. By convention, the function is called
new()and looks something like:#![allow(unused)] fn main() { impl Ls1234<'a> { pub fn new(i2c: &'a dyn I2CDevice, buffer: &'static mut [u8]) -> Ls1234<'a> { Ls1234 { i2c: i2c, alarm: alarm, state: Cell::new(State::Disabled), client: OptionalCell::empty(), } } } }This function will get called by the board's
main.rsfile when the driver is instantiated. All of the static objects or configuration that the driver requires must be passed in here. In this example, a reference to the I2C device and the static buffer for passing messages must be provided.Checkpoint: You have defined the struct which will become the driver for the IC.
-
-
Implement the logic to interface with the IC.
Now, you will actually write the code that interfaces with the IC. This requires extending the
implof the driver struct with additional functions appropriate for your particular IC.With our light sensor example, we likely want to write a sample function for reading a light sensor value:
#![allow(unused)]
fn main() {
impl Ls1234<'a> {
    pub fn new(...) -> Ls1234<'a> {...}

    pub fn start_light_reading(&self) {...}
}
}
Note that the function name is "start light reading", which is appropriate because of the event-driven, non-blocking nature of the Tock kernel. Actually communicating with the sensor will take some time, and likely requires multiple messages to be sent to and received from the sensor. Therefore, our sample function will not be able to return the result directly. Instead, the reading will be provided in the callback function described earlier.
The start reading function will likely prepare the message buffer in a way that is IC-specific, then send the command to the IC. A rough example of that operation looks like:
#![allow(unused)]
fn main() {
impl Ls1234<'a> {
    pub fn new(...) -> Ls1234<'a> {...}

    pub fn start_light_reading(&self) {
        if self.state.get() == State::Disabled {
            self.buffer.take().map(|buf| {
                self.i2c.enable();

                // Set the first byte of the buffer to the "on" command.
                // This is IC-specific and will be described in the IC
                // datasheet.
                buf[0] = 0b10100000;

                // Send the command to the chip and update our state
                // variable.
                self.i2c.write(buf, 1);
                self.state.set(State::Enabling);
            });
        }
    }
}
}
The
start_light_reading()function kicks off reading the light value from the IC and updates our internal state machine state to mark that we are waiting for the IC to turn on. Now theLs1234code is finished for the time being and we now wait for the I2C message to finish being sent. We will know when this has completed based on a callback from the I2C hardware.#![allow(unused)] fn main() { impl I2CClient for Ls1234<'a> { fn command_complete(&self, buffer: &'static mut [u8], error: Error) { // Handle what happens with the I2C send is complete here. } } }In our example, we have to send a new command after turning on the light sensor to actually read a sampled value. We use our state machine here to organize the code as in this example:
#![allow(unused)]
fn main() {
impl I2CClient for Ls1234<'a> {
    fn command_complete(&self, buffer: &'static mut [u8], _error: Error) {
        match self.state.get() {
            State::Enabling => {
                // Put the read command in the buffer and send it back to
                // the sensor.
                buffer[0] = 0b10100001;
                self.i2c.write_read(buf, 1, 2);
                // Update our state machine state.
                self.state.set(State::ReadingLight);
            }
            _ => {}
        }
    }
}
}
This will send another command to the sensor to read the actual light measurement. We also update our
self.statevariable because when this I2C transaction finishes the exact samecommand_completecallback will be called, and we must be able to remember where we are in the process of communicating with the sensor.When the read finishes, the
command_complete()callback will fire again, and we must handle the result. Since we now have the reading we can call our client's callback after updating out state machine.#![allow(unused)] fn main() { impl I2CClient for Ls1234<'a> { fn command_complete(&self, buffer: &'static mut [u8], _error: Error) { match self.state.get() { State::Enabling => { // Put the read command in the buffer and send it back to // the sensor. buffer[0] = 0b10100001; self.i2c.write_read(buf, 1, 2); // Update our state machine state. self.state.set(State::ReadingLight); } State::ReadingLight => { // Extract the light reading value. let mut reading: u16 = buffer[0] as 16; reading |= (buffer[1] as u16) << 8; // Update our state machine state. self.state.set(State::Disabled); // Trigger our callback with the result. self.client.map(|client| client.callback(reading)); } _ => {} } } } }Note: likely the sensor would need to be disabled and returned to a low power state.
At this point your driver can read the IC and return the information from the IC. For your IC you will likely need to expand on this general template. You can add additional functions to the main struct implementation, and then expand the state machine to implement those functions. You may also need additional resources, like GPIO pins or timer alarms to implement the state machine for the IC. There are examples in the
capsules/srcfolder with drivers that need different resources.
Optional Steps
-
Provide a HIL interface for the IC driver.
The driver so far has a very IC-specific interface. That is, any code that uses the driver must be written specifically with that IC in mind. In some cases that may be reasonable, for example if the IC is very unusual or has a very unique set of features. However, many ICs provide similar functionality, and higher-level code can be written without knowing what specific IC is being used on a particular hardware platform.
To enable this, some IC types have HILs in the
kernel/src/hilfolder in thesensors.rsfile. Drivers can implement one of these HILs and then higher-level code can use the HIL interface rather than a specific IC.To implement the HIL, you must implement the HIL trait functions:
#![allow(unused)]
fn main() {
impl AmbientLight for Ls1234<'a> {
    fn set_client(&self, client: &'static dyn AmbientLightClient) {

    }

    fn read_light_intensity(&self) -> ReturnCode {

    }
}
}
The user of the
AmbientLightHIL will implement theAmbientLightClientand provide the client through theset_client()function. -
Provide a userspace interface for the IC driver.
Sometimes the IC is needed by userspace, and therefore needs a syscall interface so that userspace applications can use the IC. Please refer to a separate guide on how to implement a userspace interface for a capsule.
Wrap-Up
Congratulations! You have implemented an IC driver as a capsule in Tock! We encourage you to submit a pull request to upstream this to the Tock repository. Tock is happy to accept capsule drivers even if no boards in the Tock repository currently use the driver.
Implementing a System Call Interface for Userspace
This guide provides an overview and walkthrough on how to add a system call interface for userspace applications in Tock. The system call interface exposes some kernel functionality to applications. For example, this could be the ability to sample a new sensor, or use some service like doing AES encryption.
In this guide we will use a running example of providing a userspace interface for a hypothetical water level sensor (the "WS00123" water level sensor). This interface will allow applications to query the current water level, as well as get notified when the water level exceeds a certain threshold.
Setup
This guide assumes you already have existing kernel code that needs a userspace interface. Likely that means there is already a capsule implemented. Please see the other guides if you also need to implement the capsule.
We will assume there is a struct WS00123 {...} object already implemented that
includes all of the logic needed to interface with this particular water sensor.
Overview
The high-level steps required are:
- Decide on the interface to expose to userspace.
- Map the interface to the existing syscalls in Tock.
- Create grant space for the application.
- Implement the
SyscallDrivertrait. - Document the interface.
- Expose the interface to userspace.
- Implement the syscall library in userspace.
Step-by-Step Guide
The steps from the overview are elaborated on here.
-
Decide on the interface to expose to userspace.
Creating the interface for userspace means making design decisions on how applications should be able to interface with the kernel capsule. This can have a lasting impact, and is worth spending some time on up-front to avoid implementing an interface that is difficult to use or does not match the needs of applications.
While there is not a fixed algorithm on how to create such an interface, there are a couple tips that can help with creating the interface:
- Consider the interface for the same or similar functionality in other systems (e.g. Linux, Contiki, TinyOS, RIOT, etc.). These may have iterated on the design and include useful features.
- Ignore the specific details of the capsule that exists or how the particular sensor the syscall interface is for works, and instead consider what a user of that capsule might want. That is, if you were writing an application, how would you expect to use the interface? This might be different from how the sensor or other hardware exposes features.
- Consider other chips that provide similar functionality to the specific one you have. For example, imagine there is a competing water level sensor the "OWlS789". What features do both provide? How would a single interface be usable if a hardware board swapped one out for the other?
The interface should include both actions (called "commands" in Tock) that the application can take (for example, "sample this sensor now"), as well as events (called subscribe upcalls in Tock) that the kernel can trigger inside of an application (for example, when the sensed value is ready).
The interface can also include memory sharing between the application and the kernel. For example, if the application wants to receive a number of samples at once, or if the kernel needs to operate on many bytes (say for example encrypting a buffer), then the interface should allow the application to share some of its memory with the kernel to enable that functionality.
-
Map the interface to the existing syscalls in Tock.
With a sketch of the interface created, the next step is to map that interface to the specific syscalls that the Tock kernel supports. Tock has four main relevant syscall operations that applications can use when interfacing with the kernel:
-
allow_readwrite: This lets an application share some of its memory with the kernel, which the kernel can read or write to. -
allow_readonly: This lets an application share some of its memory with the kernel, which the kernel can only read. -
subscribe: This provides a function pointer that the kernel can use to invoke an upcall on the application. -
command: This enables the application to direct the kernel to take some action.
All four also include a couple other parameters to differentiate different commands, subscriptions, or allows. Refer to the more detailed documentation on the Tock syscalls for more information.
As the Tock kernel only supports these syscalls, each feature in the design you created in the first step must be mapped to one or more of them. To help, consider these hypothetical interfaces that an application might have for our water sensor:
- What is the maximum water level? This can be a simple command, where the return value of the command is the maximum water level.
- What is the current water level? This will require two steps. First, there needs to be a subscribe call where the application can setup an upcall function. The kernel will call this when the water level value has been acquired. Second, there will need to be a command to instruct the kernel to take the water level reading.
- Take ten water level samples. This will require three steps. First, the application must use a readwrite allow syscall to share a buffer with the kernel large enough to hold 10 water level readings. Then it must setup a subscribe upcall that the kernel will call when the 10 readings are ready (note this upcall function can be the same as in the single sample case). Finally it will use a command to tell the kernel to start sampling.
- Notify me when the water level exceeds a threshold. A likely way to implement this would be to first require a subscribe syscall for the application to set the function that will get called when the high water level event occurs. Then the application will need to use a command to enable the high water level detection and to optionally set the threshold.
As you do this, remember that kernel operations, and the above system calls, cannot execute for a long period of time. All of the four system calls are non-blocking. Long-running operations should involve an application starting the operation with a command, then having the kernel signal completion with an upcall.
Checkpoint: You have defined how many allow, subscribe, and command syscalls you need, and what each will do.
-
-
Create grant space for the application.
Grants are regions in a process's memory space that are shared with the kernel. The kernel uses these to store state on behalf of the process. To provide our syscall interface for the water level sensor, we need to setup a grant so that we can store state for all of the requests we may get from processes that want to use the sensor.
The first step to do this is to create a struct that contains fields for all of the state we want to store for each process that uses our syscall interface. By convention in Tock, this struct is named
App, but it could have a different name.In our grant we need to store two things: the high water alert threshold and the upcall function pointer the app provided us when it called subscribe. We, however, only have to handle the threshold. As of Tock 2.0, the upcall is stored internally in the kernel. All we have to do is tell the kernel how many different upcall function pointers per app we need to store. In our case we only need to store one. This is provided as a parameter to
Grant.We can now create an
Appstruct which represents what will be stored in our grant:#![allow(unused)] fn main() { pub struct App { threshold: usize, } }Now that we have the type we want to store in the grant region we can create the grant type for it by extending our
WS00123struct:#![allow(unused)] fn main() { pub struct WS00123 { ... apps: Grant<App, 1>, } }Grant<App, 1>tells the kernel that we want to store the App struct in the grant, as well as one upcall function pointer.We will also need the grant region to be created by the board and passed in to us by adding it to the capsules
new()function:#![allow(unused)] fn main() { impl WS00123 { pub fn new( ... grant: Grant<App, 1>, ) -> WS00123 { WS00123 { ..., apps: grant, } } } }Now we have somewhere to store values on a per-process basis.
-
Implement the
SyscallDrivertrait.The
SyscallDrivertrait is how a capsule provides implementations for the various syscalls an application might call. The basic framework looks like:#![allow(unused)] fn main() { impl SyscallDriver for WS00123 { fn allow_readwrite( &self, appid: AppId, which, usize, slice: ReadWriteAppSlice, ) -> Result<ReadWriteAppSlice, (ReadWriteAppSlice, ErrorCode)> { } fn allow_readonly( &self, app: AppId, which: usize, slice: ReadOnlyAppSlice, ) -> Result<ReadOnlyAppSlice, (ReadOnlyAppSlice, ErrorCode)> { } fn command( &self, which: usize, r2: usize, r3: usize, caller_id: AppId) -> CommandReturn { } fn allocate_grant( &self, process_id: ProcessId) -> Result<(), crate::process::Error>; } }For details on exactly how these methods work and their return values, TRD104 is their reference document. Notice that there is no
subscribe()call, as that is handled entirely in the core kernel. However, the kernel will use the upcall slots passed as the second parameter toGrant<_, UPCALLS>to implementsubscribe()on your behalf.Note: there are default implementations for each of these, so in our water level sensor case we can simply omit the
allow_readwriteandallow_readonlycalls.By Tock convention, every syscall interface must at least support the command call with
which == 0. This allows applications to check if the syscall interface is supported on the current platform. The command must return aCommandReturn::success(). If the command is not present, then the kernel automatically has it return a failure with an error code ofErrorCode::NOSUPPORT. For our example, we use the simple case:#![allow(unused)] fn main() { impl SyscallDriver for WS00123 { fn command( &self, which: usize, r2: usize, r3: usize, caller_id: AppId) -> CommandReturn { match command_num { 0 => CommandReturn::success(), _ => CommandReturn::failure(ErrorCode::NOSUPPORT) } } } }We also want to ensure that we implement the
allocate_grant()call. This allows the kernel to ask us to setup our grant region since we know what the typeAppis and how large it is. We just need the standard implementation that we can directly copy in.#![allow(unused)] fn main() { impl SyscallDriver for WS00123 { fn allocate_grant( &self, process_id: ProcessId) -> Result<(), kernel::process::Error> { // Allocation is performed implicitly when the grant region is entered. self.apps.enter(processid, |_, _| {}) } } }Next we can implement more commands so that the application can direct our capsule as to what the application wants us to do. We need two commands, one to sample and one to enable the alert. In both cases the commands must return a
ReturnCode, and call functions that likely already exist in the original implementation of theWS00123sensor. If the functions don't quite exist, then they will need to be added as well.#![allow(unused)] fn main() { impl SyscallDriver for WS00123 { /// Command interface. /// /// ### `command_num` /// /// - `0`: Return SUCCESS if this driver is included on the platform. /// - `1`: Start a water level measurement. /// - `2`: Enable the water level detection alert. `data` is used as the /// height to set as the the threshold for detection. fn command( &self, which: usize, r2: usize, r3: usize, caller_id: AppId) -> CommandReturn { match command_num { 0 => CommandReturn::success(), 1 => self.start_measurement(app), 2 => { // Save the threshold for this app. self.apps .enter(app_id, |app, _| { app.threshold = data; CommandReturn::success() }) .map_or_else( |err| CommandReturn::failure(ErrorCode::from), |ok| self.set_high_level_detection() ) }, _ => CommandReturn::failure(ErrorCode::NOSUPPORT), } } } }The last item that needs to be added is to actually use the upcall when the sensor has been sampled or the alert has been triggered. Actually issuing the upcall will need to be added to the existing implementation of the capsule. As an example, if our water sensor was attached to the board over I2C, then we might trigger the upcall in response to a finished I2C command:
#![allow(unused)] fn main() { impl i2c::I2CClient for WS00123 { fn command_complete(&self, buffer: &'static mut [u8], _error: i2c::Error) { ... let app_id = <get saved appid for the app that issued the command>; let measurement = <calculate water level based on returned I2C data>; self.apps.enter(app_id, |app, upcalls| { upcalls.schedule_upcall(0, (0, measurement, 0)).ok(); }); } } }Note: the first argument to
schedule_upcall()is the index of the upcall to use. Since we only have one upcall we use0.There may be other cleanup code required to reset state or prepare the sensor for another sample by a different application, but these are the essential elements for implementing the syscall interface.
Finally, we need to assign our new
SyscallDriverimplementation a number so that the kernel (and userspace apps) can differentiate this syscall interface from all others that a board supports. By convention this is specified by a global value at the top of the capsule file:#![allow(unused)] fn main() { pub const DRIVER_NUM: usize = 0x80000A; }The value cannot conflict with other capsules in use, but can be set arbitrarily, particularly for testing. Tock has a procedure for assigning numbers, and you may need to change this number if the capsule is to merged into the main Tock repository.
Checkpoint: You have the syscall interface translated from a design to code that can run inside the Tock kernel.
-
Document the interface.
A syscall interface is a contract between the kernel and any number of userspace processes, and processes should be able to be developed independently of the kernel. Therefore, it is helpful to document the new syscall interface you made so applications know how to use the various command, subscribe, and allow calls.
An example markdown file documenting our water level syscall interface is as follows:
--- driver number: 0x80000A --- # Water Level Sensor WS00123 ## Overview The WS00123 water level sensor can sample the depth of water as well as trigger an event if the water level gets too high. ## Command - ### Command number: `0` **Description**: Does the driver exist? **Argument 1**: unused **Argument 2**: unused **Returns**: SUCCESS if it exists, otherwise ENODEVICE - ### Command number: `1` **Description**: Initiate a sensor reading. When a reading is ready, a callback will be delivered if the process has `subscribed`. **Argument 1**: unused **Argument 2**: unused **Returns**: `EBUSY` if a reading is already pending, `ENOMEM` if there isn't sufficient grant memory available, or `SUCCESS` if the sensor reading was initiated successfully. - ### Command number: `2` **Description**: Enable the high water detection. THe callback will the alert will be delivered if the process has `subscribed`. **Argument 1**: The water depth to alert for. **Argument 2**: unused **Returns**: `EBUSY` if a reading is already pending, `ENOMEM` if there isn't sufficient grant memory available, or `SUCCESS` if the sensor reading was initiated successfully. ## Subscribe - ### Subscribe number: `0` **Description**: Subscribe an upcall for sensor readings and alerts. **Upcall signature**: The upcall's first argument is `0` if this is a measurement, and `1` if the callback is an alert. If it is a measurement the second value will be the water level. **Returns**: SUCCESS if the subscribe was successful or ENOMEM if the driver failed to allocate memory to store the upcall.This file should be named
<driver_num>_<sensor>.md, or in this case:80000A_ws00123.md. -
Expose the interface to userspace.
The last kernel implementation step is to let the main kernel know about this new syscall interface so that if an application tries to use it the kernel knows which implementation of
SyscallDriverto call. In each board'smain.rsfile (e.g.boards/hail/src/main.rs) there is an implementation of theSyscallDriverLookuptrait where the board can setup which syscall interfaces it supports. To enable our water sensor interface we add a new entry to the match statement there:#![allow(unused)] fn main() { impl SyscallDriverLookup for Hail { fn with_driver<F, R>(&self, driver_num: usize, f: F) -> R where F: FnOnce(Option<&dyn kernel::Driver>) -> R, { match driver_num { ... capsules::ws00123::DRIVER_NUM => f(Some(self.ws00123)), ... _ => f(None), } } } } -
Implement the syscall library in userspace.
At this point userspace applications can use our new syscall interface and interact with the water sensor. However, applications would have to call all of the syscalls directly, and that is fairly difficult to get right and not user friendly. Therefore, we typically implement a small library layer in userspace to make using the interface easier.
In this guide we will be setting up a C library, and to do so we will create
libtock-c/libtock/ws00123.handlibtock-c/libtock/ws00123.c, both of which will be added to the libtock-c repository. The .h file defines the public interface and constants:#pragma once #include "tock.h" #ifdef __cplusplus extern "C" { #endif #define DRIVER_NUM_WS00123 0x80000A int ws00123_set_callback(subscribe_cb callback, void* callback_args); int ws00123_read_water_level(); int ws00123_enable_alerts(uint32_t threshold); #ifdef __cplusplus } #endifWhile the .c file provides the implementations:
#include "ws00123.h" #include "tock.h" int ws00123_set_callback(subscribe_cb callback, void* callback_args) { return subscribe(DRIVER_NUM_WS00123, 0, callback, callback_args); } int ws00123_read_water_level() { return command(DRIVER_NUM_WS00123, 1, 0, 0); } int ws00123_enable_alerts(uint32_t threshold) { return command(DRIVER_NUM_WS00123, 2, threshold, 0); }This is a very basic implementation of the interface, but it provides some more readable names to the numbers that make up the syscall interface. See other examples in libtock for how to make synchronous versions of asynchronous operations (like reading the sensor).
Wrap-Up
Congratulations! You have added a new API for userspace applications using the Tock syscall interface! We encourage you to submit a pull request to upstream this to the Tock repository.
Implementing a HIL Interface
This guide describes the process of creating a new HIL interface in Tock. "HIL"s are one or more Rust traits that provide a standard and shared interface between pieces of the Tock kernel.
Background
The most canonical use for a HIL is to provide an interface to hardware peripherals to capsules. For example, a HIL for SPI provides an interface between the SPI hardware peripheral in a microcontroller and a capsule that needs a SPI bus for its operation. The HIL is a generic interface, so that same capsule can work on different microcontrollers, as long as each microcontroller implements the SPI HIL.
HILs are also used for other generic kernel interfaces that are relevant to capsules. For example, Tock defines a HIL for a "temperature sensor". While a temperature sensor is not generally a hardware peripheral, a capsule may want to use a generic temperature sensor interface and not be restricted to using a particular temperature sensor driver. Having a HIL allows the capsule to use a generic interface. For consistency, these HILs are also specified in the kernel crate.
Note: In the future Tock will likely split these interface types into separate groups.
HIL development often significantly differs from other development in Tock. In particular, HILs can often be written quickly, but tend to take numerous iterations over relatively long periods of time to refine. This happens for three general reasons:
- HILs are intended to be generic, and therefore implementable by a range of different hardware platforms. Designing an interface that works for a range of different hardware takes time and experience with various MCUs, and often incompatibilities aren't discovered until an implementation proves to be difficult (or impossible).
- HILs are Rust traits, and Rust traits are reasonably complex and offer a fair bit of flexibility. Balancing both leveraging the flexibility Rust provides and avoiding undue complexity takes time. Again, often trial-and-error is required to settle on how traits should be composed to best capture the interface.
- HILs are intended to be generic, and therefore will be used in a variety of different use cases. Ensuring that the HIL is expressive enough for a diverse set of uses takes time. Again, often the set of uses is not known initially, and HILs often have to be revised as new use cases are discovered.
Therefore, we consider HILs to be evolving interfaces.
Tips on HIL Development
As getting a HIL interface "correct" is difficult, Tock tends to prefer starting with simple HIL interfaces that are typically inspired by the hardware used when the HIL is initially created. Trying to generalize a HIL too early can lead to complexity that is never actually warranted, or complexity that didn't actually address a problem.
Also, Tock prefers to only include code (or in this case HIL interface functions) that are actually in use by the Tock code base. This ensures that there is at least some method of using or testing various components of Tock. This also suggests that initial HIL development should only focus on an interface that is needed by the initial use case.
Overview
The high-level steps required are:
- Determine that a new HIL interface is needed.
- Create the new HIL in the kernel crate.
- Ensure the HIL file includes sufficient documentation.
Step-by-Step Guide
The steps from the overview are elaborated on here.
-
Determine that a new HIL interface is needed.
Tock includes a number of existing HIL interfaces, and modifying an existing HIL is preferred to creating a new HIL that is similar to an existing interface. Therefore, you should start by verifying an existing HIL does not already meet your need or could be modified to meet your need.
This may seem to be a straightforward step, but it can be complicated by microcontrollers calling similar functionality by different names, and the existing HIL using a standard name or a different name from another microcontroller.
Also, you can reach out via the email list or slack if you have questions about whether a new HIL is needed or an existing one should suffice.
-
Create the new HIL in the kernel crate.
Once you have determined a new HIL is required, you should create the appropriate file in
kernel/src/hil. Often the best way to start is to copy an existing HIL that is similar in nature to the interface you are trying to create.As noted above, HILs evolve over time, and HILs will be periodically updated as issues are discovered or best practices for HIL design are learned. Unfortunately, this means that copying an existing HIL might lead to "mistakes" that must be remedied before the new HIL can be merged.
Likely, it is helpful to open a pull request relatively early in the HIL creation process so that any substantial issues can be detected and corrected quickly.
Tock has a reference guide for dos and don'ts when creating a HIL. Following this guide can help avoid many of the pitfalls that we have run into when creating HILs in the past.
Tock only uses non-blocking interfaces in the kernel, and HILs should reflect that as well. Therefore, for any operation that will take more than a couple cycles to complete, or would require waiting on a hardware flag, a split interface design should be used with a
Clienttrait that receives a callback when the operation has completed. -
Ensure the HIL file includes sufficient documentation.
HIL files should be well commented with Rustdoc style (i.e.
///) comments. These comments are the main source of documentation for HILs.As HILs grow in complexity or stability, they will be documented separately to fully explain their design and intended use cases.
Wrap-Up
Congratulations! You have implemented a new HIL in Tock! We encourage you to submit a pull request to upstream this to the Tock repository.
Implementing an in-kernel Virtualization Layer
This guide provides an overview and walkthrough on how to add an in-kernel virtualization layer, such that a given hardware interface can be used simultaneously by multiple kernel capsules, or used simultaneously by a single kernel capsule and userspace. Ideally, virtual interfaces will be available for all hardware interfaces in Tock. Some example interfaces which have already been virtualized include Alarm, SPI, Flash, UART, I2C, ADC, and others.
In this guide we will use a running example of virtualizing a single hardware SPI peripheral and bus for use as a SPI Master.
Setup
This guide assumes you already have existing kernel code that needs to be virtualized. There should be an existing HIL for the resource you are virtualizing.
We will assume there is a trait SpiMaster {...} already defined and
implemented that includes all of the logic needed to interface with the
underlying SPI. We also assume there is a trait SpiMasterClient that
determines the interface a client of the SPI exposes to the underlying resource.
In most cases, equivalent traits will represent a necessary precursor to
virtualization.
Overview
The high-level steps required are:
- Create a capsule file for your virtualizer
- Determine what portions of this interface should be virtualized.
- Create a
MuxXXXstruct, which will serve as the lone client of the underlying resource. - Create a
VirtualXXXDevicewhich will implement the underlying HIL trait, allowing for the appearance of multiple of the lone resource. - Implement the logic for queuing requests from capsules.
- Implement the logic for dispatching callbacks from the underlying resource to the appropriate client.
- Document the interface.
- (Optional) Write tests for the virtualization logic.

Step-by-Step Guide
The steps from the overview are elaborated on here.
-
Create a capsule file for your virtualizer
This step is easy. Navigate to the
capsules/src/directory and create a new file namedvirtual_xxx, wherexxxis the name of the underlying resource being virtualized. All of the code you will write while following this guide belongs in that file. Additionally, opencapsules/src/lib.rsand addpub mod virtual_xxx;to the list of modules. -
Determine what portions of this interface should be virtualized
Generally, this step requires looking at the HIL being virtualized, and determining what portions of the HIL require additional logic to handle multiple concurrent clients. Lets take a look at the SPIMaster HIL:
#![allow(unused)] fn main() { pub trait SpiMaster { fn set_client(&self, client: &'static dyn SpiMasterClient); fn init(&self); fn is_busy(&self) -> bool; /// Perform an asynchronous read/write operation, whose /// completion is signaled by invoking SpiMasterClient on /// the initialized client. fn read_write_bytes( &self, write_buffer: &'static mut [u8], read_buffer: Option<&'static mut [u8]>, len: usize, ) -> ReturnCode; fn write_byte(&self, val: u8); fn read_byte(&self) -> u8; fn read_write_byte(&self, val: u8) -> u8; /// Tell the SPI peripheral what to use as a chip select pin. fn specify_chip_select(&self, cs: Self::ChipSelect); /// Returns the actual rate set fn set_rate(&self, rate: u32) -> u32; fn get_rate(&self) -> u32; fn set_clock(&self, polarity: ClockPolarity); fn get_clock(&self) -> ClockPolarity; fn set_phase(&self, phase: ClockPhase); fn get_phase(&self) -> ClockPhase; // These two functions determine what happens to the chip // select line between transfers. If hold_low() is called, // then the chip select line is held low after transfers // complete. If release_low() is called, then the chip select // line is brought high after a transfer completes. A "transfer" // is any of the read/read_write calls. These functions // allow an application to manually control when the // CS line is high or low, such that it can issue multi-byte // requests with single byte operations. fn hold_low(&self); fn release_low(&self); } }For some of these functions, it is clear that no virtualization is required. For example,
get_rate(),get_phase()andget_polarity()simply request information on the current configuration of the underlying hardware. Implementations of these can simply pass the call straight through the mux.Some other functions are not appropriate to expose to virtual clients at all. For example,
hold_low(),release_low(), andspecify_chip_select()are not suitable for use when the underlying bus is shared.init()does not make sense when it is unclear which client should call it. The mux should queue operations, so clients should not need access tois_busy().For other functions, it is clear that virtualization is necessary. For example, it is clear that if multiple clients are using the Mux, they cannot all be allowed set the rate of the underlying hardware at arbitrary times, as doing so could break an ongoing operation initiated by an underlying client. However, it is important to expose this functionality to clients. Thus
set_rate(),set_clock()andset_phase()need to be virtualized, and provided to virtual clients.set_client()needs to be adapted to support multiple simultaneous clients.Finally, virtual clients need a way to send and receive on the bus. Single byte writes and reads are typically only used under the assumption that a single client is going to make multiple single byte reads/writes consecutively, and thus are inappropriate to virtualize. Instead, the virtual interface should only include
read_write_bytes(), as that encapsulates the entire transaction that would be desired by a virtual client.Given that not all parts of the original HIL trait (
SpiMaster) are appropriate for virtualization, we should create a new trait in the SPI HIL that will represent the interface provided to clients of the Virtual SPI:#![allow(unused)] fn main() { //! kernel/src/hil/spi.rs ... /// SPIMasterDevice provides a chip-specific interface to the SPI Master /// hardware. The interface wraps the chip select line so that chip drivers /// cannot communicate with different SPI devices. pub trait SpiMasterDevice { /// Perform an asynchronous read/write operation, whose /// completion is signaled by invoking SpiMasterClient.read_write_done on /// the provided client. fn read_write_bytes( &self, write_buffer: &'static mut [u8], read_buffer: Option<&'static mut [u8]>, len: usize, ) -> ReturnCode; /// Helper function to set polarity, clock phase, and rate all at once. fn configure(&self, cpol: ClockPolarity, cpal: ClockPhase, rate: u32); fn set_polarity(&self, cpol: ClockPolarity); fn set_phase(&self, cpal: ClockPhase); fn set_rate(&self, rate: u32); fn get_polarity(&self) -> ClockPolarity; fn get_phase(&self) -> ClockPhase; fn get_rate(&self) -> u32; } }Not all virtualizers will require a new trait to provide virtualization! For example,
VirtualMuxDigestexposes the sameDigestHIL as the underlying hardware. Same forVirtualAlarm,VirtualUart, andMuxFlash.VirtualI2Cdoes use a different trait, similarly to SPI, andVirtualADCintroduces anAdcChanneltrait to enable virtualization that is not possible with the ADC interface implemented by hardware.There is no fixed algorithm for deciding exactly how to virtualize a given interface, and doing so will require thinking carefully about the requirements of the clients and nature of the underlying resource. Tock's threat model describes several requirements for virtualizers in its virtualization section.
Note: You should read these requirements!! They discuss things like the confidentiality and fairness requirements for virtualizers.
Beyond the threat model, you should think carefully about how virtual clients will use the interface, the overhead (in cycles / code size / RAM use) of different approaches, and how the interface will work in the face of multiple concurrent requests. It is also important to consider the potential for two layers of virtualization, when one of the clients of the virtualization capsule is a userspace driver that will also be virtualizing that same resource. In some cases (see: UDP port reservations) special casing the userspace driver may be valuable.
Frequently the best approach will involve looking for an already virtualized resource that is qualitatively similar to the resource you are working with, and using its virtualization as a template.
-
Create a
MuxXXXstruct, which will serve as the lone client of the underlying resource.In order to virtualize a hardware resource, we need to create some object that has a reference to the underlying hardware resource and that will hold the multiple "virtual" devices which clients will interact with. For the SPI interface, we call this struct
MuxSpiMaster:#![allow(unused)] fn main() { /// The Mux struct manages multiple Spi clients. Each client may have /// at most one outstanding Spi request. pub struct MuxSpiMaster<'a, Spi: hil::spi::SpiMaster> { // The underlying resource being virtualized spi: &'a Spi, // A list of virtual devices which clients will interact with. // (See next step for details) devices: List<'a, VirtualSpiMasterDevice<'a, Spi>>, // Additional data storage needed to implement virtualization logic inflight: OptionalCell<&'a VirtualSpiMasterDevice<'a, Spi>>, } }Here we use Tock's built-in
Listtype, which is a LinkedList of statically allocated structures that implement a given trait. This type is required because Tock does not allow heap allocation in the Kernel.Typically, this struct will implement some number of private helper functions used as part of virtualization, and provide a public constructor. For now we will just implement the constructor:
#![allow(unused)] fn main() { impl<'a, Spi: hil::spi::SpiMaster> MuxSpiMaster<'a, Spi> { pub const fn new(spi: &'a Spi) -> MuxSpiMaster<'a, Spi> { MuxSpiMaster { spi: spi, devices: List::new(), inflight: OptionalCell::empty(), } } // TODO: Implement virtualization logic helper functions } } -
Create a
VirtualXXXDevicewhich will implement the underlying HIL traitIn the previous step you probably noticed the list of virtual devices referencing a
VirtualSpiMasterDevice, which we had not created yet. We will define and implement that struct here. In practice, both must be defined simultaneously because each type references the other. TheVirtualSpiMasterDeviceshould have a reference to the mux, aListLinkfield (required so that lists ofVirtualSpiMasterDevices can be constructed), and other fields for data that needs to be stored for each client of the virtualizer.#![allow(unused)] fn main() { pub struct VirtualSpiMasterDevice<'a, Spi: hil::spi::SpiMaster> { //reference to the mux mux: &'a MuxSpiMaster<'a, Spi>, // Pointer to next element in the list of devices next: ListLink<'a, VirtualSpiMasterDevice<'a, Spi>>, // Per client data that must be stored across calls chip_select: Cell<Spi::ChipSelect>, txbuffer: TakeCell<'static, [u8]>, rxbuffer: TakeCell<'static, [u8]>, operation: Cell<Op>, client: OptionalCell<&'a dyn hil::spi::SpiMasterClient>, } impl<'a, Spi: hil::spi::SpiMaster> VirtualSpiMasterDevice<'a, Spi> { pub const fn new( mux: &'a MuxSpiMaster<'a, Spi>, chip_select: Spi::ChipSelect, ) -> VirtualSpiMasterDevice<'a, Spi> { VirtualSpiMasterDevice { mux: mux, chip_select: Cell::new(chip_select), txbuffer: TakeCell::empty(), rxbuffer: TakeCell::empty(), operation: Cell::new(Op::Idle), next: ListLink::empty(), client: OptionalCell::empty(), } } // Most virtualizers will use a set_client method that looks exactly like this pub fn set_client(&'a self, client: &'a dyn hil::spi::SpiMasterClient) { self.mux.devices.push_head(self); self.client.set(client); } } }This is the struct that will implement whatever HIL trait we decided on in step 1. In our case, this is the
SpiMasterDevicetrait:#![allow(unused)] fn main() { // Given that there are multiple types of operations we might need to queue, // create an enum that can represent each operation and the data that operation // needs to store. #[derive(Copy, Clone, PartialEq)] enum Op { Idle, Configure(hil::spi::ClockPolarity, hil::spi::ClockPhase, u32), ReadWriteBytes(usize), SetPolarity(hil::spi::ClockPolarity), SetPhase(hil::spi::ClockPhase), SetRate(u32), } impl<Spi: hil::spi::SpiMaster> hil::spi::SpiMasterDevice for VirtualSpiMasterDevice<'_, Spi> { fn configure(&self, cpol: hil::spi::ClockPolarity, cpal: hil::spi::ClockPhase, rate: u32) { self.operation.set(Op::Configure(cpol, cpal, rate)); self.mux.do_next_op(); } fn read_write_bytes( &self, write_buffer: &'static mut [u8], read_buffer: Option<&'static mut [u8]>, len: usize, ) -> ReturnCode { self.txbuffer.replace(write_buffer); self.rxbuffer.put(read_buffer); self.operation.set(Op::ReadWriteBytes(len)); self.mux.do_next_op(); ReturnCode::SUCCESS } fn set_polarity(&self, cpol: hil::spi::ClockPolarity) { self.operation.set(Op::SetPolarity(cpol)); self.mux.do_next_op(); } fn set_phase(&self, cpal: hil::spi::ClockPhase) { self.operation.set(Op::SetPhase(cpal)); self.mux.do_next_op(); } fn set_rate(&self, rate: u32) { self.operation.set(Op::SetRate(rate)); self.mux.do_next_op(); } fn get_polarity(&self) -> hil::spi::ClockPolarity { self.mux.spi.get_clock() } fn get_phase(&self) -> hil::spi::ClockPhase { self.mux.spi.get_phase() } fn get_rate(&self) -> u32 { self.mux.spi.get_rate() } } }Now we can begin to see the virtualization logic. Each
get_x()method just forwards calls directly to the underlying hardware driver, as these operations are synchronous and non-blocking. But theset()calls and the read/write calls are queued as operations. Each client can have only a single outstanding operation (a common requirement for virtualizers in Tock given the lack of dynamic allocation). These operations are "queued" by each client simply setting the operation field of itsVirtualSpiMasterDeviceto whatever operation it would like to perform next. The Mux can iterate through the list of devices to choose a pending operation. Clients learn about the completion of operations via callbacks, informing them that they can begin new operations. -
Implement the logic for queuing requests from capsules.
So far, we have sketched out a skelton for how we will queue requests from capsules, but not yet implemented the
do_next_op()function that will handle the order in which operations are performed, or how operations are translated into calls by the actual hardware driver.We know that all operations in Tock are asynchronous, so it is always possible that the underlying hardware device is busy when
do_next_op()is called -- accordingly, we need some mechanism for tracking if the underlying device is currently busy. We also need to restore the state expected by the device performing a given operaion (e.g. the chip select pin in use). Beyond that, we just forward calls to the hardware driver:#![allow(unused)] fn main() { fn do_next_op(&self) { if self.inflight.is_none() { let mnode = self .devices .iter() .find(|node| node.operation.get() != Op::Idle); mnode.map(|node| { self.spi.specify_chip_select(node.chip_select.get()); let op = node.operation.get(); // Need to set idle here in case callback changes state node.operation.set(Op::Idle); match op { Op::Configure(cpol, cpal, rate) => { // The `chip_select` type will be correct based on // what implemented `SpiMaster`. self.spi.set_clock(cpol); self.spi.set_phase(cpal); self.spi.set_rate(rate); } Op::ReadWriteBytes(len) => { // Only async operations want to block by setting // the devices as inflight. self.inflight.set(node); node.txbuffer.take().map(|txbuffer| { let rxbuffer = node.rxbuffer.take(); self.spi.read_write_bytes(txbuffer, rxbuffer, len); }); } Op::SetPolarity(pol) => { self.spi.set_clock(pol); } Op::SetPhase(pal) => { self.spi.set_phase(pal); } Op::SetRate(rate) => { self.spi.set_rate(rate); } Op::Idle => {} // Can't get here... } }); } } }Notably, the SPI driver does not implement any fairness schemes, despite the requirements of the threat model. As of this writing, the threat model is still aspirational, and not followed for all virtualizers. Eventually, this driver should be updated to use round robin queueing of clients, rather than always giving priority to whichever client was added to the List first.
-
Implement the logic for dispatching callbacks from the underlying resource to the appropriate client.
We are getting close! At this point, we have a mechanism for adding clients to the virtualizer, and for queueing and making calls. However, we have not yet addressed how to handle callbacks from the underlying resource (usually used to forward interrupts up to the appropriate client). Additionally, our queueing logic is still incomplete, as we have not yet seen when subsequent operations are triggered if an operation is requested while the underlying device is in use.
Handling callbacks in virtualizers requires two layers of handling. First, the
MuxXXXdevice must implement the appropriateXXXClienttrait such that it can subscribe to callbacks from the underlying resource, and dispatch them to the appropriateVirtualXXXDevice:#![allow(unused)] fn main() { impl<Spi: hil::spi::SpiMaster> hil::spi::SpiMasterClient for MuxSpiMaster<'_, Spi> { fn read_write_done( &self, write_buffer: &'static mut [u8], read_buffer: Option<&'static mut [u8]>, len: usize, ) { self.inflight.take().map(move |device| { self.do_next_op(); device.read_write_done(write_buffer, read_buffer, len); }); } } }This takes advantage of the fact that we stored a reference to device that initiated the inflight operation, so we can dispatch the callback directly to that device. One thing to note is that the call to
take()setsinflighttoNone, and then the callback callsdo_next_op(), triggering any still queued operations. This ensures that all queued operations will take place. This all requires that the device also has implemented the callback:#![allow(unused)] fn main() { impl<Spi: hil::spi::SpiMaster> hil::spi::SpiMasterClient for VirtualSpiMasterDevice<'_, Spi> { fn read_write_done( &self, write_buffer: &'static mut [u8], read_buffer: Option<&'static mut [u8]>, len: usize, ) { self.client.map(move |client| { client.read_write_done(write_buffer, read_buffer, len); }); } }Finally, we have dispatched the callback all the way up to the client of the virtualizer, completing the round trip process.
-
Document the interface.
Finally, you need to document the interface. Do so by placing a comment at the top of the file describing what the file does:
#![allow(unused)] fn main() { //! Virtualize a SPI master bus to enable multiple users of the SPI bus. }and add doc comments (
/// doc comment example) to any new traits created inkernel/src/hil. -
(Optional) Write tests for the virtualization logic.
Some virtualizers provide additional stress tests of virtualization logic, which can be run on hardware to perform correct operation in edge cases. For examples of such tests, look at
capsules/src/test/virtual_uart.rsorcapsules/src/test/random_alarm.rs.
Wrap-Up
Congratulations! You have virtualized a resource in the Tock kernel! We encourage you to submit a pull request to upstream this to the Tock repository.
Implementing a Kernel Test
This guide covers how to write in-kernel tests of hardware functionality. For example, if you have implemented a chip peripheral, you may want to write in-kernel tests of that peripheral to test peripheral-specific functionality that will not be exposed via the HIL for that peripheral. This guide outlines the general steps for implementing kernel tests.
Setup
This guide assumes you have existing chip, board, or architecture specific code that you wish to test from within the kernel.
Note: If you wish to test kernel code with no hardware dependencies at all, such as a ring buffer implementation, you can use cargo's test framework instead. These tests can be run by simply calling
cargo testwithin the crate that the test is located, and will be executed during CI for all tests merged into upstream Tock. An example of this approach can be found inkernel/src/collections/ring_buffer.rs.
Overview
The general steps you will follow are:
- Determine the board(s) you want to run your tests on
- Add a test file in
boards/{board}/src/ - Determine where to write actual tests -- in the test file or a capsule test
- Write your tests
- Call the test from
main.rs - Document the expected output from the test at the top of the test file
This guide will walk through how to do each of these steps.
Background
Kernel tests allow for testing of hardware-specific functionality that is not
exposed to userspace, and allows for fail-fast tests at boot that otherwise
would not be exposed until apps are loaded. Kernel tests can be useful to test
chip peripherals prior to exposing these peripherals outside the Kernel. Kernel
tests can also be included as required tests run prior to releases, to ensure
there have been no regressions for a particular component. Additionally, kernel
tests can be useful for testing capsule functionality from within the kernel,
such as when unsafe is required to verify the results of tests, or for testing
virtualization capsules in a controlled environment.
Kernel tests are generally implemented on an as-needed basis, and are not
required for all chip peripherals in Tock. In general, they are not expected to
be run in the default case, though they should always be included from main.rs
so they are compiled. These tests are allowed to use unsafe as needed, and are
permitted to conflict with normal operation, by stealing callbacks from drivers
or modifying global state.
Notably, your specific use case may differ some from the one outline here. It is
always recommended to attempt to copy from existing Tock code when developing
your own solutions. A good collection of kernel tests can be found in
boards/imix/src/tests/ for that purpose.
Step-by-Step Guide
The steps from the overview are elaborated on here.
-
Determine the board(s) you want to run your test on.
If you are testing chip or architecture specific functionality, you simply need to choose a board that uses that chip or architecture. For board specific functionality you of course need to choose that board. If you are testing a virtualization capsule, then any board that implements the underlying resource being virtualized is acceptable. Currently, most kernel tests are implemented for the Imix platform, and can be found in
boards/imix/src/tests/Checkpoint: You have identified the board you will implement your test for.
-
Add a test file in
boards/{board}/src/To start implementing the test, you should create a new source file inside the
boards/{board}/srcdirectory. For boards with lots of tests, like the Imix board, there may be atestssubdirectory -- if so, the test should go intestsinstead, and be added to thetests/mod.rsfile. The name of this test file generally should indicate the functionality being tested.Note: If the board you select is one of the nrf52dk variants (nrf52840_dongle, nrf52840dk, or nrf52dk), tests should be moved into the
nrf52dk_base/src/folder, and called fromlib.rs.Checkpoint: You have chosen a board for your test and created a test file.
-
Determine where to write actual tests -- in the test file or a capsule test.
Depending on what you are testing, it may be best practice to write a capsule test that you call from the test file you created in the previous step.
Writing a capsule test is best practice if your test meets the following criteria:
- Test does not require
unsafe - The test is for a peripheral available on multiple boards
- A HIL or capsule exists for that peripheral, so it is accessible from the
capsulescrate - The test relies only on functionality exposed via the HIL or a capsule
- You care about being able to call this test from multiple boards
Examples:
- UART Virtualization (all boards support UART, there is a HIL for UART
devices and a capsule for the
virtual_uart) - Alarm test (all boards will have some form of hardware alarm, there is an Alarm HIL)
- Other examples: see
capsules/src/test
If your test meets the criteria for writing a capsule test, follow these steps:
Add a file in
capsules/src/test/, and then add the filename tocapsules/src/mod.rslike this:#![allow(unused)] fn main() { pub mod virtual_uart; }Next, create a test struct in this file that can be instantiated by any board using this test capsule. This struct should implement a
new()function so it can be instantiated from the test file inboards, and arun()function that will run the actual tests. An example for UART follows:#![allow(unused)] fn main() { //! capsules/src/test/virtual_uart.rs pub struct TestVirtualUartReceive { device: &'static UartDevice<'static>, buffer: TakeCell<'static, [u8]>, } impl TestVirtualUartReceive { pub fn new(device: &'static UartDevice<'static>, buffer: &'static mut [u8]) -> Self { TestVirtualUartReceive { device: device, buffer: TakeCell::new(buffer), } } pub fn run(&self) { // TODO: See Next Step } } }If your test does not meet the above requirements, you can simply implement your tests in the file that you created in step 2. This can involve creating a test structure with test methods. The UDP test file takes this approach, by defining a number of self-contained tests. One such example follows:
#![allow(unused)] fn main() { //! boards/imix/src/test/udp_lowpan_test.rs pub struct LowpanTest { port_table: &'static UdpPortManager, // ... } impl LowpanTest { // This test ensures that an app and capsule cant bind to the same port // but can bind to different ports fn bind_test(&self) { let create_cap = create_capability!(NetworkCapabilityCreationCapability); let net_cap = unsafe { static_init!( NetworkCapability, NetworkCapability::new(AddrRange::Any, PortRange::Any, PortRange::Any, &create_cap) ) }; let mut socket1 = self.port_table.create_socket().unwrap(); // Attempt to bind to a port that has already been bound by an app. let result = self.port_table.bind(socket1, 1000, net_cap); assert!(result.is_err()); socket1 = result.unwrap_err(); // Get the socket back //now bind to an open port let (_send_bind, _recv_bind) = self .port_table .bind(socket1, 1001, net_cap) .expect("UDP Bind fail"); debug!("bind_test passed"); } // ... } }Checkpoint: There is a test capsule with
new()andrun()implementations. - Test does not require
-
Write your tests
The first part of this step takes place in the test file you just created -- writing the actual tests. This part is highly dependent on the functionality being verified. If you are writing your tests in test capsule, this should all be triggered from the
run()function.Depending on the specifics of your test, you may need to implement additional functions or traits in this file to make your test functional. One example is implementing a client trait on the test struct so that the test can receive the results of asynchronous operations. Our UART example requires implementing the
uart::RecieveClienton the test struct.#![allow(unused)] fn main() { //! boards/imix/src/test/virtual_uart_rx_test.rs impl TestVirtualUartReceive { // ... pub fn run(&self) { let buf = self.buffer.take().unwrap(); let len = buf.len(); debug!("Starting receive of length {}", len); let (err, _opt) = self.device.receive_buffer(buf, len); if err != ReturnCode::SUCCESS { panic!( "Calling receive_buffer() in virtual_uart test failed: {:?}", err ); } } } impl uart::ReceiveClient for TestVirtualUartReceive { fn received_buffer( &self, rx_buffer: &'static mut [u8], rx_len: usize, rcode: ReturnCode, _error: uart::Error, ) { debug!("Virtual uart read complete: {:?}: ", rcode); for i in 0..rx_len { debug!("{:02x} ", rx_buffer[i]); } debug!("Starting receive of length {}", rx_len); let (err, _opt) = self.device.receive_buffer(rx_buffer, rx_len); if err != ReturnCode::SUCCESS { panic!( "Calling receive_buffer() in virtual_uart test failed: {:?}", err ); } } } }Note that the above test calls
panic!()in the case of failure. This pattern, or the similar use ofassert!()statements, is the preferred way to communicate test failures. If communicating errors in this way is not possible, tests can indicate success/failure by printing different results to the console in each case and asking users to verify the actual output matches the expected output.The next step in this process is determining all of the parameters that need to be passed to the test. It is preferred that all logically related tests be called from a single
pub unsafe fn run(/* optional args */)to maintain convention. This ensures that all tests can be run by adding a single line tomain.rs. Many tests require a reference to an alarm in order to separate tests in time, or a reference to a virtualization capsule that is being tested. Notably, therun()function should initialize any components itself that would not have already been created inmain.rs. As an example, the below function is a starting point for thevirtual_uart_receivetest for Imix:#![allow(unused)] fn main() { pub unsafe fn run_virtual_uart_receive(mux: &'static MuxUart<'static>) { debug!("Starting virtual reads."); } }Next, a test function should initialize any objects required to run tests. This is best split out into subfunctions, like the following:
#![allow(unused)] fn main() { unsafe fn static_init_test_receive_small( mux: &'static MuxUart<'static>, ) -> &'static TestVirtualUartReceive { static mut SMALL: [u8; 3] = [0; 3]; let device = static_init!(UartDevice<'static>, UartDevice::new(mux, true)); device.setup(); let test = static_init!( TestVirtualUartReceive, TestVirtualUartReceive::new(device, &mut SMALL) ); device.set_receive_client(test); test } }This initializes an instance of the test capsule we constructed earlier. Simpler tests (such as those not relying on capsule tests) might simply use
static_init!()to initialize normal capsules directly and test them. The log test does this, for example:#![allow(unused)] fn main() { //! boards/imix/src/test/log_test.rs pub unsafe fn run( mux_alarm: &'static MuxAlarm<'static, Ast>, deferred_caller: &'static DynamicDeferredCall, ) { // Set up flash controller. flashcalw::FLASH_CONTROLLER.configure(); static mut PAGEBUFFER: flashcalw::Sam4lPage = flashcalw::Sam4lPage::new(); // Create actual log storage abstraction on top of flash. let log = static_init!( Log, log::Log::new( &TEST_LOG, &mut flashcalw::FLASH_CONTROLLER, &mut PAGEBUFFER, deferred_caller, true ) ); flash::HasClient::set_client(&flashcalw::FLASH_CONTROLLER, log); log.initialize_callback_handle( deferred_caller .register(log) .expect("no deferred call slot available for log storage"), ); // ... } }Finally, your
run()function should call the actual tests. This may involve simply calling arun()function on a capsule test, or may involve calling test functions written in the board specific test file. The virtual UART testrun()looks like this:#![allow(unused)] fn main() { pub unsafe fn run_virtual_uart_receive(mux: &'static MuxUart<'static>) { debug!("Starting virtual reads."); let small = static_init_test_receive_small(mux); let large = static_init_test_receive_large(mux); small.run(); large.run(); } }As you develop your kernel tests, you may not immediately know what functions are required in your test capsule -- this is okay! It is often easiest to start with a basic test and expand this file to test additional functionality once basic tests are working.
Checkpoint: Your tests are written, and can be called from a single
run()function. -
Call the test from
main.rs, and iterate on it until it worksNext, you should run your test by calling it from the
reset_handler()inmain.rs. In order to do so, you will also need it import it into the file by adding a line like this:#![allow(unused)] fn main() { #[allow(dead_code)] mod virtual_uart_test; }However, if your test is located inside a
testmodule this is not needed -- your test will already be included.Typically, tests are called after completing setup of the board, immediately before the call to
load_processes():#![allow(unused)] fn main() { virtual_uart_rx_test::run_virtual_uart_receive(uart_mux); debug!("Initialization complete. Entering main loop"); extern "C" { /// Beginning of the ROM region containing app images. static _sapps: u8; /// End of the ROM region containing app images. /// /// This symbol is defined in the linker script. static _eapps: u8; } kernel::procs::load_processes( // ... }Observe your results, and tune or add tests as needed.
Before you submit a PR including any kernel tests, however, please remove or comment out any lines of code that call these tests.
Checkpoint: You have a functional test that can be called in a single line from
main.rs -
Document the expected output from the test at the top of the test file
For tests that will be merged to upstream, it is good practice to document how to run a test and what the expected output of a test is. This is best done using\ document level comments (
//!) at the top of the test file. The documentation for the virtual UART test follows:#![allow(unused)] fn main() { //! Test reception on the virtualized UART by creating two readers that //! read in parallel. To add this test, include the line //! ``` //! virtual_uart_rx_test::run_virtual_uart_receive(uart_mux); //! ``` //! to the imix boot sequence, where `uart_mux` is a //! `capsules::virtual_uart::MuxUart`. There is a 3-byte and a 7-byte //! read running in parallel. Test that they are both working by typing //! and seeing that they both get all characters. If you repeatedly //! type 'a', for example (0x61), you should see something like: //! ``` //! Starting receive of length 3 //! Virtual uart read complete: CommandComplete: //! 61 //! 61 //! 61 //! 61 //! 61 //! 61 //! 61 //! Starting receive of length 7 //! Virtual uart read complete: CommandComplete: //! 61 //! 61 //! 61 //! ``` }Checkpoint: You have documented your tests
Wrap-Up
Congratulations! You have written a kernel test for Tock! We encourage you to submit a pull request to upstream this to the Tock repository.
Implementing a Component
Each Tock board defines the peripherals, capsules, kernel settings, and syscall drivers to customize Tock for that board. Often, instantiating different resources (particularly capsules and drivers) requires subtle setup steps that are easy to get wrong. The setup steps are often shared from board-to-board. Together, this makes configuring a board redundant and easy to make a mistake.
Components are the Tock mechanism to help address this. Each component includes the static memory allocations and setup steps required to implement a particular piece of kernel functionality (i.e. a capsule). You can read more technical documentation here.
In this guide we will create a component for a hypothetical system call driver
called Notifier. Our system call driver is going to use an alarm as a resource
and requires just one other parameter: a delay value in milliseconds. The steps
should be the same for any capsule you want to create a component for.
Setup
This guide assumes you already have the capsule created, and ideally that you have set it up with a board to test. Making a component then just makes it easier to include on a new board and share among boards.
Overview
The high-level steps required are:
- Define the static memory required for all objects used.
- Create a struct that holds all of the resources and configuration necessary for the capsules.
- Implement
finalize()to initialize memory and perform setup.
Step-by-Step Guide
The steps from the overview are elaborated on here.
-
Define the static memory required for all objects used.
All objects in the kernel are statically allocated, so we need to statically allocate memory for the objects to live in. Due to constraints on the macros Tock provides for statically allocating memory, we must contain all calls to allocate this memory within another macro.
Create a file in
boards/components/srcto hold the component.We need to define a macro to setup our state. We will use the
static_buf!()macro to help with this. In the file, create a macro with the name<your capsule>_component_static. This naming convention must be followed.In our hypothetical case, we need to allocate room for the notifier capsule and a buffer. Each capsule might need slightly different resources.
#![allow(unused)] fn main() { #[macro_export] macro_rules! notifier_driver_component_static { ($A:ty $(,)?) => {{ let notifier_buffer = kernel::static_buf!([u8; 16]); let notifier_driver = kernel::static_buf!( capsules_extra::notifier::NotifierDriver<'static, $A> ); (notifier_buffer, notifier_driver) };}; } }Notice how the macro uses the type
$Awhich is the type of the underlying alarm. We also use full paths to avoid errors when the macro is used. The macro then "returns" the two statically allocated resources. -
Create a struct that holds all of the resources and configuration necessary for the capsules.
Now we create the actual component object which collects all of the resources and any configuration needed to successfully setup this capsule.
#![allow(unused)] fn main() { pub struct NotifierDriverComponent<A: 'static + time::Alarm<'static>> { board_kernel: &'static kernel::Kernel, driver_num: usize, alarm: &'static A, delay_ms: usize, } }The component needs a reference to the board as well as the driver number to be used for this driver. This is to setup the grant, as we will see. If you are not setting up a syscall driver you will not need this. Finally we also need to keep track of the delay the kernel wants to use with this capsule.
Next we can create a constructor for this component object:
#![allow(unused)] fn main() { impl<A: 'static + time::Alarm<'static>> NotifierDriverComponent<A> { pub fn new( board_kernel: &'static kernel::Kernel, driver_num: usize, alarm: &'static A, delay_ms: usize, ) -> AlarmDriverComponent<A> { AlarmDriverComponent { board_kernel, driver_num, alarm, delay_ms, } } } }Note, all configuration that is required must be passed in to this
new()constructor. -
Implement
finalize()to initialize memory and perform setup.The last step is to implement the
Componenttrait and thefinalize()method to actually setup the capsule.The general format looks like:
#![allow(unused)] fn main() { impl<A: 'static + time::Alarm<'static>> Component for NotifierDriverComponent<A> { type StaticInput = (...); type Output = ...; fn finalize(self, static_buffer: Self::StaticInput) -> Self::Output {} } }We need to define what statically allocated types we need, and what this method will produce:
#![allow(unused)] fn main() { impl<A: 'static + time::Alarm<'static>> Component for AlarmDriverComponent<A> { type StaticInput = ( &'static mut MaybeUninit<[u8; 16]>, &'static mut MaybeUninit<NotifierDriver<'static, $A>>, ); type Output = &'static NotifierDriver<'static, A>; fn finalize(self, static_buffer: Self::StaticInput) -> Self::Output {} } }Notice that the static input types must match the output of the macro. The output type is what we are actually creating.
Inside the
finalize()method we need to initialize the static memory and configure/setup the capsules:#![allow(unused)] fn main() { impl<A: 'static + time::Alarm<'static>> Component for AlarmDriverComponent<A> { type StaticInput = ( &'static mut MaybeUninit<[u8; 16]>, &'static mut MaybeUninit<NotifierDriver<'static, $A>>, ); type Output = &'static NotifierDriver<'static, A>; fn finalize(self, static_buffer: Self::StaticInput) -> Self::Output { let grant_cap = create_capability!(capabilities::MemoryAllocationCapability); let buf = static_buffer.0.write([0; 16]); let notifier = static_buffer.1.write(NotifierDriver::new( self.alarm, self.board_kernel.create_grant(self.driver_num, &grant_cap), buf, self.delay_ms, )); // Very important we set the callback client correctly. self.alarm.set_client(notifier); notifier } } }We initialize the memory for the static buffer, create the grant for the syscall driver to use, provide the driver with the alarm resource, and pass in the delay value to use. Lastly, we return a reference to the actual notifier driver object.
Summary
Our full component looks like:
#![allow(unused)] fn main() { use core::mem::MaybeUninit; use capsules_extra::notifier::NotifierDriver; use kernel::capabilities; use kernel::component::Component; use kernel::create_capability; use kernel::hil::time::{self, Alarm}; #[macro_export] macro_rules! notifier_driver_component_static { ($A:ty $(,)?) => {{ let notifier_buffer = kernel::static_buf!([u8; 16]); let notifier_driver = kernel::static_buf!( capsules_extra::notifier::NotifierDriver<'static, $A> ); (notifier_buffer, notifier_driver) };}; } pub struct NotifierDriverComponent<A: 'static + time::Alarm<'static>> { board_kernel: &'static kernel::Kernel, driver_num: usize, alarm: &'static A, delay_ms: usize, } impl<A: 'static + time::Alarm<'static>> NotifierDriverComponent<A> { pub fn new( board_kernel: &'static kernel::Kernel, driver_num: usize, alarm: &'static A, delay_ms: usize, ) -> AlarmDriverComponent<A> { AlarmDriverComponent { board_kernel, driver_num, alarm, delay_ms, } } } impl<A: 'static + time::Alarm<'static>> Component for AlarmDriverComponent<A> { type StaticInput = ( &'static mut MaybeUninit<[u8; 16]>, &'static mut MaybeUninit<NotifierDriver<'static, $A>>, ); type Output = &'static NotifierDriver<'static, A>; fn finalize(self, static_buffer: Self::StaticInput) -> Self::Output { let grant_cap = create_capability!(capabilities::MemoryAllocationCapability); let buf = static_buffer.0.write([0; 16]); let notifier = static_buffer.1.write(NotifierDriver::new( self.alarm, self.board_kernel.create_grant(self.driver_num, &grant_cap), buf, self.delay_ms, )); // Very important we set the callback client correctly. self.alarm.set_client(notifier); notifier } } }
Usage
In a board's main.rs file to use the component:
#![allow(unused)] fn main() { let notifier = components::notifier::NotifierDriverComponent::new( board_kernel, capsules_core::notifier::DRIVER_NUM, alarm, 100, ) .finalize(components::notifier_driver_component_static!(nrf52840::rtc::Rtc)); }
Wrap-Up
Congratulations! You have created a component to easily create a resource in the Tock kernel! We encourage you to submit a pull request to upstream this to the Tock repository.
Minimizing Tock Code Size
Many embedded applications are ultimately limited by the flash space available on the board in use. This document provides tips on how to write Rust code such that it does not require an undue amount of flash, and highlights some options which can be used to reduce the size required for a particular image.
Code Style: tips for keeping Rust code small
When to use generic types with trait bounds versus trait objects (dyn)
Polymorphic structs and functions are one of the biggest sources of bloat in Rust binaries -- use of generic types can lead to bloat from monomorphization, while use of trait objects introduces vtables into the binary and limits opportunities for inlining.
Use dyn when the function in question will be called with multiple concrete
types; otherwise code size is increased for every concrete type used
(monomorphization).
#![allow(unused)] fn main() { fn set_gpio_client(&dyn GpioClientTrait) -> Self {//...} // elsewhere let radio: Radio = Radio::new(); set_gpio_client(&radio); let button: Button = Button::new(); set_gpio_client(&button); }
Use generics with trait bounds when the function is only ever called with a single public type per board; this reduces code size and run time cost. This increases source code complexity for decreased image size and decreased clock cycles used.
#![allow(unused)] fn main() { // On a given chip, there is only a single FlashController. We use generics so // that there can be a shared interface by all FlashController's on different // chips, but in a given binary this function will never be called with multiple // types. impl<'a, F: FlashController> StorageDriverBackend<'a, F> { pub fn new( storage: &'a StorageController<'a, F>, ) -> Self { ... } }
Similarly, only use const generics when there will not be monomorphization, or if the body of the method which would be monomorphized is sufficiently small that it will be inlined anyways.
Non-generic-inner-functions
Sometimes, generic monomorphization is unavoidable (much of the code in grant.rs is an example of this). When generics must be used despite functions being called with multiple different types, use the non-generic-inner-function method, written about here, and applied in our codebase (see PR 2648 for an example).
Panics
Panics add substantial code size to Tock binaries -- on the order of 50-75 bytes per panic. Returning errors is much cheaper than panicing, and also produces more dependable code. Whenever possible, return errors instead of panicing. Often, this will not only mean avoiding explicit panics: many core library functions panic internally depending on the input.
The most common panics in Tock binaries are from array accesses, but these can often be ergonomically replaced with result-based error handling:
#![allow(unused)] fn main() { // BAD: produces bloat fn do_stuff(&mut self) -> Result<(), ErrorCode> { if self.my_array[4] == 7 { self.other_array[3] = false; Ok(()) } else { Err(ErrorCode::SIZE) } } // GOOD fn do_stuff(&mut self) -> Result<(), ErrorCode> { if self.my_array.get(4).ok_or(ErrorCode::FAIL)? == 7 { *(self.other_array.get_mut(3).ok_or(ErrorCode::FAIL)?) = false; Ok(()) } else { Err(ErrorCode::SIZE) } } }
Similarly, avoid code that could divide by 0, and avoid signed division which
could divide a types MIN value by -1. Finally, avoid using unwrap() /
expect(), and make sure to give the compiler enough information that it can
guarantee copy_from_slice() is only being called on two slices of equal
length.
Formatting overhead
Implementations of fmt::Debug and fmt::Display are expensive -- the core
library functions they rely on include multiple panics and lots of (size)
expensive formatting/unicode code that is unnecessary for simple use cases. This
is well-documented
elsewhere.
Accordingly, use #[derive(Debug)] and fmt::Display sparingly. For simple
enums, manual to_string(&self) -> &str methods can be substantially cheaper.
For example, consider the following enum/use:
#![allow(unused)] fn main() { // BAD #[derive(Debug)] enum TpmState { Idle, Ready, CommandReception, CommandExecutionComplete, CommandExecution, CommandCompletion, } let tpm_state = TpmState::Idle; debug!("{:?}", tpm_state); // GOOD enum TpmState { Idle, Ready, CommandReception, CommandExecutionComplete, CommandExecution, CommandCompletion, } impl TpmState { fn to_string(&self) -> &str { use TpmState::*; match self { Idle => "Idle", Ready => "Ready", CommandReception => "CommandReception", CommandExecutionComplete => "CommandExecutionComplete", CommandExecution => "CommandExecution", CommandCompletion => "CommandCompletion", } } } let tpm_state = TpmState::Idle; debug!("{}", tpm_state.to_string()); }
The latter example is 112 bytes smaller than the former, despite being functionally equivalent.
For structs with runtime values that cannot easily be turned into &str
representations this process is not so straightforward, consider whether the
substantial overhead of calling these methods is worth the debugability
improvement.
64 bit division
Avoid all 64 bit division/modulus, it adds ~1kB if used, as the software techniques for performing these are speed oriented. Often bit manipulation approaches will be much cheaper, especially if one of the operands to the division is a compile-time constant.
Global arrays
For global const/static mut variables, don't store collections in arrays
unless all elements of the array are used.
The canonical example of this is GPIO -- if you have 100 GPIO pins, but your binary only uses 3 of them:
#![allow(unused)] fn main() { pub const GPIO_PINS: [Pin; 100] = [//...]; //BAD -- UNUSED PINS STILL IN BINARY // GOOD APPROACH pub const GPIO_PIN_0: Pin = Pin::new(0); pub const GPIO_PIN_1: Pin = Pin::new(1); pub const GPIO_PIN_2: Pin = Pin::new(2); // ...and so on. }
The latter approach ensures that the compiler can remove pins which are not used from the binary.
Combine register accesses
Combine register accesses into as few volatile operations as possible. E.g.
#![allow(unused)] fn main() { regs.dcfg.modify(DevConfig::DEVSPD::FullSpeed1_1); regs.dcfg.modify(DevConfig::DESCDMA::SET); regs.dcfg.modify(DevConfig::DEVADDR.val(0)); }
is much more expensive than:
#![allow(unused)] fn main() { regs.dcfg.modify( DevConfig::DEVSPD::FullSpeed1_1 + DevConfig::DESCDMA::SET + DevConfig::DEVADDR.val(0), ); }
because each individual modify is volatile so the compiler cannot optimize the calls together.
Minimize calls to Grant::enter()
Grants are fundamental to Tock's architecture, but the internal implementation
of Grants are relatively complex. Further, Grants are generic over all types
that are stored in Grants, so multiple copies of many Grant functions end up in
the binary. The largest of these is Grant::enter(), which is called often in
capsule code. That said, it is often possible to reduce the number of calls to
this method. For example: you can combine calls to apps.enter():
#![allow(unused)] fn main() { // BAD -- DONT DO THIS match command_num { 0 => self.apps.enter(|app, _| {app.perform_cmd_0()}, 1 => self.apps.enter(|app, _| {app.perform_cmd_1()}, } // GOOD -- DO THIS self.apps.enter(|app, _| { match command_num { 0 => app.perform_cmd_0(), 1 => app.perform_cmd_1(), } }) }
The latter saves ~100 bytes because each additional call to Grant::enter()
leads to an additional monomorphized copy of the body of Grant::enter().
Scattered additional tips
- Avoid calling functions in
core::str, there is lots of overhead here that is not optimized out. For example: if you have a space separated string, usingtext.split_ascii_whitespace()costs 150 more bytes than usingtext.as_bytes().split(|b| *b == b' ');. - Avoid static mut globals when possible, and favor global constants. static mut variables are placed in .relocate, so they consume both flash and RAM, and cannot be optimized as well because the compiler cannot make its normal aliasing assumptions.
- Use const generics to pass sized arrays instead of slices, unless this will lead to monomorphization. In addition to removing panics on array accesses, this allows for passing smaller objects (references to arrays are just a pointer, slices are pointer + length), and lets the compiler make additional optimizations based on the known array length.
- Test the effect of
#[inline(always/never)]directives, sometimes the result will surprise you. If the savings are small, it is usually better to leave it up to the compiler, for increased resilience to future changes. - For functions that will not be inlined, try to keep arguments/returns in registers. On RISC-V, this means using <= 8 1-word arguments, no arguments > 2 words, and <= 2 words in return value.
Reducing the size of an out-of-tree board
In general, upstream Tock strives to produce small binaries. However, there is often a tension between code size, debugability, and user friendliness. As a result, upstream Tock does not always choose the most minimal configuration possible. For out-of-tree boards especially focused on code size, there are a few steps you can take to further reduce code size:
- Disable the
debug_panic_infooption inkernel/src/config.rs-- this will remove a lot of debug information that is provided in panics, but can reduce code size by 8-12 kB. - Implement your own peripheral struct that does not include peripherals you do
not need. Often, the
DefaultPeripheralsstruct for a chip may include peripherals not used in your project, and the structure of the interrupt handler means that you will pay the code size cost of the unused peripherals unless you implement your own Peripheral struct. The option to do this was first introduced in PR 2069 and is explained there. - Modify your panic handler to not use the
PanicInfostruct. This will allow LLVM to optimize out the paths, panic messages, line numbers, etc. which would otherwise be stored in the binary to allow users to backtrace and debug panics. - Remove the implementation of
debug!(): if you really want size savings, and are ok not printing anything, you can remove the implementation ofdebug!()and replace it with an empty macro. This will remove the code associated with any calls todebug!()in the core kernel or chip crates that you depend on, as well as any remaining code associated with the fmt machinery. - Fine-tune your inline-threshold. This can have a significant impact, but the
ideal value is dependent on your particular code base, and changes as the
compiler does -- update it when you update the compiler version! In practice,
we have observed that very small values are often optimal (e.g., in the range
of 2 to 10). This is done by passing
-C inline-threshold=xto rustc. - Try
opt-level=sinstead ofopt-level=z. In practice,s(when combined with a reduced inline threshold) often seems to produce smaller binaries. This is worth revisiting periodically, given thatzis supposed to lead to smaller binaries thans.
Porting Tock
This guide covers how to port Tock to a new platform.
This guide is a work in progress. Comments and pull requests are appreciated!
Overview
At a high level, to port Tock to a new platform you will need to create a new
"board" as a crate, as well as potentially add additional "chip" and "arch"
crates. The board crate specifies the exact resources available on a hardware
platform by stitching capsules together with the chip crates (e.g. assigning
pins, setting baud rates, allocating hardware peripherals etc.). The chip crate
implements the peripheral drivers (e.g. UART, GPIO, alarms, etc.) for a specific
microcontroller by implementing the traits found in kernel/src/hil. If your
platform uses a microcontroller already supported by Tock then you can use the
existing chip crate. The arch crate implements the low-level code for a specific
hardware architecture (e.g. what happens when the chip first boots and how
system calls are implemented).
Is Tock a Good Fit for my Hardware?
Before porting Tock to a new platform or microcontroller, you should determine if Tock is a good fit. While we do not have an exact rubric, there are some requirements that we generally look for:
-
Must have requirements:
- Memory protection support. This is generally the MPU on Cortex-M platforms or the PMP on RISC-V platforms.
- At least 32-bit support. Tock is not designed for 16-bit platforms.
- Enough RAM and flash to support userspace applications. "Enough" is underspecified, but generally boards should have at least 64 kB of RAM and 128 kB of flash.
-
Generally expected requirements:
- The platform should be 32-bit. Tock may support 64-bit in the future.
- The platform should be single core. A multicore CPU is OK, but the expectation is that only one core will be used with Tock.
Crate Details
This section includes more details on what is required to implement each type of crate for a new hardware platform.
arch Crate
Tock currently supports the ARM Cortex-M0, Cortex-M3, and Cortex M4, and the rv32i architectures. There is not much architecture-specific code in Tock, the list is pretty much:
- Syscall entry/exit
- Interrupt configuration
- Top-half interrupt handlers
- MPU configuration (if appropriate)
- Power management configuration (if appropriate)
It would likely be fairly easy to port Tock to another ARM Cortex M (specifically the M0+, M23, M4F, or M7) or another rv32i variant. It will probably be more work to port Tock to other architectures. While we aim to be architecture agnostic, this has only been tested on a small number of architectures.
If you are interested in porting Tock to a new architecture, it's likely best to reach out to us via email or Slack before digging in too deep.
chip Crate
The chip crate is specific to a particular microcontroller, but should attempt
to be general towards a family of microcontrollers. For example, support for the
nRF58240 and nRF58230 microcontrollers is shared in the chips/nrf52 and
chips/nrf5x crates. This helps reduce duplicated code and simplifies adding
new specific microcontrollers.
The chip crate contains microcontroller-specific implementations of the
interfaces defined in kernel/src/hil.
Chips have a lot of features and Tock supports a large number of interfaces to express them. Build up the implementation of a new chip incrementally. Get reset and initialization code working. Set it up to run on the chip's default clock and add a GPIO interface. That's a good point to put together a minimal board that uses the chip and validate with an end-to-end userland application that uses GPIOs.
Once you have something small like GPIOs working, it's a great time to open a pull request to Tock. This lets others know about your efforts with this chip and can hopefully attract additional support. It also is a chance to get some feedback from the Tock core team before you have written too much code.
Moving forward, chips tend to break down into reasonable units of work.
Implement something like kernel::hil::UART for your chip, then submit a pull
request. Pick a new peripheral and repeat!
Historically, Tock chips defined peripherals as static mut global variables,
which made them easy to access but encouraged use of unsafe code and prevented
boards from instantiating only the set of peripherals they needed. Now,
peripherals are instantiated at runtime in main.rs, which resolves these
issues. To prevent each board from having to instantiate peripherals
individually, chips should provide a ChipNameDefaultPeripherals struct that
defines and creates all peripherals available for the chip in Tock. This will be
used by upstream boards using the chip, without forcing the overhead and code
size of all peripherals on more minimal out-of-tree boards.
Tips and Tools
- Using System View Description (SVD) files for specific microcontrollers can
help with setting up the register mappings for individual peripherals. See the
tools/svd2regs.pytool (./svd2regs.py -h) for help with automatically generating the register mappings.
board Crate
The board crate, in boards/src, is specific to a physical hardware platform.
The board file essentially configures the kernel to support the specific
hardware setup. This includes instantiating drivers for sensors, mapping
communication buses to those sensors, configuring GPIO pins, etc.
Tock is leveraging "components" for setting up board crates. Components are contained structs that include all of the setup code for a particular driver, and only require boards to pass in the specific options that are unique to the particular platform. For example:
#![allow(unused)] fn main() { let isl29035 = components::isl29035::Isl29035Component::new(sensors_i2c, mux_alarm) .finalize(components::isl29035_component_static!(sam4l::ast::Ast)); let ambient_light = components::isl29035::AmbientLightComponent::new( board_kernel, capsules::ambient_light::DRIVER_NUM, isl29035, ) .finalize(components::ambient_light_component_static!()); }
instantiates the components for a specific light sensor (the ISL29035) and for
an ambient light sensor interface for userspace. Board initiation should be
largely done using components, but not all components have been created yet, so
board files are generally a mix of components and verbose driver instantiation.
The best bet is to start from an existing board's main.rs file and adapt it.
Initially, you will likely want to delete most of the capsules and add them
slowly as you get things working.
Warning:
[capsule name]_component_static!()macros are singletons, and must not be called in a loop or within a function. These macros should instead be instantiated directly inmain().
Component Creation
Creating a component for a capsule has two main benefits: 1) all subtleties and any complexities with setting up the capsule can be contained in the component, reducing the chance for error when using the capsule, and 2) the details of instantiating a capsule are abstracted from the high-level setup of a board. Therefore, Tock encourages boards to use components for their main startup process.
Basic components generally have a structure like the following simplified
example for a Console component:
#![allow(unused)] fn main() { use core::mem::MaybeUninit; /// Helper macro that calls `static_buf!()`. This helps allow components to be /// instantiated multiple times. #[macro_export] macro_rules! console_component_static { () => {{ let console = kernel::static_buf!(capsules::console::Console<'static>); console }}; } /// Main struct that represents the component. This should contain all /// configuration and resources needed to instantiate this capsule. pub struct ConsoleComponent { uart: &'static capsules::virtual_uart::UartDevice<'static>, } impl ConsoleComponent { /// The constructor for the component where the resources and configuration /// are provided. pub fn new( uart: &'static capsules::virtual_uart::UartDevice, ) -> ConsoleComponent { ConsoleComponent { uart, } } } impl Component for ConsoleComponent { /// The statically defined (using `static_buf!()`) structures where the /// instantiated capsules will actually be stored. type StaticInput = &'static mut MaybeUninit<capsules::console::Console<'static>>; /// What will be returned to the user of the component. type Output = &'static capsules::console::Console<'static>; /// Initializes and configures the capsule. unsafe fn finalize(self, s: Self::StaticInput) -> Self::Output { /// Call `.write()` on the static buffer to set its contents with the /// constructor from the capsule. let console = s.write(console::Console::new(self.uart)); /// Set any needed clients or other configuration steps. hil::uart::Transmit::set_transmit_client(self.uart, console); hil::uart::Receive::set_receive_client(self.uart, console); /// Return the static reference to the newly created capsule object. console } } }
Using a basic component like this console example looks like:
#![allow(unused)] fn main() { // in main.rs: let console = ConsoleComponent::new(uart_device) .finalize(components::console_component_static!()); }
When creating components, keep the following steps in mind:
-
All static buffers needed for the component MUST be created using
static_buf!()inside of a macro, and nowhere else. This is necessary to help allow components to be used multiple times (for example if a board has two temperature sensors). Because the samestatic_buf!()call cannot be executed multiple times,static_buf!()cannot be placed in a function, and must be called directly from main.rs. To preserve the ergonomics of components, we wrap the call tostatic_buf!()in a macro, and call the macro from main.rs instead ofstatic_buf!()directly.The naming convention of the macro that wraps
static_buf!()should be[capsule name]_component_static!()to indicate this is where the static buffers are created. The macro should only create static buffers. -
All configuration and resources not related to static buffers should be passed to the
new()constructor of the component object.
Finally, some capsules and resources are templated over chip-specific resources. This slightly complicates defining the static buffers for certain capsules. To ensure that components can be re-used across different boards and microcontrollers, components use the same macro strategy for other static buffers.
#![allow(unused)] fn main() { use core::mem::MaybeUninit; #[macro_export] macro_rules! alarm_mux_component_static { ($A: ty) => {{ let alarm = kernel::static_buf!(capsules::virtual_alarm::MuxAlarm<'static, $A>); alarm }}; } pub struct AlarmMuxComponent<A: 'static + time::Alarm<'static>> { alarm: &'static A, } impl<A: 'static + time::Alarm<'static>> AlarmMuxComponent<A> { pub fn new(alarm: &'static A) -> AlarmMuxComponent<A> { AlarmMuxComponent { alarm } } } impl<A: 'static + time::Alarm<'static>> Component for AlarmMuxComponent<A> { type StaticInput = &'static mut MaybeUninit<capsules::virtual_alarm::MuxAlarm<'static, A>>; type Output = &'static MuxAlarm<'static, A>; unsafe fn finalize(self, s: Self::StaticInput) -> Self::Output { let mux_alarm = s.write(MuxAlarm::new(self.alarm)); self.alarm.set_alarm_client(mux_alarm); mux_alarm } } }
Here, the alarm_mux_component_static!() macro needs the type of the underlying
alarm hardware. The usage looks like:
#![allow(unused)] fn main() { let mux_alarm = components::alarm::AlarmMuxComponent::new(&peripherals.ast) .finalize(components::alarm_mux_component_static!(sam4l::ast::Ast)); }
Board Support
In addition to kernel code, boards also require some support files. These specify metadata such as the board name, how to load code onto the board, and anything special that userland applications may need for this board.
panic!s (aka io.rs)
Each board must author a custom routine to handle panic!s. Most panic!
machinery is handled by the Tock kernel, but the board author must provide some
minimalist access to hardware interfaces, specifically LEDs and/or UART.
As a first step, it is simplest to just get LED-based panic! working. Have
your panic! handler set up a prominent LED and then call
kernel::debug::panic_blink_forever.
If UART is available, the kernel is capable of printing a lot of very helpful
additional debugging information. However, as we are in a panic! situation,
it's important to strip this down to a minimalist implementation. In particular,
the supplied UART must be synchronous (note that this in contrast to the rest of
the kernel UART interfaces, which are all asynchronous). Usually implementing a
very simple Writer that simply writes one byte at a time directly to the UART
is easiest/best. It is not important that panic! UART writer be efficient. You
can then replace the call to
kernel::debug::panic_blink_forever
with a call to
kernel::debug::panic.
For largely historical reasons, panic implementations for all boards live in a
file named io.rs adjacent to the board's main.rs file.
Board Cargo.toml, build.rs
Every board crate must author a top-level manifest, Cargo.toml. In general,
you can probably simply copy this from another board, modifying the board name
and author(s) as appropriate. Note that Tock also includes a build script,
build.rs, that you should also copy. The build script simply adds a dependency
on the kernel layout.
Board Makefile
There is a Makefile in the root of every board crate, at a minimum, the board Makefile must include:
# Makefile for building the tock kernel for the Hail platform
TARGET=thumbv7em-none-eabi # Target triple
PLATFORM=hail # Board name here
include ../Makefile.common # ../ assumes board lives in $(TOCK)/boards/<board>
Tock provides boards/Makefile.common that drives most of the build system. In
general, you should not need to dig into this Makefile -- if something doesn't
seem to be working, hop on slack and ask.
Getting the built kernel onto a board
In addition to building the kernel, the board Makefile should include rules for getting code onto the board. This will naturally be fairly board-specific, but Tock does have two targets normally supplied:
make program: For "plug-'n-plug" loading. Usually these are boards with a bootloader or some other support IC. The expectation is that during normal operation, a user could simply plug in a board and typemake programto load code.make flash: For "more direct" loading. Usually this means that a JTAG or some equivalent interface is being used. Often it implies that external hardware is required, though some of the development kit boards have an integrated JTAG on-board, so external hardware is not a hard and fast rule.make install: This should be an alias to eitherprogramorflash, whichever is the preferred approach for this board.
If you don't support program or flash, you should define an empty rule that explains how to program the board:
.PHONY: program
echo "To program, run SPEICAL_COMMAND"
exit 1
Board README
Every board must have a README.md file included in the top level of the crate.
This file must:
- Provide links to information about the platform and how to purchase/acquire the platform. If there are different versions of the platform the version used in testing should be clearly specified.
- Include an overview on how to program the hardware, including any additional dependencies that are required.
Loading Apps
Ideally, Tockloader will support loading apps on to your board (perhaps with some flags set to specific values). If that is not the case, please create an issue on the Tockloader repo so we can update the tool to support loading code onto your board.
Common Pitfalls
- Make sure you are careful when setting up the board
main.rsfile. In particular, it is important to ensure that all of the requiredset_clientfunctions for capsules are called so that callbacks are not lost. Forgetting these often results in the platform looking like it doesn't do anything.
Adding a Platform to Tock Repository
After creating a new platform, we would be thrilled to have it included in mainline Tock. However, Tock has a few guidelines for the minimum requirements of a board that is merged into the main Tock repository:
- The hardware must be widely available. Generally that means the hardware platform can be purchased online.
- The port of Tock to the platform must include at least:
Consolesupport so thatdebug!()andprintf()work.- Timer support.
- GPIO support with interrupt functionality.
- The contributor must be willing to maintain the platform, at least initially, and help test the platform for future releases.
With these requirements met we should be able to merge the platform into Tock relatively quickly. In the pull request to add the platform, you should add this checklist:
### New Platform Checklist
- [ ] Hardware is widely available.
- [ ] I can support the platform, which includes release testing for the
platform, at least initially.
- Basic features are implemented:
- [ ] `Console`, including `debug!()` and userspace `printf()`.
- [ ] Timers.
- [ ] GPIO with interrupts.
Porting Tock 1.x Capsules to Tock 2.0
This guide covers how to port Tock capsules from the 1.x system call API to the 2.x system call API. It outlines how the API has changed and gives code examples.
Overview
Version 2 of the Tock operating system changes the system call API and ABI in several ways. This document describes the changes and their implications to capsule implementations. It gives guidance on how to port a capsule from Tock 1.x to 2.0.
Tock 2.0 System Call API
The Tock system call API is implemented in the Driver trait. Tock 2.0 updates
this trait to be more precise and correctly support Rust's memory semantics.
SyscallDriver
This is the signature for the 2.0 Driver trait:
#![allow(unused)] fn main() { pub trait SyscallDriver { fn command(&self, which: usize, r2: usize, r3: usize, caller_id: ProcessId) -> CommandResult { CommandResult::failure(ErrorCode::NOSUPPORT) } fn allow_readwrite( &self, process_id: ProcessId, allow_num: usize, buffer: ReadWriteProcessBuffer, ) -> Result<ReadWriteProcessBuffer, (ReadWriteProcessBuffer, ErrorCode)> { Err((slice, ErrorCode::NOSUPPORT)) } fn allow_readonly( &self, process_id: ProcessId, allow_num: usize, buffer: ReadOnlyProcessBuffer, ) -> Result<ReadOnlyProcessBuffer, (ReadOnlyProcessBuffer, ErrorCode)> { Err((slice, ErrorCode::NOSUPPORT)) } fn allocate_grant(&self, processid: ProcessId) -> Result<(), crate::process::Error>; } }
The first thing to note is that there are now two versions of the old allow
method: one for a read/write buffer and one for a read-only buffer. They pass
different types of slices.
The second thing to note is that the two methods that pass pointers,
allow_readwrite and allow_readonly, return a Result. The success case
(Ok) returns a pointer back in the form of an application slice. The failure
case (Err) returns the same structure back but also has an ErrorCode.
These two methods follow a swapping calling convention: you pass in a pointer
and get one back. If the call fails, you get back the one you passed in. If the
call succeeds, you get back the one the capsule previously had. That is, you
call allow_readwrite with an application slice A and it succeeds, then the
next successful call to allow_readwrite will return A.
These swapping semantics allow the kernel to maintain an invariant that there is
only one instance of a particular application slice at any time. Since an
application slice represents a region of application memory, having two objects
representing the same region of memory violates Rust's memory guarantees. When
the scheduler calls allow_readwrite, allow_readonly or subscribe, it moves
the application slice or callback into the capsule. The capsule, in turn, moves
the previous one out.
The command method behaves differently, because commands only operate on
values, not pointers. Each command has its own arguments and number of return
types. This is encapsulated within CommandResult.
The third thing to note is that there is no longer a subscribe() method. This
has been removed and instead all upcalls are managed entirely by the kernel.
Scheduling an upcall is now done with a provided object from entering a grant.
The fourth thing to note is the new allocate_grant() method. This allows the
kernel to request that a capsule enters its grant region so that it is allocated
for the specific process. This should be implemented with a roughly boilerplate
implementation described below.
Porting Capsules and Example Code
The major change you'll see in porting your code is that capsule logic becomes
simpler: Options have been replaced by structures, and there's a basic
structure to swapping application slices.
Examples of command and CommandResult
The LED capsule implements only commands, so it provides a very simple example of what commands look like.
#![allow(unused)] fn main() { fn command(&self, command_num: usize, data: usize, _: usize, _: ProcessId) -> CommandResult { self.leds .map(|leds| { match command_num { ... // on 1 => { if data >= leds.len() { CommandResult::failure(ErrorCode::INVAL) /* led out of range */ } else { leds[data].on(); CommandResult::success() } }, }
The capsule dispatches on the command number. It uses the first argument,
data, as which LED to turn activate. It then returns either a
CommandResult::Success (generated with CommandResult::success()) or a
CommandResult::Failure (generated with CommandResult::failure()).
A CommandResult is a wrapper around a GenericSyscallReturnValue,
constraining it to the versions of GenericSyscallReturnValue that can be
returned by a command.
Here is a slightly more complex implementation of Command, from the console
capsule.
#![allow(unused)] fn main() { fn command(&self, cmd_num: usize, arg1: usize, _: usize, processid: ProcessId) -> CommandResult{ let res = match cmd_num { 0 => Ok(Ok(())), 1 => { // putstr let len = arg1; self.apps.enter(processid, |app, _| { self.send_new(processid, app, len) }).map_err(ErrorCode::from) }, 2 => { // getnstr let len = arg1; self.apps.enter(processid, |app, _| { self.receive_new(processid, app, len) }).map_err(ErrorCode::from) }, 3 => { // Abort RX self.uart.receive_abort(); Ok(Ok(())) } _ => Err(ErrorCode::NOSUPPORT) }; match res { Ok(r) => { CommandResult::from(r), }, Err(e) => CommandResult::failure(e) } } }
This implementation is more complex because it uses a grant region that stores
per-process state. Grant::enter returns a
Result<Result<(), ErrorCode>, grant::Error>. An outer Err return type means
the grant could not be entered successfully and the closure was not invoked:
this returns what grant error occurred. An Ok return type means the closure
was executed, but it is possible that an error occurred during its execution. So
there are three cases:
Ok(Ok(()))Ok(Err(ErrorCode:: error cases))Err(grant::Error)
The bottom match statement separates these two. In the Ok() case, it checks
whether the inner Result contains an Err(ErrorCode). If not (Err), this
means it was a success, and the result was a success, so it returns a
CommandResult::Success. If it can be converted into an error code, or if the
grant produced an error, it returns a CommandResult::Failure.
One of the requirements of commands in 2.0 is that each individual command_num
have a single failure return type and a single success return size. This means
that for a given command_num, it is not allowed for it to sometimes return
CommandResult::Success and other times return Command::SuccessWithValue, as
these are different sizes. As part of easing this transition, Tock 2.0 removed
the SuccessWithValue variant of ReturnCode, and then later in the transition
removed ReturnCode entirely, replacing all uses of ReturnCode with
Result<(), ErrorCode>.
If, while porting, you encounter a construction of
ReturnCode::SuccessWithValue{v} in command() for an out-of-tree capsule,
replace it with a construction of CommandResult::success_u32(v), and make sure
that it is impossible for that command_num to return CommandResult::Success in
any other scenario.
ReturnCode versus ErrorCode
Because the new system call ABI explicitly distinguishes failures and successes,
it replaces ReturnCode with ErrorCode to denote which error in failure
cases. ErrorCode is simply ReturnCode without any success cases, and with
names that remove the leading E since it's obvious they are an error:
ErrorCode::FAIL is the equivalent of ReturnCode::EFAIL. ReturnCode is
still used in the kernel, but may be deprecated in time.
Examples of allow_readwrite and allow_readonly
Because ReadWriteProcessBuffer and ReadOnlyProcessBuffer represent access to
userspace memory, the kernel tightly constrains how these objects are
constructed and passed. They do not implement Copy or Clone, so only one
instance of these objects exists in the kernel at any time.
Note that console has one ReadOnlyProcessBuffer for printing/putnstr and
one ReadWriteProcessBuffer for reading/getnstr. Here is a sample
implementation of allow_readwrite for the console capsule:
#![allow(unused)] fn main() { pub struct App { write_buffer: ReadOnlyProcessBuffer, ... fn allow_readonly( &self, process_id: ProcessId, allow_num: usize, mut buffer: ReadOnlyProcessBuffer, ) -> Result<ReadOnlyProcessBuffer, (ReadOnlyProcessBuffer, ErrorCode)> { let res = match allow_num { 1 => self .apps .enter(processid, |process_id, _| { mem::swap(&mut process_id.write_buffer, &mut buffer); }) .map_err(ErrorCode::from), _ => Err(ErrorCode::NOSUPPORT), }; if let Err(e) = res { Err((slice, e)) } else { Ok(slice) } } }
The implementation is quite simple: if there is a valid grant region, the method
swaps the passed ReadOnlyProcessBuffer and the one in the App region,
returning the one that was in the app region. It then returns slice, which is
either the passed slice or the swapped out one.
The new subscription mechanism
Tock 2.0 introduces a guarantee for the subscribe syscall that for every unique
subscribe (i.e. (driver_num, subscribe_num) tuple), userspace will be returned
the previously subscribe upcall (or null if this is the first subscription).
This guarantee means that once an upcall is returned, the kernel will never
schedule the upcall again (unless it is re-subscribed in the future), and
userspace can deallocate the upcall function if it so chooses.
Providing this guarantee necessitates changes to the capsule interface for
declaring and using upcalls. To declare upcalls, a capsule now provides the
number of upcalls as a templated value on Grant.
#![allow(unused)] fn main() { struct capsule { ... apps: Grant<T, NUM_UPCALLS>, ... } }
The second parameter tells the kernel how many upcalls to save. Capsules no
longer can store an object of type Upcall in their grant region.
To ensure that the kernel can store the upcalls, a capsule must implement the
allocate_grant() method. The typical implementation looks like:
#![allow(unused)] fn main() { fn allocate_grant(&self, processid: ProcessId) -> Result<(), kernel::procs::Error> { self.apps.enter(processid, |_, _| {}) } }
Finally to schedule an upcall any calls to app.upcall.schedule() should be
replaced with code like:
#![allow(unused)] fn main() { self.apps.enter(processid, |app, upcalls| { upcalls.schedule_upcall(upcall_number, (r0, r1, r2)); }); }
The parameter upcall_number matches the subscribe_num the process used with
the subscribe syscall.
Using ReadOnlyProcessBuffer and ReadWriteProcessBuffer: console
One key change in the Tock 2.0 API is explicitly acknowledging that application slices may disappear at any time. For example, if a process passes a slice into the kernel, it can later swap it out with a later allow call. Similarly, application grants may disappear at any time.
This means that ReadWriteProcessBuffer and ReadOnlyProcessBuffer now do not
allow you to obtain their pointers and lengths. Instead, they provide a map_or
method. This is how console uses this, for example, to copy process data into
its write buffer and call the underlying transmit_buffer:
#![allow(unused)] fn main() { fn send(&self, process_id: ProcessId, app: &mut App) { if self.tx_in_progress.is_none() { self.tx_in_progress.set(process_id); self.tx_buffer.take().map(|buffer| { let len = app.write_buffer.map_or(0, |data| data.len()); if app.write_remaining > len { // A slice has changed under us and is now smaller than // what we need to write -- just write what we can. app.write_remaining = len; } let transaction_len = app.write_buffer.map_or(0, |data| { for (i, c) in data[data.len() - app.write_remaining..data.len()] .iter() .enumerate() { if buffer.len() <= i { return i; } buffer[i] = *c; } app.write_remaining }); app.write_remaining -= transaction_len; let (_err, _opt) = self.uart.transmit_buffer(buffer, transaction_len); }); } else { app.pending_write = true; } } }
Note that the implementation looks at the length of the slice: it doesn't copy it out into grant state. If a slice was suddenly truncated, it checks and adjust the amount it has written.
Using ReadOnlyProcessBuffer and ReadWriteProcessBuffer: spi_controller
This is a second example, taken from spi_controller. Because SPI transfers are
bidirectional, there is an RX buffer and a TX buffer. However, a client can
ignore what it receives, and only pass a TX buffer if it wants: the RX buffer
can be zero length. As with other bus transfers, the SPI driver needs to handle
the case when its buffers change in length under it. For example, a client may
make the following calls:
allow_readwrite(rx_buf, 200)allow_readonly(tx_buf, 200)command(SPI_TRANSFER, 200)- (after some time, while transfer is ongoing)
allow_readonly(tx_buf2, 100)
Because the underlying SPI tranfer typically uses DMA, the buffer passed to the
peripheral driver is static. The spi_controller has fixed-size static
buffers. It performs a transfer by copying application slice data into/from
these buffers. A very long application transfer may be broken into multiple
low-level transfers.
If a transfer is smaller than the static buffer, it is simple: spi_controller
copies the application slice data into its static transmit buffer and starts the
transfer. If the process rescinds the buffer, it doesn't matter, as the capsule
has the data. Similarly, the presence of a receive application slice only
matters when the transfer completes, and the capsule decides whether to copy
what it received out.
The principal complexity is when the buffers change during a low-level transfer and then the capsule needs to figure out whether to continue with a subsequent low-level transfer or finish the operation. The code needs to be careful to not access past the end of a slice and cause a kernel panic.
The code looks like this:
#![allow(unused)] fn main() { // Assumes checks for busy/etc. already done // Updates app.index to be index + length of op fn do_next_read_write(&self, app: &mut App) { let write_len = self.kernel_write.map_or(0, |kwbuf| { let mut start = app.index; let tmp_len = app.app_write.map_or(0, |src| { let len = cmp::min(app.len - start, self.kernel_len.get()); let end = cmp::min(start + len, src.len()); start = cmp::min(start, end); for (i, c) in src.as_ref()[start..end].iter().enumerate() { kwbuf[i] = *c; } end - start }); app.index = start + tmp_len; tmp_len }); self.spi_master.read_write_bytes( self.kernel_write.take().unwrap(), self.kernel_read.take(), write_len, ); } }
The capsule keeps track of its current write position with app.index. This
points to the first byte of untransmitted data. When a transfer starts in
response to a system call, the capsule checks that the requested length of the
transfer is not longer than the length of the transmit buffer, and also that the
receive buffer is either zero or at least as long. The total length of a
transfer is stored in app.len.
But if the transmit buffer is swapped during a transfer, it may be shorter than
app.index. In the above code, the variable len stores the desired length of
the low-level transfer: it's the minimum of data remaining in the transfer and
the size of the low-level static buffer. The variable end stores the index of
the last byte that can be safely transmitted: it is the minimum of the low-level
transfer end (start + len) and the length of the application slice
(src.len()). Note that end can be smaller than start if the application
slice is shorter than the current write position. To handle this case, start
is set to be the minimum of start and end: the transfer will be of length
zero.
VSCode Debugging
This is a guide on how to perform remote debugging via JTAG in Tock using VSCode (at the moment (Feb 2018) nRF51-DK and nRF52-DK are supported).
Requirements
Installation
- Install VSCode for your platform
- Open VSCode
- Enter the extensions menu by pressing
View/Extensions - Install
Native DebugandRustin that view by searching for them
You are now good to run the debugger and the debugging configurations are already set for you. But, if you want change the configuration, for example to run some special GDB commands before starting, you can do that here.
Enabling breakpoints
Let's now test if this works by configuring some breakpoints:
-
Enter
Explorer modeby pressingView/Explorer -
Browse and open a file where you want to enable a breakpoint
-
In my case I want to have a breakpoint in the
mainin main.rs -
Click to the left of the line number to enable a breakpoint. You should see a red dot now as the figure below:

Running the debugger
-
You need to start the
GDB Serverbefore launching a debugging session in VSCode (check out the instructions for how to do that for your board). -
Enter
Debug modein VSCode by pressingView/Debug. You should now see a debug view somewhere on your screen as in the figure below:
-
Choose your board in the scroll bar and then click on the green arrow or
Debug/Start Debugging. -
You should now see that program stopped at the breakpoint as the figure below:
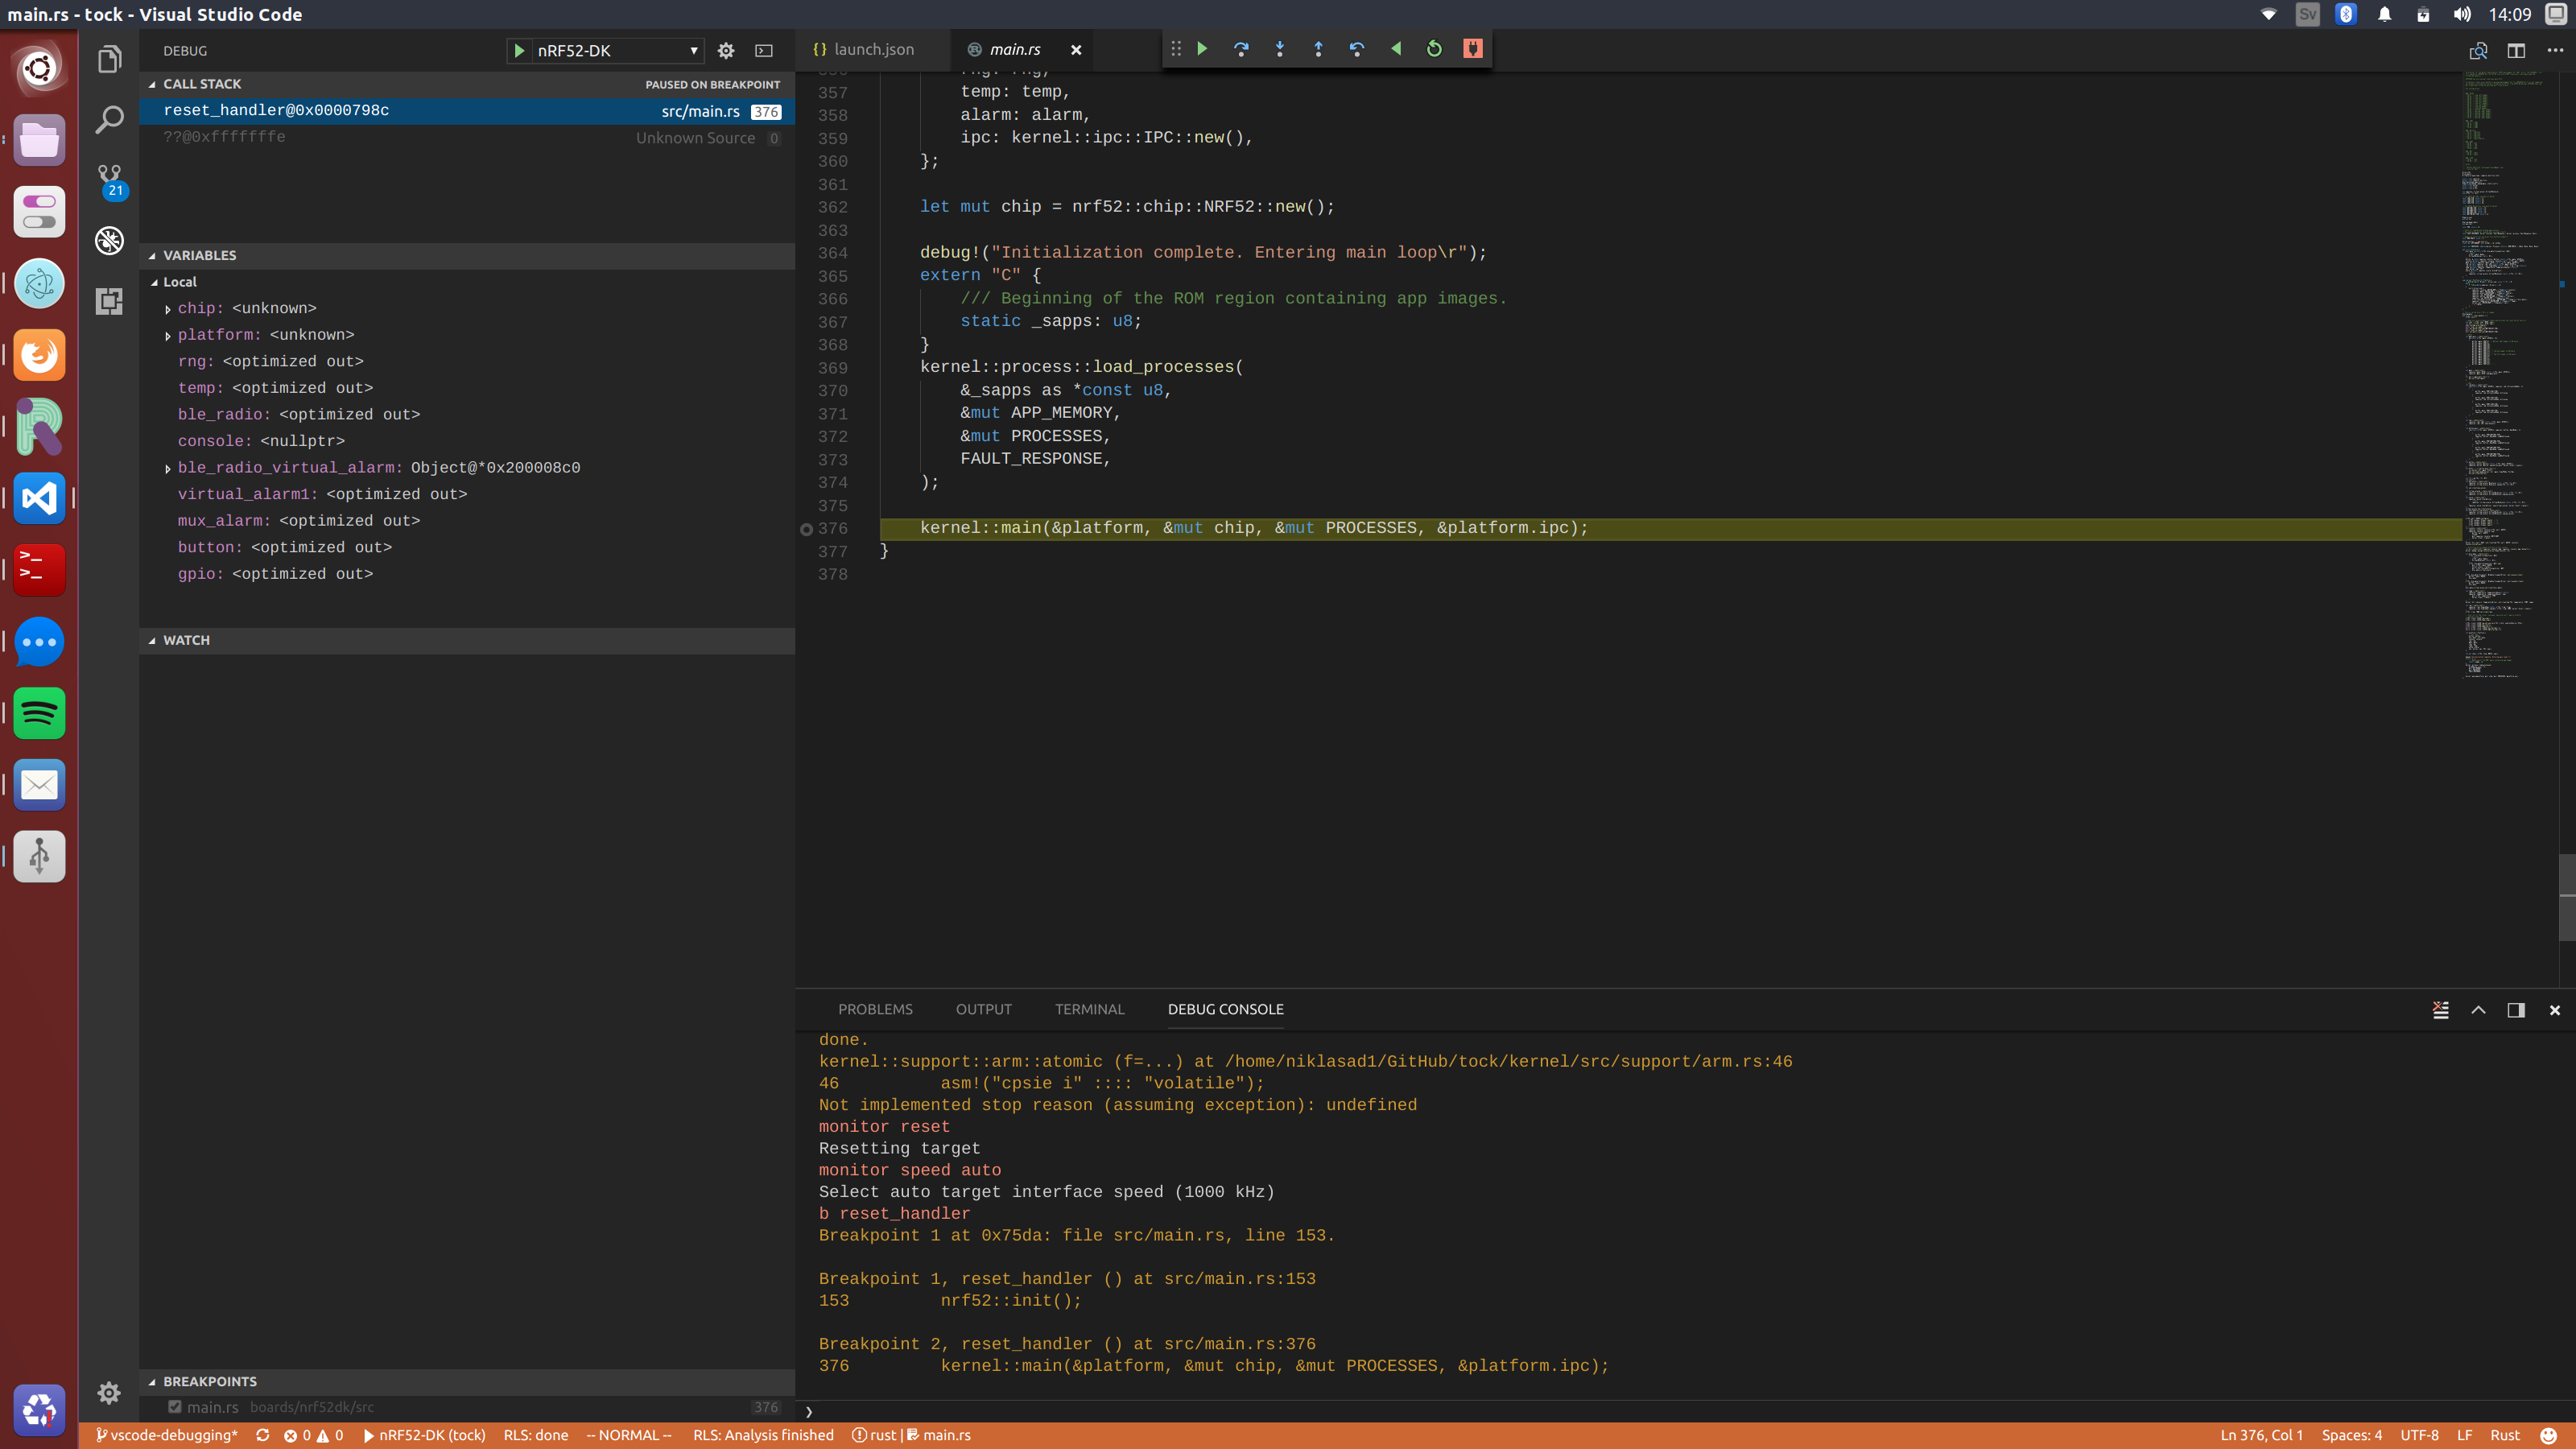
-
Finally, if want to use specific GDB commands you can use the debug console in VSCode which is very useful.
Issues
-
Sometimes GDB behaves unpredictably and stops at the wrong source line. For example, sometimes we have noticed that debugger stops at
/kernel/src/support/arm.rsinstead of themain. If that occurs just pressstep overand it should hopefully jump to correct location. -
Rust in
release modeis optimizing using things such as inlining and mangling which makes debugging harder and values may not be visible. To perform more reliable debugging mark the important functions with:#[no_mangle] #[inline(never)] -
Enable
rust-pretty printeror something similar because viewing variables is very limited in VSCode.
Kernel Documentation
This portion of the Tock Book describes details of the design and structure of the Tock kernel.
For API-level documentation, view the rustdocs.
Tock Overview
Tock is a secure, embedded operating system for Cortex-M and RISC-V microcontrollers. Tock assumes the hardware includes a memory protection unit (MPU), as systems without an MPU cannot simultaneously support untrusted processes and retain Tock's safety and security properties. The Tock kernel and its extensions (called capsules) are written in Rust.
Tock can run multiple, independent untrusted processes written in any language. The number of processes Tock can simultaneously support is constrained by MCU flash and RAM. Tock can be configured to use different scheduling algorithms, but the default Tock scheduler is preemptive and uses a round-robin policy. Tock uses a microkernel architecture: complex drivers and services are often implemented as untrusted processes, which other processes, such as applications, can invoke through inter-process commmunication (IPC).
This document gives an overview of Tock's architecture, the different classes of code in Tock, the protection mechanisms it uses, and how this structure is reflected in the software's directory structure.
Tock Architecture
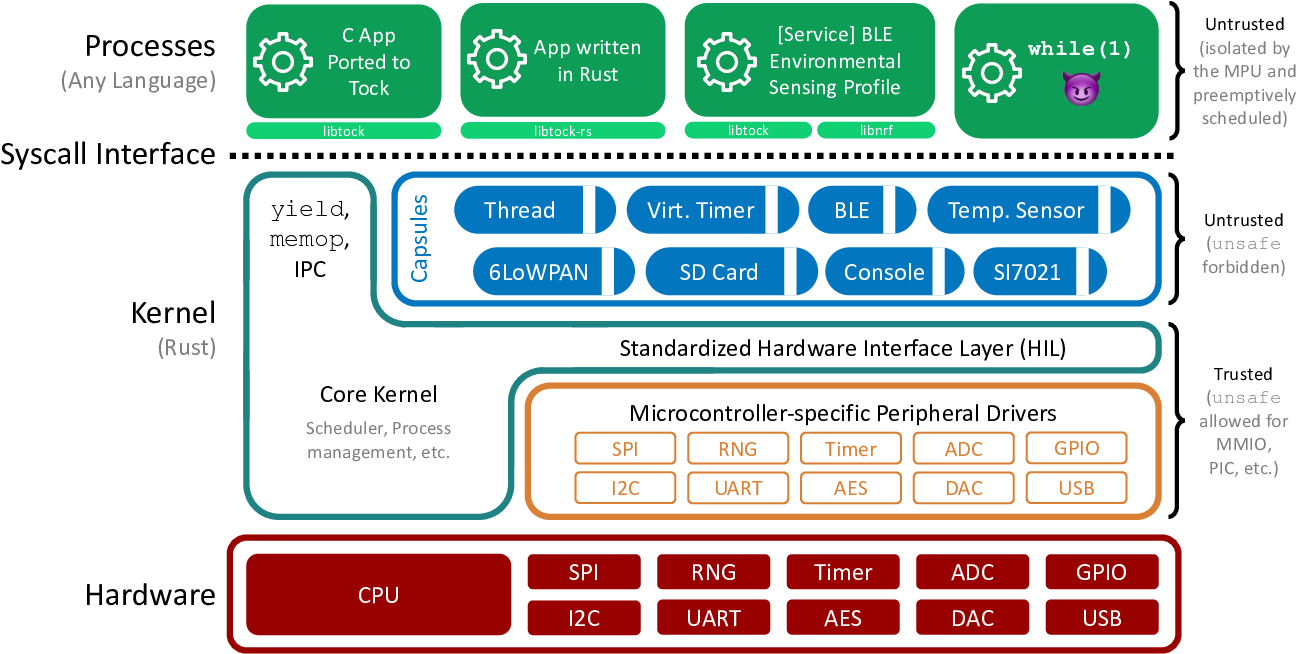
The above Figure shows Tock's architecture. Code falls into one of three categories: the core kernel, capsules, and processes.
The core kernel and capsules are both written in Rust. Rust is a type-safe systems language; other documents discuss the language and its implications to kernel design in greater detail, but the key idea is that Rust code can't use memory differently than intended (e.g., overflow buffers, forge pointers, or have pointers to dead stack frames). Because these restrictions prevent many things that an OS kernel has to do (such as access a peripheral that exists at a memory address specified in a datasheet), the very small core kernel is allowed to break them by using "unsafe" Rust code. Capsules, however, cannot use unsafe features. This means that the core kernel code is very small and carefully written, while new capsules added to the kernel are safe code and so do not have to be trusted.
Processes can be written in any language. The kernel protects itself and other processes from bad process code by using a hardware memory protection unit (MPU). If a process tries to access memory it's not allowed to, this triggers an exception. The kernel handles this exception and kills the process.
The kernel provides four major system calls:
- command: makes a call from the process into the kernel
- subscribe: registers a callback in the process for an upcall from the kernel
- allow: gives kernel access to memory in the process
- yield: suspends process until after a callback is invoked
Every system call except yield is non-blocking. Commands that might take a long time (such as sending a message over a UART) return immediately and issue a callback when they complete. The yield system call blocks the process until a callback is invoked; userland code typically implements blocking functions by invoking a command and then using yield to wait until the callback completes.
The command, subscribe, and allow system calls all take a driver ID as their first parameter. This indicates which driver in the kernel that system call is intended for. Drivers are capsules that implement the system call.
Tock Design
Most operating systems provide isolation between components using a process-like abstraction: each component is given its own slice of the system memory (for its stack, heap, data) that is not accessible by other components. Processes are great because they provide a convenient abstraction for both isolation and concurrency. However, on resource-limited systems, like microcontrollers with much less than 1MB of memory, this approach leads to a trade-off between isolation granularity and resource consumption.
Tock's architecture resolves this trade-off by using a language sandbox to isolated components and a cooperative scheduling model for concurrency in the kernel. As a result, isolation is (more or less) free in terms of resource consumption at the expense of preemptive scheduling (so a malicious component could block the system by, e.g., spinning in an infinite loop).
To first order, all components in Tock, including those in the kernel, are mutually distrustful. Inside the kernel, Tock achieves this with a language-based isolation abstraction called capsules that incurs no memory or computation overhead. In user-space, Tock uses (more-or-less) a traditional process model where process are isolated from the kernel and each other using hardware protection mechanisms.
In addition, Tock is designed with other embedded systems-specific goals in mind. Tock favors overall reliability of the system and discourages components (prevents when possible) from preventing system progress when buggy.
Architecture
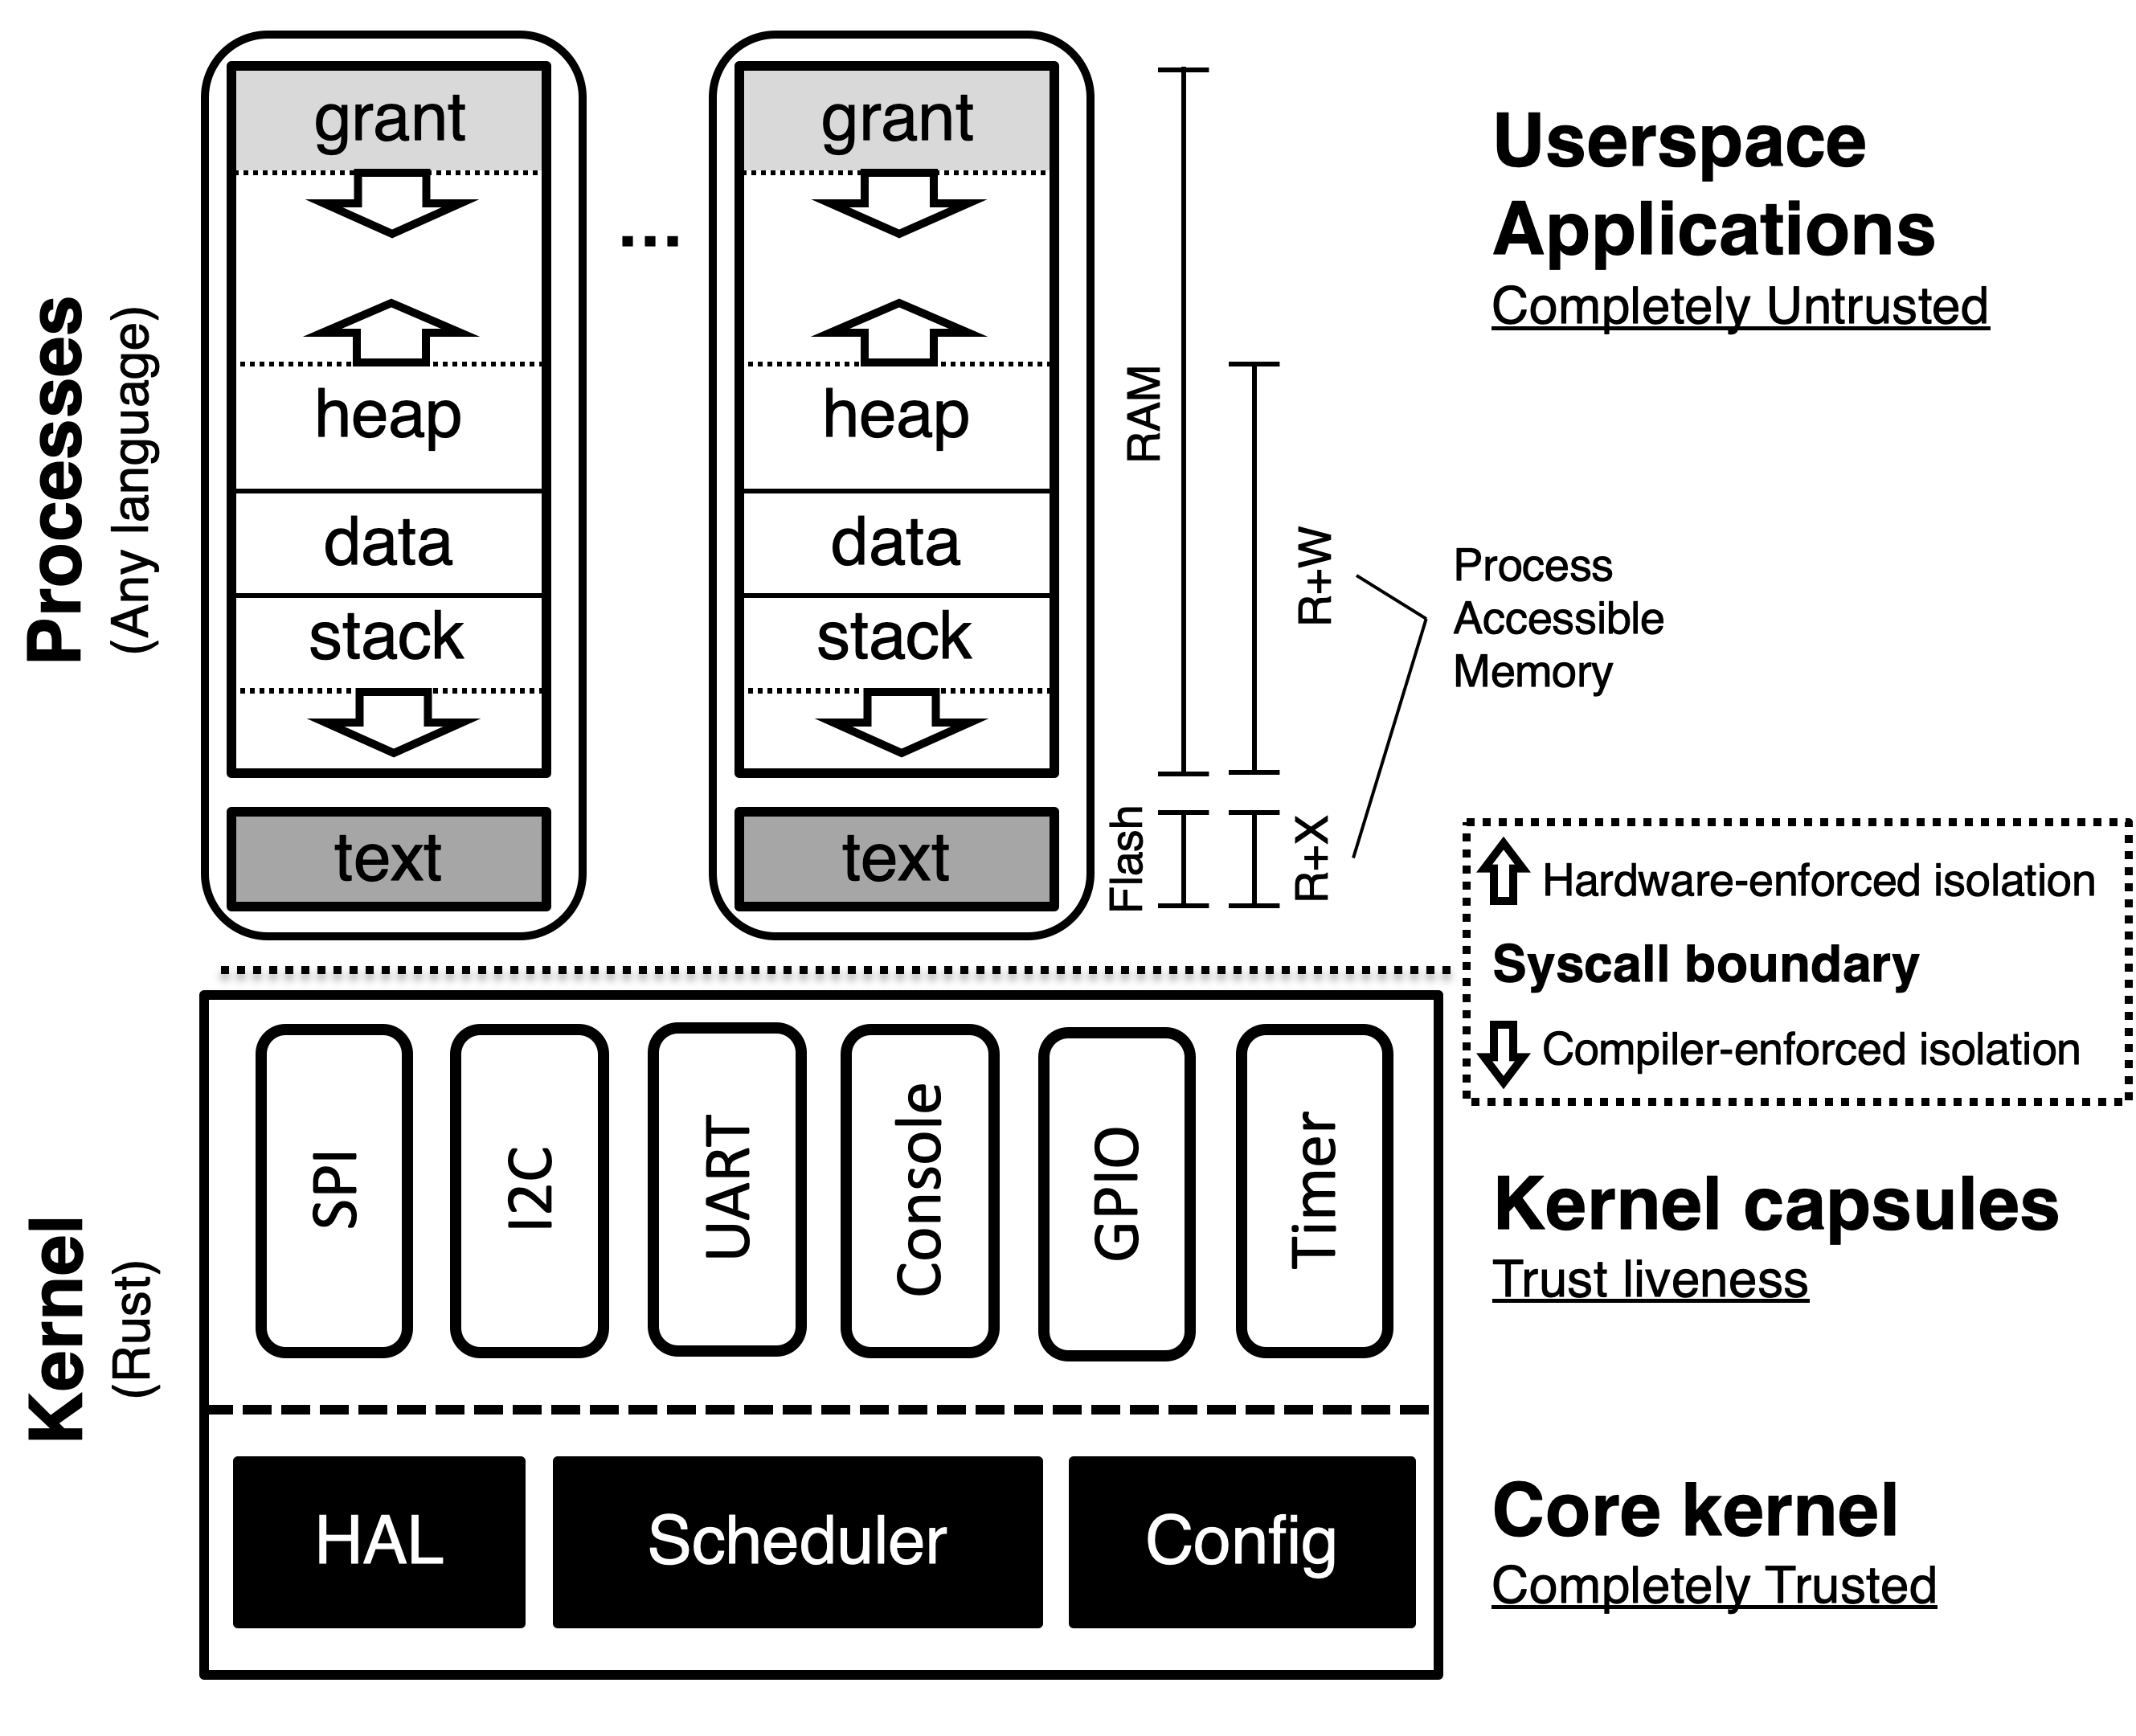
Tock includes three architectural components: a small trusted kernel, written in Rust, which implements a hardware abstraction layer (HAL); scheduler; and platform-specific configuration. Other system components are implemented in one of two protection mechanisms: capsules, which are compiled with the kernel and use Rust’s type and module systems for safety, and processes, which use the MPU for protection at runtime.
System components (an application, driver, virtualization layer, etc.) can be implemented in either a capsule or process, but each mechanism trades off concurrency and safety with memory consumption, performance, and granularity.
| Category | Capsule | Process |
|---|---|---|
| Protection | Language | Hardware |
| Memory Overhead | None | Separate stack |
| Protection Granularity | Fine | Coarse |
| Concurrency | Cooperative | Preemptive |
| Update at Runtime | No | Yes |
As a result, each is more appropriate for implementing different components. In general, drivers and virtualization layers are implemented as capsules, while applications and complex drivers using existing code/libraries, such as networking stacks, are implemented as processes.
Capsules
A capsule is a Rust struct and associated functions. Capsules interact with each other directly, accessing exposed fields and calling functions in other capsules. Trusted platform configuration code initializes them, giving them access to any other capsules or kernel resources they need. Capsules can protect internal state by not exporting certain functions or fields.
Capsules run inside the kernel in privileged hardware mode, but Rust’s type and module systems protect the core kernel from buggy or malicious capsules. Because type and memory safety are enforced at compile-time, there is no overhead associated with safety, and capsules require minimal error checking. For example, a capsule never has to check the validity of a reference. If the reference exists, it points to valid memory of the right type. This allows extremely fine-grained isolation since there is virtually no overhead to splitting up components.
Rust’s language protection offers strong safety guarantees. Unless a capsule is able to subvert the Rust type system, it can only access resources explicitly granted to it, and only in ways permitted by the interfaces those resources expose. However, because capsules are cooperatively scheduled in the same single-threaded event loop as the kernel, they must be trusted for system liveness. If a capsule panics, or does not yield back to the event handler, the system can only recover by restarting.
Processes
Processes are independent applications that are isolated from the kernel and run with reduced privileges in separate execution threads from the kernel. The kernel schedules processes preemptively, so processes have stronger system liveness guarantees than capsules. Moreover, uses hardware protection to enforce process isolation at runtime. This allows processes to be written in any language and to be safely loaded at runtime.
Memory Layout
Processes are isolated from each other, the kernel, and the underlying hardware explicitly by the hardware Memory Protection Unit (MPU). The MPU limits which memory addresses a process can access. Accesses outside of a process's permitted region result in a fault and trap to the kernel.
Code, stored in flash, is made accessible with a read-only memory protection region. Each process is allocated a contiguous region of RAM. One novel aspect of a process is the presence of a "grant" region at the top of the address space. This is memory allocated to the process covered by a memory protection region that the process can neither read nor write. The grant region, discussed below, is needed for the kernel to be able to borrow memory from a process in order to ensure liveness and safety in response to system calls.
Grants
Capsules are not allowed to allocate memory dynamically since dynamic allocation in the kernel makes it hard to predict if memory will be exhausted. A single capsule with poor memory management could cause the rest of the kernel to fail. Moreover, since it uses a single stack, the kernel cannot easily recover from capsule failures.
However, capsules often need to dynamically allocate memory in response to process requests. For example, a virtual timer driver must allocate a structure to hold metadata for each new timer any process creates. Therefore, Tock allows capsules to dynamically allocate from the memory of a process making a request.
It is unsafe, though, for a capsule to directly hold a reference to process memory. Processes crash and can be dynamically loaded, so, without explicit checks throughout the kernel code, it would not be possible to ensure that a reference to process memory is still valid.
For a capsule to safely allocate memory from a process, the kernel must enforce three properties:
-
Allocated memory does not allow capsules to break the type system.
-
Capsules can only access pointers to process memory while the process is alive.
-
The kernel must be able to reclaim memory from a terminated process.
Tock provides a safe memory allocation mechanism that meets these three requirements through memory grants. Capsules can allocate data of arbitrary type from the memory of processes that interact with them. This memory is allocated from the grant segment.
Just as with buffers passed through allow, references to granted memory are wrapped in a type-safe struct that ensures the process is still alive before dereferencing. Unlike shared buffers, which can only be a buffer type in a capsule, granted memory can be defined as any type. Therefore, processes cannot access this memory since doing so might violate type-safety.
In-Kernel Design Principles
To help meet Tock's goals, encourage portability across hardware, and ensure a sustainable operating system, several design principles have emerged over time for the Tock kernel. These are general principles that new contributions to the kernel should try to uphold. However, these principles have been informed by Tock's development, and will likely continue to evolve as Tock and the Rust ecosystem evolve.
Role of HILs
Generally, the Tock kernel is structured into three layers:
-
Chip-specific drivers: these typically live in a crate in the
chipssubdirectory, or an equivalent crate in an different repository (e.g. the Titan port is out of tree but itsh1bcrate is the equivalent here). These drivers have implementations that are specific to the hardware of a particular microcontroller. Ideally, their implementation is fairly simple, and they merely adhere to a common interface (a HIL). That's not always the case, but that's the ideal. -
Chip-agnostic, portable, peripheral drivers and subsystems. These typically live in the
capsulescrate. These include things like virtual alarms and virtual I2C stack, as well as drivers for hardware peripherals not on the chip itself (e.g. sensors, radios, etc). These drivers typically rely on the chip-specific drivers through the HILs. -
System call drivers, also typically found in the
capsulescrate. These are the drivers that implement a particular part of the system call interfaces, and are often even more abstracted from the hardware than (2) - for example, the temperature sensor system call driver can use any temperature sensor, including several implemented as portable peripheral drivers.The system call interface is another point of standardization that can be implemented in various ways. So it is perfectly reasonable to have several implementations of the same system call interface that use completely different hardware stacks, and therefore HILs and chip-specific drivers (e.g. a console driver that operates over USB might just be implemented as a different system call driver that implements the same system calls, rather than trying to fit USB into the UART HIL).
Because of their importance, the interfaces between these layers are a key part of Tock's design and implementation. These interfaces are called Tock's Hardware Interface Layer, or HIL. A HIL is a portable collection of Rust traits that can be implemented in either a portable or a non-portable way. An example of a non-portable implementation of a HIL is an Alarm that is implemented in terms of counter and compare registers of a specific chip, while an example of a portable implementation is a virtualization layer that multiplexes multiple Alarms top of a single underlying Alarm.
A HIL consists of one or more Rust traits that are intended to be used together. In some cases, implementations may only implement a subset of a HIL's traits. For example the analog-to-digital (ADC) conversion HIL may have traits both for single and streams of samples. A particular implementation may only support single samples and so not implement the streaming traits.
The choice of particular HIL interfaces is pretty important, and we have some general principles we follow:
-
HIL implementations should be fairly general. If we have an interface that doesn't work very well across different hardware, we probably have the wrong interface - it's either too high level, or too low level, or it's just not flexible enough. But HILs shouldn't generally be designed to optimize for particular applications or hardware, and definitely not for a particular combination of applications and hardware. If there are cases where that is really truly necessary, a driver can be very chip or board specific and circumvent the HILs entirely.
Sometimes there are useful interfaces that some chips can provide natively, while other chips lack the necessary hardware support, but the functionality could be emulated in some way. In these cases, Tock sometimes uses "advanced" traits in HILs that enable a chip to expose its more sophisticated features while not requiring that all implementors of the HIL have to implement the function. For example, the UART HIL includes a
ReceiveAdvancedtrait that includes a special functionreceive_automatic()which receives bytes on the UART until a pause between bytes is detected. This is supported directly by the SAM4L hardware, but can also be emulated using timers and GPIO interrupts. By including this in an advanced trait, capsules can still use the interface but other UART implementations that do not have that required feature do not have to implement it. -
A HIL implementation may assume it is the only way the device will be used. As a result, Tock tries to avoid having more than one HIL for a particular service or abstraction, because it will not, in general, be possible for the kernel to support simultaneously using different HILs for the same device. For example, suppose there were two different HILs for a UART with slightly different APIs. The chip-specific implementation of each one will need to read and write hardware registers and handle interrupts, so they cannot exist simultaneously. By allowing a HIL to assume it is the only way the device will be used, Tock allows HILs to precisely define their semantics without having to worry about potential future conflicts or use cases.
Split-phase Operation
While processes are time sliced and preemptive in Tock, the kernel is not. Everything is run-to-completion. That is an important design choice because it allows the kernel to avoid allocating lots of stacks for lots of tasks, and it makes it possible to reason more simply about static and other shared variables.
Therefore, all I/O operations in the Tock kernel are asynchronous and non-blocking. A method call starts an operation and returns immediately. When the operation completes, the struct implementing the operation calls a callback. Tock uses callbacks rather than closures because closures typically require dynamic memory allocation, which the kernel avoids and does not generally support.
This design does add complexity when writing drivers as a blocking API is generally simpler to use. However, this is a conscious choice to favor overall safety of the kernel (e.g. avoiding running out of memory or preventing other code from running on time) over functional correctness of individual drivers (because they might be more error-prone, not because they cannot be written correctly).
There are limited cases when the kernel can briefly block. For example, the SAM4L's GPIO controller can take up to 5 cycles to become ready between operations. Technically, a completely asynchronous driver would make this split-phase: the operation returns immediately, and issues a callback when it completes. However, because just setting up the callback will take more than 5 cycles, spinning for 5 cycles is not only simpler, it's also cheaper. The implementation therefore spins for a handful of cycles before returning, such that the operation is synchronous. These cases are rare, though: the operation has to be so fast that it's not worth allowing other code to run during the delay.
External Dependencies
Tock generally prohibits any external crates within the Tock kernel to avoid including external unsafe code. However, in certain situations Tock does allow external dependencies. This is decided on a case by case basis. For more details on this see External Dependencies.
Tock uses some external libraries by vendoring them within the libraries
folder. This puts the library's source in the same repository, while keeping the
library as a clearly separate crate. This adds a maintenance requirement and
complicates updates, so this is also used on a limited basis.
Using unsafe and Capabilities
Tock attempts to minimize the amount of unsafe code in the kernel. Of course, there are a number of operations that the kernel must do which fundamentally violate Rust's memory safety guarantees, and we try to compartmentalize these operations and explain how to use them in an ultimately safe manner.
For operations that violate Rust safety, Tock marks the functions, structs, and
traits as unsafe. This restricts the crates that can use these elements.
Generally, Tock tries to make it clear where an unsafe operation is occurring by
requiring the unsafe keyword be present. For example, with memory-mapped
input/output (MMIO) registers, casting an arbitrary pointer to a struct that
represents those registers violates memory safety unless the register map and
address are verified to be correct. To denote this, doing the cast is clearly
marked as unsafe. However, once the cast is complete, accessing those
registers no longer violates memory safety. Therefore, using the registers does
not require the unsafe keyword.
Not all potentially dangerous code violates Rust's safety model, however. For
example, stopping a process from running on the board does not violate
language-level safety, but is still a potentially problematic operation from a
security and system reliability standpoint, as not all kernel code should be
able halt arbitrary processes (in particular, untrusted capsules should not have
this access to this API). One way to restrict access to these types of functions
would be to re-use the unsafe mechanism, since cargo will emit a warning if
code that is prohibited from using unsafe attempts to invoke an unsafe
function. However, this muddles the use of unsafe, and makes it difficult to
understand if code potentially violates safety or is a restricted API.
Instead, Tock uses capabilities to restrict access to important APIs. As such, any public APIs inside the kernel that should be very restricted in what other code can use them should require a specific capability in their function signatures. This prevents code that has not explicitly been granted the capability from calling the protected API.
To promote the principle of least privilege, capabilities are relatively fine-grained and provide narrow access to specific APIs. This means that generally new APIs will require defining new capabilities.
Ease of Use and Understanding
Whenever possible, Tock's design optimizes to lower the barrier for new users or developers to understand and use Tock. Sometimes, this means intentionally making a design choice that prioritizes readability or clarity over performance.
As an example, Tock generally avoids using Rust's
features
and #[cfg()] attribute to enable conditional compilation. While using a set of
features can lead to optimizing exactly what code should be included when the
kernel is built, it also makes it very difficult for users unfamiliar with the
features to decide which features to enable and when. Likely, these users will
use the default configuration, reducing the benefit of having the features
available. Also, conditional compilation makes it very difficult to understand
exactly what version of the kernel is running on any particular board as the
features can substantially change what code is running. Finally, the non-default
options are unlikely to be tested as robustly as the default configuration,
leading to versions of the kernel which are no longer available.
Tock also tries to ensure Tock "just works" for users. This manifests by trying
to minimize the number of steps to get Tock running. The build system uses
make which is familiar to many developers, and just running make in a board
folder will compile the kernel. The most supported boards (Hail and imix) can
then be programmed by just running make install. Installing an app just
requires one more command: tockloader install blink. Tockloader will continue
to expand to support the ease-of-use with Tock. Now, "just works" is a design
goal that Tock is not completely meeting. But, future design decisions should
continue to encourage Tock to "just work".
Demonstrated Features
Tock discourages adding functionality to the kernel unless a clear use case has
been established. For example, adding a red-black tree implementation to
kernel/src/common might be useful in the future for some new Tock feature.
However, that would be unlikely to be merged without a use case inside of the
kernel that motivates needing a red-black tree. This general principle provides
a starting point for evaluating new features in pull requests.
Requiring a use case also makes the code more likely to be tested and used, as well as updated as other internal kernel APIs change.
Merge Aggressively, Archive Unabashedly
As an experimental embedded operating system with roots in academic research, Tock is likely to receive contributions of new, risky, experimental, or narrowly focused code that may or may not be useful for the long-term growth of Tock. Rather than use a "holding" or "contribution" repository for new, experimental code, Tock tries to merge new features into mainline Tock. This both eases the maintenance burden of the code (it doesn't have to be maintained out-of-tree) and makes the feature more visible.
However, not all features catch on, or are completed, or prove useful, and having the code in mainline Tock becomes an overall maintenance burden. In these cases, Tock will move the code to an archive repository.
Soundness and Unsafe Issues
An operating system necessarily must use unsafe code. This document explains the rationale behind some of the key mechanisms in Tock that do use unsafe code but should still preserve safety in the overall OS.
static_init!
The "type" of static_init! is basically:
#![allow(unused)] fn main() { T => (fn() -> T) -> &'static mut T }
Meaning that given a function that returns something of type T, static_init!
returns a mutable reference to T with static lifetime.
This is effectively meant to be equivalent to declaring a mutable static variable:
#![allow(unused)] fn main() { static mut MY_VAR: SomeT = SomeT::const_constructor(); }
Then creating a reference to it:
#![allow(unused)] fn main() { let my_ref: &'static mut = &mut MY_VAR; }
However, the rvalue in static declarations must be const (because Rust doesn't
have pre-initialization sections). So static_init! basically allows static
variables that have non-const initializers.
Note that in both of these cases, the caller must wrap the calls in unsafe
since references a mutable variable is unsafe (due to aliasing rules).
Use
static_init! is used in Tock to initialize capsules, which will eventually
reference each other. In all cases, these references are immutable. It is
important for these to be statically allocated for two reasons. First, it helps
surface memory pressure issues at link time (if they are allocated on the stack,
they won't trivially show up as out-of-memory link errors if the stack isn't
sized properly). Second, the lifetimes of mutually-dependent capsules needs to
be equal, and 'static is a convenient way of achieving this.
However, in a few cases, it is useful to start with a mutable reference in order
to enforce who can make certain calls. For example, setting up buffers in the
SPI driver is, for practical reasons, deferred until after construction but we
would like to enforce that it can only be called by the platform initialization
function (before the kernel loop starts). This is enforced because all
references after the platform is setup are immutable, and the config_buffers
method takes an &mut self (Note: it looks like this is not strictly
necessary, so maybe not a big deal if we can't do this).
Soundness
The thing that would make the use of static_init! unsafe is if it was used to
create aliases to mutable references. The fact that it returns an &'static mut
is a red flag, so it bears explanation why I think this is OK.
Just as with any &mut, as soon as it is reborrowed it can no longer be used.
What we do in Tock, specifically, is use it mutably in some cases immediately
after calling static_init!, then reborrow it immutably to pass into capsules.
If a particular capsule happened to accept a &mut, the compiler would try to
move the reference and it would either fail that call (if it's already
reborrowed immutably elsewhere) or disallow further reborrows. Note that this is
fine if it is indeed not used as a shared reference (although I don't think we
have examples of that use).
It is important, though, that the same code calling static_init! is not
executed twice. This creates two major issues. First, it could technically
result in multiple mutable references. Second, it would run the constructor
twice, which may create other soundness or functional issues with existing
references to the same memory. I believe this is not different that code that
takes a mutable reference to a static variable. To prohibit this, static_init!
internally uses an Option-like structure to mark when the static buffer has
been initialized, and causes a panic! if the same buffer is re-initialized
(i.e. the same static_init! was called twice). With this check, we can mark
static_init! as safe.
Alternatives
It seems technically possible to return an immutable static reference from
static_init! instead. It would require a bit of code changes, and wouldn't
allow us to restrict certain capsule methods to initialization, but may not be a
particularly big deal.
Also, something something static variables of type Option everywhere (ugh...
but maybe reasonable).
Capabilities: Restricting Access to Certain Functions and Operations
Certain operations and functions, particularly those in the kernel crate, are
not "unsafe" from a language perspective, but are unsafe from an isolation and
system operation perspective. For example, restarting a process, conceptually,
does not violate type or memory safety (even though the specific implementation
in Tock does), but it would violate overall system safety if any code in the
kernel could restart any arbitrary process. Therefore, Tock must be careful with
how it provides a function like restart_process(), and, in particular, must
not allow capsules, which are untrusted code that must be sandboxed by Rust, to
have access to the restart_process() function.
Luckily, Rust provides a primitive for doing this restriction: use of the
unsafe keyword. Any function marked as unsafe can only be called from a
different unsafe function or from an unsafe block. Therefore, by removing
the ability to define an unsafe block, using the #![forbid(unsafe_code)]
attribute in a crate, all modules in that crate cannot call any functions marked
with unsafe. In the case of Tock, the capsules crate is marked with this
attribute, and therefore all capsules cannot use unsafe functions. While this
approach is effective, it is very coarse-grained: it provides either access to
all unsafe functions or none. To provide more nuanced control, Tock includes a
mechanism called Capabilities.
Capabilities are essentially zero-memory objects that are required to call
certain functions. Abstractly, restricted functions, like restart_process(),
would require that the caller has a certain capability:
#![allow(unused)] fn main() { restart_process(process_id: usize, capability: ProcessRestartCapability) {} }
Any attempt to call that function without possessing that capability would
result in code that does not compile. To prevent unauthorized uses of
capabilities, capabilities can only be created by trusted code. In Tock, this is
implemented by defining capabilities as unsafe traits, which can only be
implemented for an object by code capable of calling unsafe. Therefore, code
in the untrusted capsules crate cannot generate a capability on its own, and
instead must be passed the capability by module in a different crate.
Capabilities can be defined for very broad purposes or very narrowly, and code can "request" multiple capabilities. Multiple capabilities in Tock can be passed by implementing multiple capability traits for a single object.
Capability Examples
-
One example of how capabilities are useful in Tock is with loading processes. Loading processes is left as a responsibility of the board, since a board may choose to handle its processes in a certain way, or not support userland processes at all. However, the kernel crate provides a helpful function called
load_processes()that provides the Tock standard method for finding and loading processes. This function is defined in the kernel crate so that all Tock boards can share it, which necessitates that the function be made public. This has the effect that all modules with access to the kernel crate can callload_processes(), even though calling it twice would lead to unwanted behavior. One approach is to mark the function asunsafe, so only trusted code can call it. This is effective, but not explicit, and conflates language-level safety with system operation-level safety. By instead requiring that the caller ofload_processes()has a certain capability, the expectations of the caller are more explicit, and the unsafe function does not have to be repurposed. -
A similar example is a function like
restart_all_processes()which causes all processes on the board to enter a fault state and restart from their original_startpoint with all grants removed. Again, this is a function that could violate the system-level goals, but could be very useful in certain situations or for debugging grant cleanup when apps fail. Unlikeload_processes(), however, it might make sense for a capsule to be able to callrestart_all_processes(), in response to a certain event or to act as a watchdog. In that case, restricting access by marking it asunsafewill not work: capsules cannot call unsafe code. By using capabilities, only a caller with the correct capability can callrestart_all_processes(), and individual boards can be very explicit about which capsules they grant which capabilities.
Lifetimes
Values in the Tock kernel can be allocated in three ways:
-
Static allocation. Statically allocated values are never deallocated. These values are represented as Rust "borrows" with a
'staticlifetime. -
Stack allocation. Stack allocated values have a lexically bound lifetime. That is, we know by looking at the source code when they will be deallocated. When you create a reference to such a value, the Rust type system ensures that reference is never used after the value is deallocated by assigning a "lifetime" to the reference.
-
Grant values. Values allocated from a process's grant region have a runtime-dependent lifetime. For example, when they are deallocated depends on whether the processes crashes. Since we can't represent runtime-dependent lifetimes in Rust's type-system, references to grant values in Tock are done through the
Granttype, which is owned by its referrer.
Next we'll discuss how Rust's notion of lifetimes maps to the lifetimes of values in Tock and how this affects the use of different types of values in the kernel.
Rust lifetimes
Each reference (called a borrow) in Rust has lifetime associated with its type that determines in what scope it is valid. The lifetime of a reference must be more constrained than the value it was borrowed from. The compiler, in turn, ensures that references cannot escape their valid scope.
As a result, data structures that store a reference must declare the minimal lifetime of that reference. For example:
#![allow(unused)] fn main() { struct Foo<'a> { bar: &'a Bar } }
defines a data structure Foo that contains a reference to another type, Bar.
The reference has a lifetime 'a, which is a type parameter of Foo. Note that
'a is an arbitrary choice of name for the lifetime, such as E in a generic
List<E>. It is also possible to use the explicit lifetime 'static rather
than a type parameter when the reference should always live forever, regardless
of how long the containing type (e.g. Foo) lives:
#![allow(unused)] fn main() { struct Foo { bar: &'static Bar } }
Buffer management
Buffers used in asynchronous hardware operations must be static. On the one hand, we need to guarantee (to the hardware) that the buffer will not be deallocated before the hardware relinquishes its pointer. On the other hand, the hardware has no way of telling us (i.e. the Rust compiler) that it will only access the buffer within a certain lexical bound (because we are using the hardware asynchronously). To resolve this, buffers passed to hardware should be allocated statically.
Circular dependencies
Tock uses circular dependencies to give capsules access to each other.
Specifically, two capsules that depend on each other will each have a field
containing a reference to the other. For example, a client of the timer Alarm
trait needs a reference to an instance of the timer in order to start/stop it,
while the instance of timer needs a reference to the client in order to
propagate events. This is handled by the set_client function, which allows the
platform definition to connect objects after creation.
#![allow(unused)] fn main() { impl Foo<'a> { fn set_client(&self, client: &'a Client) { self.client.set(client); } } }
Tock Threat Model
Overview
Tock provides hardware-based isolation between processes as well as language-based isolation between kernel capsules.
Tock supports a variety of hardware, including boards defined in the Tock repository and boards defined "out of tree" in a separate repository. Additionally, Tock's installation model may vary between different use cases even when those use cases are based on the same hardware. As a result of Tock's flexibility, the mechanisms it uses to provide isolation — and the strength of that isolation — vary from deployment to deployment.
This threat model describes the isolation provided by Tock as well as the trust model that Tock uses to implement that isolation. Users of Tock, which include board integrators and application developers, should use this threat model to understand what isolation Tock provides to them (and what isolation it may not provide). Tock developers should use this threat model as a guide for how to provide Tock's isolation guarantees.
Definitions
These definitions are shared between the documents in this directory.
A process is a runtime instantiation of an application binary. When an application binary "restarts", its process is terminated and a new process is started using the same binary. Note that the kernel is not considered a process, although it is a thread of execution.
Process data includes a process' binary in non-volatile storage, its memory footprint in RAM, and any data that conceptually belongs to the process that is held by the kernel or other processes. For example, if a process is reading from a UART then the data in the UART buffer is considered the process' data, even when it is stored in a location in RAM only readable by the kernel.
Kernel data includes the kernel's image in non-volatile storage as well as data in RAM that does not conceptually belong to processes. For example, the scheduler's data structures are kernel data.
Capsule data is data that is associated with a particular kernel capsule. This data can be either kernel data or process data, depending on its conceptual owner. For example, an ADC driver's configuration is kernel data, while samples an ADC driver takes on behalf of a process are process data.
Tock's users refers to entities that make use of Tock OS. In the context of threat modelling, this typically refers to board integrators (entities that combine Tock components into an OS to run on a specific piece of hardware) and application developers (who consume Tock's APIs and rely on the OS' guarantees).
Isolation Provided to Processes
Confidentiality: A process' data may not be accessed by other processes or by capsules, unless explicitly permitted by the process. Note that Tock does not generally provide defense against side channel attacks; see the Side Channel Defense heading below for more details. Additionally, Virtualization describes some limitations on isolation for shared resources.
Integrity: Process data may not be modified by other processes or by capsules, except when allowed by the process.
Availability: Processes may not deny service to each other at runtime. As an exception to this rule, some finite resources may be allocated on a first-come-first-served basis. This exception is described in detail in Virtualization.
Isolation Provided to Kernel Code
Confidentiality: Kernel data may not be accessed by processes, except where explicitly permitted by the owning component. Kernel data may not be accessed by capsules, except where explicitly permitted by the owning component. The limitations about side channel defense and Virtualization that apply to process data also apply to kernel data.
Integrity: Processes and capsules may not modify kernel data except through APIs intentionally exposed by the owning code.
Availability: Processes cannot starve the kernel of resources or otherwise perform denial-of-service attacks against the kernel. This does not extend to capsule code; capsule code may deny service to trusted kernel code. As described in Virtualization, kernel APIs should be designed to prevent starvation.
Isolation that Tock does NOT Provide
There are practical limits to the isolation that Tock can provide; this section describes some of those limits.
Side Channel Defense
In general, Tock's users should assume that Tock does NOT provide side channel mitigations except where Tock's documentation indicates side channel mitigations exist.
Tock's answer to "should code X mitigate side channel Y" is generally "no". Many side channels that Tock can mitigate in theory are too expensive for Tock to mitigate in practice. As a result, Tock does not mitigate side channels by default. However, specific Tock components may provide and document their own side channel mitigation. For instance, Tock may provide a cryptography API that implements constant-time operations, and may document the side channel defense in the cryptography API's documentation.
In deciding whether to mitigate a side channel, Tock developers should consider both the cost of mitigating the side channel as well as the value provided by mitigating that side channel. For example:
-
Tock does not hide a process' CPU usage from other processes. Hiding CPU utilization generally requires making significant performance tradeoffs, and CPU utilization is not a particularly sensitive signal.
-
Although Tock protects a process' data from unauthorized access, Tock does not hide the size of a process' data regions. Without virtual memory hardware, it is very difficult to hide a process' size, and that size is not particularly sensitive.
-
It is often practical to build constant-time cryptographic API implementations, and protecting the secrecy of plaintext is valuable. As such, it may make sense for a Tock board to expose a cryptographic API with some side channel defenses.
Guaranteed Launching of Binaries
Tock does not guarantee that binaries it finds are launched as processes. For example, if there is not enough RAM available to launch every binary then the kernel will skip some binaries.
This parallels the "first-come, first-served" resource reservation process described in Virtualization.
Components Trusted to Provide Isolation
The Tock kernel depends on several components (including hardware and software) in order to implement the above isolation guarantees. Some of these components, such as the application loader, may vary depending on Tock's use case. The following documents describe the trust model that exists between the Tock kernel and its security-relevant dependencies:
-
Capsule Isolation describes the coding practices used to isolate capsules from the remainder of the kernel.
-
Application Loader describes the trust placed in the application deployment mechanism.
-
TBF Headers describes the trust model associated with the Tock Binary Format headers.
-
Code Review describes code review practices used to ensure the trustworthiness of Tock's codebase.
What is an "Application"?
Tock does not currently have a precise definition of "application", although there is consensus on the following:
-
Unlike a process, an application persists across reboots and updates. For example, an application binary can be updated without becoming a new application but the update will create a new process.
-
An application consists of at least one application binary (in the Tock Binary Format), although it is unclear whether multiple application binaries can collectively be considered a single application (e.g. if they implement a single piece of functionality).
This section will be updated when we have a more precise definition of "application".
Capsule Isolation
Isolation Mechanism
Capsules are limited to what they can access within Rust's type system without
using unsafe. That isolation is implemented by banning unsafe from use in
capsule code and by banning the use of unaudited libraries (except those that
ship with Rust's toolchain) in kernel code. This isolation is vulnerable to code
that exploits compiler bugs or bugs in unsafe code in toolchain libraries.
When a board integrator chooses to use a capsule, they are responsible for
auditing the code of the capsule to confirm the policies are followed and to
detect potentially malicious behavior. The use of Rust's type system as a
security isolation mechanism relies in part on Rust's resistance to underhanded
programming techniques (stealthy obfuscation), and is a weaker form of isolation
than the hardware-backed isolation used to isolate the kernel (and other
processes) from processes.
Capsules are scheduled cooperatively with the rest of the kernel, and as such they can deny service to the rest of the system.
Impact on Kernel API Design
Kernel APIs should be designed to limit the data that capsules have access to. Trusted kernel code should use capabilities as necessary in its API to limit the access that capsule code has. For example, an API that allows its clients to access data that is not owned by either the API or caller should require a "trusted" capability.
Virtualization
Tock components that share resources between multiple clients (which may be kernel components, processes, or a mix of both) are responsible for providing confidentiality and availability guarantees to those clients.
Data Sharing (Confidentiality)
In general, kernel components with multiple clients should not share data between their clients. Furthermore, data from a client should not end up in a capsule the client is unaware of.
When a capsule with multiple clients is given a buffer by one of those clients, it must do one of the following:
-
Avoid sharing the buffer with any other kernel code. Return the buffer to the same client.
-
Only share the buffer downwards, to lower-level components. For example, a capsule providing virtualized access to a piece of hardware may pass the buffer to the driver for that hardware.
-
Wipe the buffer before sharing it with another client.
Kernel components with multiple clients that retrieve data on behalf of those clients must implement isolation commensurate with their functionality. When possible, components reading from shared buses should mux data transferred over those buses. For example:
-
A UDP API can provide a mechanism for clients (processes and/or capsules) to gain exclusive access to a port. The UDP API should then prevent clients from reading messages sent to other clients or impersonating other clients.
-
A UART API with multiple clients should implement a protocol that allows the UART API to determine which client a received packet belongs to and route it accordingly (in other words, it should implement some form of muxing).
-
Analog-to-Digital Converter (ADC) hardware does not have a concept of which process "owns" data, nor is there a way to implement such a concept. As such, an ADC API that allows clients to take samples upon request does not need to take separate samples for different clients. An ADC API that receives simultaneous requests to sample the same source may take a single reading and distribute it to multiple clients.
Fairness (Availability)
Tock components do not need to guarantee fairness between clients. For example, a UART virtualization layer may allow capsules/processes using large buffers to see higher throughputs than capsules/processes using small buffers. However, components should prevent starvation when the semantics of the operation allow it. For the UART example, this means using round-robin scheduling rather than preferring lower-numbered clients.
When it is not possible to prevent starvation — such as shared resources that may be locked for indefinite amounts of time — then components have two options:
-
Allow resource reservations on a first-come, first-served basis. This is essentially equivalent to allowing clients to take out unreturnable locks on the resources.
-
Restrict access to the API using a kernel capability (only possible for internal kernel APIs).
An example of an API that would allow first-come-first-served reservations is crypto hardware with a finite number of non-sharable registers. In this case, different processes can use different registers, but if the registers are overcommitted then later/slower processes will be unable to reserve resources.
An example of an API that would be protected via a kernel capability is indefinite continuous ADC sampling that blocks other ADC requests. In this case, first-come-first-served reservations do not make sense because only one client can be supported anyway.
Application Loader
What is an Application Loader?
The term "application loader" refers to the mechanism used to add Tock applications to a Tock system. It can take several forms; here are a few examples:
-
Tockloader is an application loader that runs on a host system. It uses various host-to-board interfaces (e.g. JTAG, UART bootloader, etc) to manipulate application binaries on the Tock system's nonvolatile storage.
-
Some build systems combine the kernel and apps at build time into a single, monolithic image. This monolithic image is then deployed using a programming tool.
-
A kernel-assisted installer may be a Tock capsule that receives application binaries over USB and writes them into flash.
Why Must We Trust It?
The application loader has the ability to read and modify application binaries. As a result, the application loader must be trusted to provide confidentiality and sometimes integrity guarantees to applications. For example, the application loader must not modify or exfiltrate applications other than the application(s) it was asked to operate on.
Tock kernels that require all application binaries to be signed do not need to trust the application loader for application integrity, as that is done by validating the signature instead. Tock kernels that do not require signed application binaries must trust the application loader to not maliciously modify applications.
To protect the kernel's confidentiality, integrity, and availability the application loader must not modify, erase, or exfiltrate kernel data. On most boards, the application loader must be trusted to not modify, erase, or exfiltrate kernel data. However, Tock boards may use other mechanisms to protect the kernel without trusting the application loader. For example, a board with access-control hardware between its flash storage and the application loader may use that hardware to protect the kernel's data without trusting the application loader.
Tock Binary Format (TBF) Total Size Verification Requirement
The application loader is required to confirm that the TBF header's total_size
field is correct for the specified format version (as specified in the
Tock Binary Format) before deploying
an application binary. This is to prevent the newly-deployed application from
executing the following attacks:
-
Specifying a too-large
total_sizethat includes the subsequent application(s) binary, allowing the malicious application to read the binary (impacting confidentiality). -
Specifying a too-small
total_sizeand making the kernel parse the end of its image as the subsequent application binary's TBF headers (impacting integrity).
Trusted Compute Base in the Application Loader
The application loader may be broken into multiple pieces, only some of which need to be trusted. The resulting threat model depends on the form the application loader takes. For example:
-
Tockloader has the access it needs to directly delete, corrupt, and exfiltrate the kernel. As a result, Tockloader must be trusted for Tock's confidentiality, integrity, and availability guarantees.
-
A build system that combines apps into a single image must be trusted to correctly compile and merge the apps and kernel. The build system must be trusted to provide confidentiality, integrity, and availability guarantees. The firmware deployment mechanism must be trusted for confidentiality and availability guarantees. If the resulting image is signed (and the signature verified by a bootloader), then the firmware deployment mechanism need not be trusted for integrity. If there is no signature verification in the bootloader then the firmware deployment mechanism must be trusted for integrity as well.
-
An application loader that performs the nonvolatile storage write from within Tock's kernel may make its confidentiality, integrity, and availability guarantees in the Tock kernel. Such a loader would need to perform the
total_sizefield verification within the kernel. In that case, the kernel code is the only code that needs to be trusted, even if there are other components to the application loader (such as a host binary that transmits the application over USB).
TBF Headers
TBF is the Tock Binary Format. It is the format of application binaries in a Tock system's flash storage.
TBF headers are considered part of an application, and are mostly untrusted. As such, TBF header parsing must be robust against malicious inputs (e.g. pointers must be checked to confirm they are in-bounds for the binary).
However, because the kernel relies on the TBF's total_size field to load the
binaries, the application loader is responsible for verifying the total_size
field at install time. The kernel trusts the total_size field for
confidentiality and integrity.
When possible, TLV types should be designed so that the kernel does not need to trust their correctness. When a TLV type is defined that the kernel must trust, then the threat model must be updated to indicate that application loaders are responsible for verifying the value of that TLV type.
Code Review
Kernel Code Review
Changes to the Tock OS kernel (in the kernel/ directory of the repository) are reviewed by the Tock core working group. However, not all ports of Tock (which include chip crates, board crates, and hardware-specific capsules) are maintained by the Tock core working group.
The Tock repository must document which working group (if any) is responsible for each hardware-specific crate or capsule.
Third-Party Dependencies
Tock OS repositories permit third party dependencies for critical components that are impractical to author directly. Each repository containing embedded code (including tock, libtock-c, and libtock-rs) must have a written policy documenting:
-
All unaudited required dependencies. For example, Tock depends on Rust's libcore, and does not audit
libcore's source. -
How to avoid pulling in unaudited optional dependencies.
A dependency may be audited by vendoring it into the repository and putting it through code review. This policy does not currently apply to host-side tools, such as elf2tab and tockloader, but may be extended in the future.
Implementation
Documentation related to the implementation of Tock.
How does Tock compile?
There are two types of compilation artifacts in Tock: the kernel and user-level processes (i.e. apps). Each type compiles differently. In addition, each platform has a different way of programming the kernel and processes. Below is an explanation of both kernel and process compilation as well as some examples of how platforms program each onto an actual board.
Compiling the kernel
The kernel is divided into five Rust crates (i.e. packages):
-
A core kernel crate containing key kernel operations such as handling interrupts and scheduling processes, shared kernel libraries such as
SubSlice, and the Hardware Interface Layer (HIL) definitions. This is located in thekernel/folder. -
An architecture (e.g. ARM Cortex M4) crate that implements context switching, and provides memory protection and systick drivers. This is located in the
arch/folder. -
A chip-specific (e.g. Atmel SAM4L) crate which handles interrupts and implements the hardware abstraction layer for a chip's peripherals. This is located in the
chips/folder. -
One (or more) crates for hardware independent drivers and virtualization layers. This is the
capsules/folder in Tock. External projects using Tock may create additional crates for their own drivers. -
A platform-specific (e.g. Imix) crate that configures the chip and its peripherals, assigns peripherals to drivers, sets up virtualization layers, and defines a system call interface. This is located in
boards/.
These crates are compiled using Cargo, Rust's package
manager, with the platform crate as the base of the dependency graph. In
practice, the use of Cargo is masked by the Makefile system in Tock. Users can
simply type make from the proper directory in boards/ to build the kernel
for that platform.
Internally, the Makefile is simply invoking Cargo to handle the build. For
example, make on the imix platform roughly translates to:
$ cargo build --release --target=thumbv7em-none-eabi
The --release argument tells Cargo to invoke the Rust compiler with
optimizations turned on. --target points Cargo to the target specification
which includes the LLVM data-layout definition and architecture definitions for
the compiler. Note, Tock uses additional compiler and linker flags to generate
correct and optimized kernel binaries for our supported embedded targets.
Life of a Tock compilation
When Cargo begins compiling the platform crate, it first resolves all
dependencies recursively. It chooses package versions that satisfy the
requirements across the dependency graph. Dependencies are defined in each
crate's Cargo.toml file and refer to paths in the local file-system, a remote
git repository, or a package published on crates.io.
Second, Cargo compiles each crate in turn as dependencies are satisfied. Each
crate is compiled as an rlib (an ar archive containing object files) and
combined into an executable ELF file by the compilation of the platform crate.
You can see each command executed by cargo by passing it the --verbose
argument. In our build system, you can run make V=1 to see the verbose
commands.
Platform Build Scripts
Cargo supports
build scripts
when compiling crates, and each Tock platform crate includes a build.rs build
script. In Tock, these build scripts are primarily used to instruct cargo to
rebuild the kernel if a linker script changes.
Cargo's build.rs scripts are small Rust programs that must be compiled as part
of the kernel build process. Since these scripts execute on the host machine,
this means building Tock requires a Rust toolchain valid for the host machine
and its architecture. Cargo runs the compiled build script when compiling the
platform crate.
LLVM Binutils
Tock uses the lld, objcopy, and size tools included with the Rust
toolchain to produce kernel binaries that are executed on microcontrollers. This
has two main ramifications:
- The tools are not entirely feature-compatible with the GNU versions. While they are very similar, there are edge cases where they do not behave exactly the same. This will likely improve with time, but it is worth noting in case unexpected issues arise.
- The tools will automatically update with Rust versions. The tools are
provided in the
llvm-toolsrustup component that is compiled for and ships with every version of the Rust toolchain. Therefore, if Rust updates the version they use in the Rust repository, Tock will also see those updates.
Special .apps section
Tock kernels include a .apps section in the kernel .elf file that is at the
same physical address where applications will be loaded. When compiling the
kernel, this is just a placeholder and is not populated with any meaningful
data. It exists to make it easy to update the kernel .elf file with an
application binary to make a monolithic .elf file so that the kernel and apps
can be flashed together.
When the Tock build system creates the kernel binary, it explicitly removes this section so that the placeholder is not included in the kernel binary.
To use the special .apps section, objcopy can replace the placeholder with
an actual app binary. The general command looks like:
$ arm-none-eabi-objcopy --update-section .apps=libtock-c/examples/c_hello/build/cortex-m4/cortex-m4.tbf target/thumbv7em-none-eabi/release/stm32f412gdiscovery.elf target/thumbv7em-none-eabi/release/stm32f4discovery-app.elf
This replaces the placeholder section .apps with the "c_hello" application TBF
in the stm32f412gdiscovery.elf kernel ELF, and creates a new .elf called
stm32f4discovery-app.elf.
Compiling a process
Unlike many other embedded systems, compilation of application code is entirely
separated from the kernel in Tock. An application uses a libtock library and
is built into a free-standing binary. The binary can then be uploaded onto a
Tock platform with an already existing kernel to be loaded and run.
Tock can support applications using any programming language and compiler provided the applications can run with only access to fixed regions in flash and RAM and without virtual memory.
Each Tock process requires a header that informs the kernel of the size of the application's binary and where the location of the entry point is within the compiled binary.
Executing without Virtual Memory
Tock supports resource constrained microcontrollers which do not support virtual memory. This means Tock process cannot assume a known address space. Tock supports two methods for enabling processes despite the lack of virtual memory: embedded PIC (FDPIC) and fixed address loading.
Position Independent Code
Since Tock loads applications separately from the kernel and is capable of running multiple applications concurrently, applications cannot know in advance at which address they will be loaded. This problem is common to many computer systems and is typically addressed by dynamically linking and loading code at runtime.
Tock, however, makes a different choice and requires applications to be compiled
as position independent code. Compiling with FDPIC makes all control flow
relative to the current PC, rather than using jumps to specified absolute
addresses. All data accesses are relative to the start of the data segment for
that app, and the address of the data segment is stored in a register referred
to as the base register. This allows the segments in Flash and RAM to be
placed anywhere, and the OS only has to correctly initialize the base register.
FDPIC code can be inefficient on some architectures such as x86, but the ARM instruction set is optimized for FDPIC operation and allows most code to execute with little to no overhead. Using FDPIC still requires some fixup at runtime, but the relocations are simple and cause only a one-time cost when an application is loaded. A more in-depth discussion of dynamically loading applications can be found on the Tock website: Dynamic Code Loading on a MCU.
For applications compiled with arm-none-eabi-gcc, building FDPIC code for Tock
requires four flags:
-fPIC: only emit code that uses relative addresses.-msingle-pic-base: force the use of a consistent base register for the data sections.-mpic-register=r9: use register r9 as the base register.-mno-pic-data-is-text-relative: do not assume that the data segment is placed at a constant offset from the text segment.
Each Tock application uses a linker script that places Flash at address
0x80000000 and SRAM at address 0x00000000. This allows relocations pointing
at Flash to be easily differentiated from relocations pointing at RAM.
Fixed Address Loading
Unfortunately, not all compilers support FDPIC. As of August 2023, LLVM and riscv-gcc both do not support FDPIC. This complicates running Tock processes, but Tock supports an alternative method using fixed addresses. This method works by compiling Tock processes for fixed addresses in both flash and RAM (as typical embedded compilation would do) and then processes are placed in flash so that they match their fixed flash address and the kernel sets their RAM region so their RAM addresses match. While this simplifies compilation, ensuring that those addresses are properly met involves several components.
Fixed Address TBF Header
The first step is the linker must communicate which addresses it expects the
process to be placed at in both flash and RAM at execution time. It does this
with two symbols in the .elf file:
_flash_origin: The address in flash the app was compiled for._sram_origin: The address in ram the app was compiled for.
These symbols are then parsed by elf2tab. elf2tab uses _flash_origin to
ensure the .tbf file is properly created so that the compiled binary will end
up at the correct address. Both _flash_origin and _sram_origin are used to
create a FixedAddresses TBF TLV that is included in the TBF header. An example
of the Fixed Addresses TLV:
TLV: Fixed Addresses (5) [0x40 ]
fixed_address_ram : 536920064 0x2000c000
fixed_address_flash : 268599424 0x10028080
With the Fixed Addresses TLV included in the TBF header, the kernel and other tools now understand that for this process its address requirements must be met.
By convention, userspace apps compiled for fixed flash and RAM addresses include
the addresses in the .tbf filenames. For example, the leds example compiled as
a libtock-rs app might have a TAB that looks like:
[STATUS ] Inspecting TABs...
TAB: leds
build-date: 2023-08-08 22:24:07+00:00
minimum-tock-kernel-version: 2.1
tab-version: 1
included architectures: cortex-m0, cortex-m4, riscv32imc
tbfs:
cortex-m0.0x10020000.0x20004000
cortex-m0.0x10028000.0x2000c000
cortex-m4.0x00030000.0x20008000
cortex-m4.0x00038000.0x20010000
cortex-m4.0x00040000.0x10002000
cortex-m4.0x00040000.0x20008000
cortex-m4.0x00042000.0x2000a000
cortex-m4.0x00048000.0x1000a000
cortex-m4.0x00048000.0x20010000
cortex-m4.0x00080000.0x20006000
cortex-m4.0x00088000.0x2000e000
riscv32imc.0x403b0000.0x3fca2000
riscv32imc.0x40440000.0x3fcaa000
Loading Fixed Address Processes into Flash
When installing fixed address processes on a board the loading tool must ensure that it places the TBF at the correct address in flash so that the process binary executes at the address the linker intended. Tockloader supports installing apps on boards and placing them at their fixed address location. Tockloader will try to find a sort order based on available TBFs to install all of the requested apps at valid fixed addresses.
With the process loaded at its fixed flash address, its essential that the RAM address the process is expecting can also be met. However, the valid RAM addresses for process is determined by the memory the kernel has reserved for processes. Typically, this memory region is dynamic based on memory the kernel is not using. The loader tool needs to know what memory is available for processes so it can choose the compiled TBF that expects a RAM address the kernel will actually be able to satisfy.
For the loader tool to learn what RAM addresses are available for processes the kernel includes a TLV kernel attributes structure in flash immediately before the start of apps. Tockloader can read these attributes to determine the valid RAM range for processes so it can choose suitable TBFs when installing apps.
Booting Fixed Address Processes
The final step is for the kernel to initialize and execute processes. The processes are already stored in flash, but the kernel must allocate a RAM region that meets the process's fixed RAM requirements. The kernel will leave gaps in RAM between processes to ensure processes have the RAM addresses they expected during compilation.
Tock Binary Format
In order to be loaded correctly, applications must follow the Tock Binary Format. This means the initial bytes of a Tock app must follow this format so that Tock can load the application correctly.
In practice, this is automatically handled for applications. As part of the compilation process, a tool called Elf to TAB does the conversion from ELF to Tock's expected binary format, ensuring that sections are placed in the expected order, adding a section that lists necessary load-time relocations, and creating the TBF header.
Tock Application Bundle
To support ease-of-use and distributable applications, Tock applications are
compiled for multiple architectures and bundled together into a "Tock
Application Bundle" or .tab file. This creates a standalone file for an
application that can be flashed onto any board that supports Tock, and removes
the need for the board to be specified when the application is compiled. The TAB
has enough information to be flashed on many or all Tock compatible boards, and
the correct binary is chosen when the application is flashed and not when it is
compiled.
TAB Format
.tab files are tared archives of TBF compatible binaries along with a
metadata.toml file that includes some extra information about the application.
A simplified example command that creates a .tab file is:
tar cf app.tab cortex-m0.bin cortex-m4.bin metadata.toml
Metadata
The metadata.toml file in the .tab file is a TOML file that contains a
series of key-value pairs, one per line, that provides more detailed information
and can help when flashing the application. Existing fields:
tab-version = 1 // TAB file format version
name = "<package name>" // Package name of the application
only-for-boards = <list of boards> // Optional list of board kernels that this application supports
build-date = 2017-03-20T19:37:11Z // When the application was compiled
Loading the kernel and processes onto a board
There is no particular limitation on how code can be loaded onto a board. JTAG
and various bootloaders are all equally possible. For example, the hail and
imix platforms primarily use the serial "tock-bootloader", and the other
platforms use jlink or openocd to flash code over a JTAG connection. In general,
these methods are subject to change based on whatever is easiest for users of
the platform.
In order to support multiple concurrent applications, the easiest option is to
use tockloader (git repo) to manage
multiple applications on a platform. Importantly, while applications currently
share the same upload process as the kernel, they are planned to support
additional methods in the future. Application loading through wireless methods
especially is targeted for future editions of Tock.
Kernel Configuration
Because Tock is meant to run on various platforms (spanning multiple architectures and various available peripherals), and with multiple use cases in mind (for example, "production" vs. debug build with various levels of debugging detail), Tock provides various configuration options so that each build can be adapted to each use case. In general, there are three variants of kernel configuration that Tock supports:
- Per-board customization of kernel components. For example, choosing the scheduling algorithm the kernel uses. The policies guide goes into more depth on this configuration variant.
- Crate-level composition of kernel code. Building a functional kernel consists of using several crates, and choosing specific crates can configure the kernel for a specific board or use case.
- Compile-time configuration to conditionally compile certain kernel features.
Tock attempts to support these configuration variants while avoiding undue confusion as to what exact code is being included in any particular kernel compilation. Specifically, Tock tries to avoid pitfalls of "ifdef" conditional code (which can be tricky to reason about which code is being include and to suitable test).
Crate-Level Configuration
Each level of abstraction (e.g. core kernel, CPU architecture, chip, board) has its own crate. Configuring a board is then done by including the relevant crates for the particular chip.
For example, many microcontrollers have a family of related chips. Depending on which specific version of a MCU a board uses often makes subtle adjustments to which peripherals are available. A board makes these configurations by careful choosing which crates to include as dependencies. Consider a board which uses the nRF52840 MCU, a version in the nRF52 family. It's board-level dependency tree might look like:
┌────────────────┐
│ │
│ Board Crate │
│ │
└─────┬─────────┬┘
│ └───────┬───────────────┐
┌──► ┌─────┴────────┐ ┌──┴───────┐ ┌─────┴────┐
│ │ nRF52840 │ │ Capsules │ │ Kernel │
│ └─────┬────────┘ └──────────┘ └──────────┘
│ ┌───┴──────┐
│ │ nRF52 │
Chips │ └───┬──────┘
│ ┌───┴──────┐
│ │ nRF5 │
└──► └──────────┘
where choosing the specific chip-variant as a dependency configures the code included in the kernel. These dependencies are expressed via normal Cargo crate dependencies.
Compile-Time Configuration Options
To facilitate fine-grained configuration of the kernel (for example to enable
syscall tracing), a Config struct is defined in kernel/src/config.rs. The
Config struct defines a collection of boolean values which can be imported
throughout the kernel crate to configure the behavior of the kernel. As these
values are const booleans, the compiler can statically optimize away any code
that is not used based on the settings in Config, while still checking syntax
and types.
To make it easier to configure the values in Config, the values of these
booleans are determined by cargo features. Individual boards can determine which
features of the kernel crate are included without users having to manually
modify the code in the kernel crate. Because of how feature unification works,
all features are off-by-default, so if the Tock kernel wants a default value for
a config option to be turning something on, the feature should be named
appropriately (e.g. the no_debug_panics feature is enabled to set the
debug_panics config option to false).
To enable any feature, modify the Cargo.toml in your board crate as follows:
[dependencies]
# Turn off debug_panics, turn on trace_syscalls
kernel = { path = "../../kernel", features = ["no_debug_panics", "trace_syscalls"]}
These features should not be set from any crate other than the top-level board crate. If you prefer not to rely on the features, you can still directly modify the boolean config value in kernel/src/config.rs if you prefer---this can be easier when rapidly debugging on an upstream board, for example.
To use the configuration within the kernel crate, simply read the values. For
example, to use a boolean configuration, just use an if statement.
Kernel Attributes
Kernel attributes are stored in a data structure at the end of the kernel's allocated flash region. These attributes describe properties of the flashed kernel on a particular hardware board. External tools can read these attributes to learn about the kernel installed on the board.
Format
Kernel attributes are stored in a descending TLV (type-length-value) structure. That means they start at the highest address in flash, and are appended in descending flash addresses.
The first four bytes are a sentinel that spells "TOCK" (in ASCII). This sentinel allows external tools to check if kernel attributes are present. Note, "first" in this context means the four bytes with the largest address since this structure is stored at the end of flash.
The next byte is a version byte. This allows for future changes to the structure.
The next three bytes are reserved.
After the header are zero or more TLV structures that hold the kernel attributes.
Header Format
0 1 2 3 4 (bytes)
+----------+----------+----------+----------+
| TLVs... |
+----------+----------+----------+----------+
| Reserved | Reserved | Reserved | Version |
+----------+----------+----------+----------+
| T (0x54) | O (0x4F) | C (0x43) | K (0x4B) |
+----------+----------+----------+----------+
^
end of flash region─┘
TLV Format
0 1 2 3 4 (bytes)
+----------+----------+----------+----------+
| Value... |
+----------+----------+----------+----------+
| Type | Length |
+----------+----------+----------+----------+
- Type: Indicates which TLV this is. Little endian.
- Length: The length of the value. Little endian.
- Value: Length bytes corresponding to the TLV.
TLVs
The TLV types used for kernel attributes are unrelated to the TLV types used for the Tock Binary Format. However, to minimize possible confusion, type values for each should not use the same numbers.
App Memory (0x0101)
Specifies the region of memory the kernel will use for applications.
0 1 2 3 4 (bytes)
+----------+----------+----------+----------+
| Start Address |
+----------+----------+----------+----------+
| App Memory Length |
+----------+----------+----------+----------+
| Type = 0x0101 | Length = 8 |
+----------+----------+----------+----------+
- Start Address: The address in RAM the kernel will use to start allocation memory for apps. Little endian.
- App Memory Length: The number of bytes in the region of memory for apps. Little endian.
Kernel Binary (0x0102)
Specifies where the kernel binary is and its size.
0 1 2 3 4 (bytes)
+----------+----------+----------+----------+
| Start Address |
+----------+----------+----------+----------+
| Binary Length |
+----------+----------+----------+----------+
| Type = 0x0102 | Length = 8 |
+----------+----------+----------+----------+
- Start Address: The address in flash the kernel binary starts at. Little endian.
- Binary Length: The number of bytes in the kernel binary. Little endian.
Kernel Attributes Location
Kernel attributes are stored at the end of the kernel's flash region and immediately before the start of flash for TBFs.
Memory Layout
This document describes how the memory in Tock is structured and used for the kernel, applications, and supporting state.
Note: This is a general guide describing the canonical memory layout for Tock. In practice, embedded hardware is fairly varied and individual chips may deviate from this either subtly or substantially.
Tock is intended to run on microcontrollers like the Cortex-M, which have
non-volatile flash memory (for code) and RAM (for stack and data) in a single
address space. While the Cortex-M architecture specifies a high-level layout of
the address space, the exact layout of Tock can differ from board to board. Most
boards simply define the beginning and end of flash and SRAM in their
layout.ld file and then include the
generic Tock memory map.
Flash
The nonvolatile flash memory holds the kernel code and a linked-list of sorts of process code.
Kernel code
The kernel code is split into two major regions. The first is .text, which
holds the vector table, program code, initialization routines, and other
read-only data. This section is written to the beginning of flash.
The second major region following up the .text region is the .relocate
region. It holds values that need to exist in SRAM, but have non-zero initial
values that Tock copies from flash to SRAM as part of its initialization (see
Startup docs).
Process code
Processes are placed in flash starting at a known address which can be retrieved
in the kernel using the symbol _sapps. Each process starts with a Tock Binary
Format (TBF) header and then the actual application binary. Processes are placed
continuously in flash, and each process's TBF header includes the entire size of
the process in flash. This creates a linked-list structure that the kernel uses
to traverse apps. The end of the valid processes are denoted by an invalid TBF
header. Typically the flash page after the last valid process is set to all 0x00
or 0xFF.
RAM
The RAM holds the data currently being used by both the kernel and processes.
Kernel RAM
The kernel RAM contains three major regions:
- Kernel stack.
- Kernel data: initialized memory, copied from flash at boot.
- Kernel BSS: uninitialized memory, zeroed at boot.
Process RAM
The process RAM is memory space divided between all running apps.
A process's RAM contains four major regions:
- Process stack
- Process data
- Process heap
- Grant
The figure below shows the memory space of one process.

Hardware Implementations
SAM4L
The SAM4L is a microcontroller used on the Hail and Imix platforms, among others. The structure of its flash and RAM is as follows.
Flash
| Address Range | Length (bytes) | Content | Description |
|---|---|---|---|
| 0x0-3FF | 1024 | Bootloader | Reserved flash for the bootloader. Likely the vector table. |
| 0x400-0x5FF | 512 | Flags | Reserved space for flags. If the bootloader is present, the first 14 bytes are "TOCKBOOTLOADER". |
| 0x600-0x9FF | 1024 | Attributes | Up to 16 key-value pairs of attributes that describe the board and the software running on it. |
| 0xA00-0xFFFF | 61.5k | Bootloader | The software bootloader provides non-JTAG methods of programming the kernel and applications. |
| 0x10000-0x3FFFF | 128k | Kernel | Flash space for the kernel. |
| 0x3FFxx-0x3FFFF | variable | Attributes | Kernel attributes that describe various properties of the kernel. |
| 0x40000-0x7FFFF | 320k | Apps | Flash space for applications. |
RAM
| Address Range | Length (bytes) | Content | Description |
|---|---|---|---|
| 0x20000000-0x2000FFFF | 64k | Kernel and app RAM | The kernel links with all of the RAM, and then allocates a buffer internally for application use. |
Overview
The following image gives an example of how things are currently laid out in practice. It shows the address space of both flash and RAM with three running applications: crc, ip_sense, and analog_comparator.
Mutable References, Memory Containers, and Cells
Borrows are a critical part of the Rust language that help provide its safety guarantees. However, when there is no dynamic memory allocation (no heap), as with Tock, event-driven code runs into challenges with Rust's borrow semantics. Often multiple structs need to be able to call (share) a struct based on what events occur. For example, a struct representing a radio interface needs to handle callbacks both from the bus it uses as well as handle calls from higher layers of a networking stack. Both of these callers need to be able to change the state of the radio struct, but Rust's borrow checker does not allow them to both have mutable references to the struct.
To solve this problem, Tock builds on the observation that having two references
to a struct that can modify it is safe, as long as no references to memory
inside the struct are leaked (there is no interior mutability). Tock uses
memory containers, a set of types that allow mutability but not interior
mutability, to achieve this goal. The Rust standard library has two memory
container types, Cell and RefCell. Tock uses Cell extensively, but also
adds five new memory container types, each of which is tailored to a specific
use common in kernel code.
Brief Overview of Borrowing in Rust
Ownership and Borrowing are two design features in Rust which prevent race conditions and make it impossible to write code that produces dangling pointers.
Borrowing is the Rust mechanism to allow references to memory. Similar to references in C++ and other languages, borrows make it possible to efficiently pass large structures by passing pointers rather than copying the entire structure. The Rust compiler, however, limits borrows so that they cannot create race conditions, which are caused by concurrent writes or concurrent reads and writes to memory. Rust limits code to either a single mutable (writeable) reference or any number of read-only references.
If a piece of code has a mutable reference to a piece of memory, it's also
important that other code does not have any references within that memory.
Otherwise, the language is not safe. For example, consider this case of an
enum which can be either a pointer or a value:
#![allow(unused)] fn main() { enum NumOrPointer { Num(u32), Pointer(&'static mut u32) } }
A Rust enum is like a type-safe C union. Suppose that code has both a mutable
reference to a NumOrPointer and a read-only reference to the encapsulated
Pointer. If the code with the NumOrPointer reference changes it to be a
Num, it can then set the Num to be any value. However, the reference to
Pointer can still access the memory as a pointer. As these two representations
use the same memory, this means that the reference to Num can create any
pointer it wants, breaking Rust's type safety:
#![allow(unused)] fn main() { // n.b. illegal example let external : &mut NumOrPointer; match external { &mut Pointer(ref mut internal) => { // This would violate safety and // write to memory at 0xdeadbeef *external = Num(0xdeadbeef); *internal = 12345; }, ... } }
As the Tock kernel is single threaded, it doesn't have race conditions and so in some cases it may be safe for there to be multiple references, as long as they do not point inside each other (as in the number/pointer example). But Rust doesn't know this, so its rules still hold. In practice, Rust's rules cause problems in event-driven code.
Issues with Borrowing in Event-Driven code
Event-driven code often requires multiple writeable references to the same object. Consider, for example, an event-driven embedded application that periodically samples a sensor and receives commands over a serial port. At any given time, this application can have two or three event callbacks registered: a timer, sensor data acquisition, and receiving a command. Each callback is registered with a different component in the kernel, and each of these components requires a reference to the object to issue a callback on. That is, the generator of each callback requires its own writeable reference to the application. Rust's rules, however, do not allow multiple mutable references.
Cells in Tock
Tock uses several Cell types for different data types. This table summarizes the various types, and more detail is included below.
| Cell Type | Best Used For | Example | Common Uses |
|---|---|---|---|
Cell | Primitive types | Cell<bool>, sched/kernel.rs | State variables (holding an enum), true/false flags, integer parameters like length. |
TakeCell | Small static buffers | TakeCell<'static, [u8]>, spi.rs | Holding static buffers that will receive or send data. |
MapCell | Large static buffers | MapCell<App>, spi.rs | Delegating reference to large buffers (e.g. application buffers). |
OptionalCell | Optional parameters | client: OptionalCell<&'static hil::nonvolatile_storage::NonvolatileStorageClient>, nonvolatile_to_pages.rs | Keeping state that can be uninitialized, like a Client before one is set. |
VolatileCell | Registers | VolatileCell<u32> | Accessing MMIO registers, used by tock_registers crate. |
The TakeCell abstraction
While the different memory containers each have specialized uses, most of their
operations are common across the different types. We therefore explain the basic
use of memory containers in the context of TakeCell, and the
additional/specialized functionality of each other type in its own section. From
tock/libraries/tock-cells/src/take_cell.rs:
A
TakeCellis a potential reference to mutable memory. Borrow rules are enforced by forcing clients to either move the memory out of the cell or operate on a borrow within a closure.
A TakeCell can be full or empty: it is like a safe pointer that can be null. If
code wants to operate on the data contained in the TakeCell, it must either move
the data out of the TakeCell (making it empty), or it must do so within a
closure with a map call. Using map passes a block of code for the TakeCell
to execute. Using a closure allows code to modify the contents of the TakeCell
inline, without any danger of a control path accidentally not replacing the
value. However, because it is a closure, a reference to the contents of the
TakeCell cannot escape.
TakeCell allows code to modify its contents when it has a normal (non-mutable) reference. This in turn means that if a structure stores its state in TakeCells, then code which has a regular (non-mutable) reference to the structure can change the contents of the TakeCell and therefore modify the structure. Therefore, it is possible for multiple callbacks to have references to the structure and modify its state.
Example use of .take() and .replace()
When TakeCell.take() is called, ownership of a location in memory moves out of
the cell. It can then be freely used by whoever took it (as they own it) and
then put back with TakeCell.put() or TakeCell.replace().
For example, this piece of code from chips/nrf51/src/clock.rs sets the
callback client for a hardware clock:
#![allow(unused)] fn main() { pub fn set_client(&self, client: &'static ClockClient) { self.client.replace(client); } }
If there is a current client, it's replaced with client. If self.client is
empty, then it's filled with client.
This piece of code from chips/sam4l/src/dma.rs cancels a current direct memory
access (DMA) operation, removing the buffer in the current transaction from the
TakeCell with a call to take:
#![allow(unused)] fn main() { pub fn abort_transfer(&self) -> Option<&'static mut [u8]> { self.registers .idr .write(Interrupt::TERR::SET + Interrupt::TRC::SET + Interrupt::RCZ::SET); // Reset counter self.registers.tcr.write(TransferCounter::TCV.val(0)); self.buffer.take() } }
Example use of .map()
Although the contents of a TakeCell can be directly accessed through a
combination of take and replace, Tock code typically uses TakeCell.map(),
which wraps the provided closure between a TakeCell.take() and
TakeCell.replace(). This approach has the advantage that a bug in control flow
that doesn't correctly replace won't accidentally leave the TakeCell empty.
Here is a simple use of map, taken from chips/sam4l/src/dma.rs:
#![allow(unused)] fn main() { pub fn disable(&self) { let registers: &SpiRegisters = unsafe { &*self.registers }; self.dma_read.map(|read| read.disable()); self.dma_write.map(|write| write.disable()); registers.cr.set(0b10); } }
Both dma_read and dma_write are of type TakeCell<&'static mut DMAChannel>,
that is, a TakeCell for a mutable reference to a DMA channel. By calling map,
the function can access the reference and call the disable function. If the
TakeCell has no reference (it is empty), then map does nothing.
Here is a more complex example use of map, taken from
chips/sam4l/src/spi.rs:
#![allow(unused)] fn main() { self.client.map(|cb| { txbuf.map(|txbuf| { cb.read_write_done(txbuf, rxbuf, len); }); }); }
In this example, client is a TakeCell<&'static SpiMasterClient>. The closure
passed to map has a single argument, the value which the TakeCell contains. So
in this case, cb is the reference to an SpiMasterClient. Note that the
closure passed to client.map then itself contains a closure, which uses cb
to invoke a callback passing txbuf.
.map() variants
TakeCell.map() provides a convenient method for interacting with a
TakeCell's stored contents, but it also hides the case when the TakeCell is
empty by simply not executing the closure. To allow for handling the cases when
the TakeCell is empty, rust (and by extension Tock) provides additional
functions.
The first is .map_or(). This is useful for returning a value both when the
TakeCell is empty and when it has a contained value. For example, rather than:
#![allow(unused)] fn main() { let return = if txbuf.is_some() { txbuf.map(|txbuf| { write_done(txbuf); }); Ok(()) } else { Err(ErrorCode::RESERVE) }; }
.map_or() allows us to do this instead:
#![allow(unused)] fn main() { let return = txbuf.map_or(Err(ErrorCode::RESERVE), |txbuf| { write_done(txbuf); Ok(()) }); }
If the TakeCell is empty, the first argument (the error code) is returned,
otherwise the closure is executed and Ok(()) is returned.
Sometimes we may want to execute different code based on whether the TakeCell
is empty or not. Again, we could do this:
#![allow(unused)] fn main() { if txbuf.is_some() { txbuf.map(|txbuf| { write_done(txbuf); }); } else { write_done_failure(); }; }
Instead, however, we can use the .map_or_else() function. This allows us to
pass in two closures, one for if the TakeCell is empty, and one for if it has
contents:
#![allow(unused)] fn main() { txbuf.map_or_else(|| { write_done_failure(); }, |txbuf| { write_done(txbuf); }); }
Note, in both the .map_or() and .map_or_else() cases, the first argument
corresponds to when the TakeCell is empty.
MapCell
A MapCell is very similar to a TakeCell in its purpose and interface. What
differs is the underlying implementation. In a TakeCell, when something
take()s the contents of the cell, the memory inside is actually moved. This is
a performance problem if the data in a TakeCell is large, but saves both
cycles and memory if the data is small (like a pointer or slice) because the
internal Option can be optimized in many cases and the code operates on
registers as opposed to memory. On the flip side, MapCells introduce some
accounting overhead for small types and require a minimum number of cycles to
access.
The commit that introduced MapCell includes some performance
benchmarks, but exact performance will vary based on the usage scenario.
Generally speaking, medium to large sized buffers should prefer MapCells.
OptionalCell
OptionalCell
is effectively a wrapper for a Cell that contains an Option, like:
#![allow(unused)] fn main() { struct OptionalCell { c: Cell<Option<T>>, } }
This to an extent mirrors the TakeCell interface, where the Option is hidden
from the user. So instead of my_optional_cell.get().map(|| {}), the code can
be: my_optional_cell.map(|| {}).
OptionalCell can hold the same values that Cell can, but can also be just
None if the value is effectively unset. Using an OptionalCell (like a
NumCell) makes the code clearer and hides extra tedious function calls. This
is particularly useful when a capsule needs to hold some mutable state
(therefore requiring a Cell) but there isn't a meaningful value to use in the
new() constructor.
Comparison to TakeCell
TakeCell and OptionalCell are quite similar, but the key differentiator is
the Copy bound required for items to use some of the methods defined on
OptionalCell, such as map(). The Copy bound enables safe "reentrant"
access to the stored value, because multiple accesses will be operating on
different copies of the same stored item. The semantic difference is the name: a
TakeCell is designed for something that must literally be taken, e.g. commonly
a buffer that is given to a different subsystem in a way not easily captured by
the Rust borrow mechanisms (commonly when a buffer is passed into, borrowed,
"by" a hardware peripheral, and returned when hardware event has filled the
buffer). #2360 has some examples where
trying to convert a TakeCell into an OptionalCell does not work.
VolatileCell
A VolatileCell is just a helper type for doing volatile reads and writes to a
value. This is mostly used for accessing memory-mapped I/O registers. The
get() and set() functions are wrappers around core::ptr::read_volatile()
and core::ptr::write_volatile().
Cell Extensions
In addition to custom types, Tock adds extensions to some of
the standard cells to enhance and ease usability. The mechanism here is to add
traits to existing data types to enhance their ability. To use extensions,
authors need only use kernel::common::cells::THE_EXTENSION to pull the new
traits into scope.
NumericCellExt
NumericCellExt
extends cells that contain "numeric" types (like usize or i32) to provide
some convenient functions (add() and subtract(), for example). This
extension makes for cleaner code when storing numbers that are increased or
decreased. For example, with a typical Cell, adding one to the stored value
looks like: my_cell.set(my_cell.get() + 1). With a NumericCellExt it is a
little easier to understand: my_cell.increment() (or my_cell.add(1)).
Tock Processes
This document explains how application code works in Tock. This is not a guide to writing applications, but rather documentation of the overall design of how applications are implemented in Tock.
Overview of Processes in Tock
Processes in Tock run application code meant to accomplish some type of task for the end user. Processes run in user mode. Unlike kernel code, which runs in supervisor mode and handles device drivers, chip-specific details, as well as general operating system tasks, application code running in processes is independent of the details of the underlying hardware (except the instruction set architecture). Unlike many existing embedded operating systems, in Tock processes are not compiled with the kernel. Instead they are entirely separate code that interact with the kernel and each other through system calls.
Since processes are not a part of the kernel, application code running in a process may be written in any language that can be compiled into code capable of running on a microcontroller. Tock supports running multiple processes concurrently. Co-operatively multiprogramming is the default, but processes may also be time sliced. Processes may share data with each other via Inter-Process Communication (IPC) through system calls.
Processes run code in unprivileged mode (e.g., user mode on Cortex-M or RV32I microcontrollers). The Tock kernel uses hardware memory protection (an MPU on CortexM and a PMP on RV32I) to restrict which addresses application code running in a process can access. A process makes system calls to access hardware peripherals or modify what memory is accessible to it.
Tock supports dynamically loading and unloading independently compiled applications. In this setting, applications do not know at compile time what address they will be installed at and loaded from. To be dynamically loadable, application code must be compiled as position independent code (PIC). This allows them to be run from any address they happen to be loaded into.
In some cases, applications may know their location at compile-time. This happens, for example, in cases where the kernel and applications are combined into a single cryptographically signed binary that is accepted by a secure bootloader. In these cases, compiling an application with explicit addresses works.
Tock supports running multiple processes at the same time. The maximum number of processes supported by the kernel is typically a compile-time constant in the range of 2-4, but is limited only by the available RAM and Flash resources of the chip. Tock scheduling generally assumes that it is a small number (e.g., uses O(n) scheduling algorithms).
System Calls
System calls are how processes and the kernel share data and interact. These could include commands to drivers, subscriptions to callbacks, granting of memory to the kernel so it can store data related to the application, communication with other application code, and many others. In practice, system calls are made through library code and the application need not deal with them directly.
For example, consider the following system call that sets a GPIO pin high:
int gpio_set(GPIO_Pin_t pin) {
return command(GPIO_DRIVER_NUM, 2, pin);
}
The command system call itself is implemented as the ARM assembly instruction
svc (service call):
int __attribute__((naked))
command(uint32_t driver, uint32_t command, int data) {
asm volatile("svc 2\nbx lr" ::: "memory", "r0");
}
A detailed description of Tock's system call API and ABI can be found in TRD104. The system call documentation describes how the are implemented in the kernel.
Upcalls and Termination
The Tock kernel is completely non-blocking, and it pushes this asynchronous behavior to userspace code. This means that system calls (with one exception) do not block. Instead, they always return very quickly. Long-running operations (e.g., sending data over a bus, sampling a sensor) signal their completion to userspace through upcalls. An upcall is a function call the kernel makes on userspace code.
Yield system calls are the exception to this non-blocking rule. The yield-wait system call blocks until the kernel invokes an upcall on the process. The kernel only invokes upcalls when a process issues the yield system call. The kernel does not invoke upcalls at arbitrary points in the program.
For example, consider the case of when a process wants to sleep for 100 milliseconds. The timer library might break this into three operations:
- It registers an upcall for the timer system call driver with a Subscribe system call.
- It tells the timer system call driver to issue an upcall in 100 milliseconds by invoking a Command system call.
- It calls the yield-wait system call. This causes the process to block until the timer upcall executes. The kernel pushes a stack frame onto the process to execute the upcall; this function call returns to the instruction after yield was invoked.
When a process registers an upcall with a call to a Subscribe system call, it
may pass a pointer userdata. The kernel does not access or use this data: it
simply passes it back on each invocation of the upcall. This allows a process to
register the same function as multiple upcalls, and distinguish them by the data
passed in the argument.
It is important to note that upcalls are not executed until a process calls
yield. The kernel will enqueue upcalls as events occur within the kernel,
but the application will not handle them until it yields.
Applications which are "finished" should call an Exit system call. There are two variants of Exit: exit-terminate and exit-restart. They differ in what they signal to the kernel: does the application wish to stop running, or be rebooted?
Inter-Process Communication
Inter-process communication (IPC) allows for separate processes to communicate directly through shared buffers. IPC in Tock is implemented with a service-client model. Each process can support one service. The service is identified by the name of the application running in the process, which is included in the Tock Binary Format Header for the application. A process can communicate with multiple services and will get a unique handle for each discovered service. Clients and services communicate through shared buffers. Each client can share some of its own application memory with the service and then notify the service to instruct it to parse the shared buffer.
Services
Services are named by the package name included in the app's TBF header. To
register a service, an app can call ipc_register_svc() to setup a callback.
This callback will be called whenever a client calls notify on that service.
Clients
Clients must first discover services they wish to use with the function
ipc_discover(). They can then share a buffer with the service by calling
ipc_share(). To instruct the service to do something with the buffer, the
client can call ipc_notify_svc(). If the app wants to get notifications from
the service, it must call ipc_register_client_cb() to receive events from when
the service when the service calls ipc_notify_client().
See ipc.h in libtock-c for more information on these functions.
Application Entry Point
An application specifies the first function the kernel should call by setting
the variable init_fn_offset in its TBF header. This function should have the
following signature:
void _start(void* text_start, void* mem_start, void* memory_len, void* app_heap_break);
Process RAM and Flash Memory
The actual process binary and TBF header are stored in nonvolatile flash. This flash region is fixed when the application is installed.
When a process is loaded by the kernel, the process is assigned a fixed, contiguous region of memory in RAM. This is the entire amount of memory the process can use during its entire lifetime. This region includes the typical memory regions for a process (i.e. stack, data, and heap), but also includes the kernel's grant region for the process and the process control block.
Process RAM is memory space divided between all running apps. The figure below shows the memory space of a process.
The Tock kernel tries to impart no requirements on how a process uses its own accessible memory. As such, a process starts in a very minimal environment, with an initial stack sufficient to support a syscall, but not much more. Application startup routines should first move their program break to accommodate their desired layout, and then setup local stack and heap tracking in accordance with their runtime.
Stack and Heap
Applications can specify their working memory requirements by setting the
minimum_ram_size variable in their TBF headers. Note that the Tock kernel
treats this as a minimum, depending on the underlying platform, the amount of
memory may be larger than requested, but will never be smaller.
If there is insufficient memory to load your application, the kernel will fail during loading and print a message.
If an application exceeds its allotted memory during runtime, the application will crash (see the Debugging section for an example).
Isolation
The kernel limits processes to only accessing their own memory regions by using hardware memory protection units. On Cortex-M platforms this is the MPU and on RV32I platforms this is the PMP (or ePMP).
Before doing a context switch to a process the kernel configures the memory protection unit for that process. Only the memory regions assigned to the process are set as accessible.
Flash Isolation
Processes cannot access arbitrary addresses in flash, including bootloader and kernel code. They are also prohibited from reading or writing the nonvolatile regions of other processes.
Processes do have access to their own memory in flash. Certain regions, including their Tock Binary Format (TBF) header and a protected region after the header, are read-only, as the kernel must be able to ensure the integrity of the header. In particular, the kernel needs to know the total size of the app to find the next app in flash. The kernel may also wish to store nonvolatile information about the app (e.g. how many times it has entered a failure state) that the app should not be able to alter.
The remainder of the app, and in particular the actual code of the app, is considered to be owned by the app. The app can read the flash to execute its own code. If the MCU uses flash for its nonvolatile memory the app can not likely directly modify its own flash region, as flash typically requires some hardware peripheral interaction to erase or write flash. In this case, the app would require kernel support to modify its flash region.
RAM Isolation
For the process's RAM region, the kernel maintains a brk pointer and gives the
process full access to only its memory region below that brk pointer. Processes
can use the Memop syscall to increase the brk pointer. Memop syscalls can
also be used by the process to inform the kernel of where it has placed its
stack and heap, but these are entirely used for debugging. The kernel does not
need to know how the process has organized its memory for normal operation.
All kernel-owned data on behalf of a process (i.e. grant and PCB) is stored at the top (i.e. highest addresses) of the process's memory region. Processes are never given any access to this memory, even though it is within the process's allocated memory region.
Processes can choose to explicitly share portions of their RAM with the kernel
through the use of Allow syscalls. This gives capsules read/write access to
the process's memory for use with a specific capsule operation.
Debugging
If an application crashes, Tock provides a very detailed stack dump. By default, when an application crashes Tock prints a crash dump over the platform's default console interface. When your application crashes, we recommend looking at this output very carefully: often we have spent hours trying to track down a bug which in retrospect was quite obviously indicated in the dump, if we had just looked at the right fields.
Note that because an application is relocated when it is loaded, the binaries
and debugging .lst files generated when the app was originally compiled will not
match the actual executing application on the board. To generate matching files
(and in particular a matching .lst file), you can use the make debug target
app directory to create an appropriate .lst file that matches how the
application was actually executed. See the end of the debug print out for an
example command invocation.
---| Fault Status |---
Data Access Violation: true
Forced Hard Fault: true
Faulting Memory Address: 0x00000000
Fault Status Register (CFSR): 0x00000082
Hard Fault Status Register (HFSR): 0x40000000
---| App Status |---
App: crash_dummy - [Fault]
Events Queued: 0 Syscall Count: 0 Dropped Callback Count: 0
Restart Count: 0
Last Syscall: None
╔═══════════╤══════════════════════════════════════════╗
║ Address │ Region Name Used | Allocated (bytes) ║
╚0x20006000═╪══════════════════════════════════════════╝
│ ▼ Grant 948 | 948
0x20005C4C ┼───────────────────────────────────────────
│ Unused
0x200049F0 ┼───────────────────────────────────────────
│ ▲ Heap 0 | 4700 S
0x200049F0 ┼─────────────────────────────────────────── R
│ Data 496 | 496 A
0x20004800 ┼─────────────────────────────────────────── M
│ ▼ Stack 72 | 2048
0x200047B8 ┼───────────────────────────────────────────
│ Unused
0x20004000 ┴───────────────────────────────────────────
.....
0x00030400 ┬─────────────────────────────────────────── F
│ App Flash 976 L
0x00030030 ┼─────────────────────────────────────────── A
│ Protected 48 S
0x00030000 ┴─────────────────────────────────────────── H
R0 : 0x00000000 R6 : 0x20004894
R1 : 0x00000001 R7 : 0x20004000
R2 : 0x00000000 R8 : 0x00000000
R3 : 0x00000000 R10: 0x00000000
R4 : 0x00000000 R11: 0x00000000
R5 : 0x20004800 R12: 0x12E36C82
R9 : 0x20004800 (Static Base Register)
SP : 0x200047B8 (Process Stack Pointer)
LR : 0x000301B7
PC : 0x000300AA
YPC : 0x000301B6
APSR: N 0 Z 1 C 1 V 0 Q 0
GE 0 0 0 0
EPSR: ICI.IT 0x00
ThumbBit true
Cortex-M MPU
Region 0: base: 0x20004000, length: 8192 bytes; ReadWrite (0x3)
Region 1: base: 0x30000, length: 1024 bytes; ReadOnly (0x6)
Region 2: Unused
Region 3: Unused
Region 4: Unused
Region 5: Unused
Region 6: Unused
Region 7: Unused
To debug, run `make debug RAM_START=0x20004000 FLASH_INIT=0x30059`
in the app's folder and open the .lst file.
Applications
For example applications, see the language specific userland repos:
- libtock-c: C and C++ apps.
- libtock-rs: Rust apps.
Tock Startup
This document walks through how all of the components of Tock start up.
When a microcontroller boots (or resets, or services an interrupt) it loads an address for a function from a table indexed by interrupt type known as the vector table. The location of the vector table in memory is chip-specific, thus it is placed in a special section for linking.
Cortex-M microcontrollers expect a vector table to be at address 0x00000000. This can either be a software bootloader or the Tock kernel itself.
RISC-V gives hardware designers a great deal of design freedom for how booting works. Typically, after coming out of reset, a RISC-V processor will start executing out of ROM but this may be configurable. The HiFive1 board, for example, supports booting out ROM, One-Time programmable (OTP) memory or a QSPI flash controller.
Optional Bootloader
Many Tock boards (including Hail and imix) use a software bootloader that executes when the MCU first boots. The bootloader provides a way to talk to the chip over serial and to load new code, as well as potentially other administrative tasks. When the bootloader has finished, it tells the MCU that the vector table has moved (to a known address), and then jumps to a new address.
Tock first instructions
ARM Vector Table and IRQ table
On ARM chips, Tock splits the vector table into two sections, .vectors which
hold the first 16 entries, common to all ARM cores, and .irqs, which is
appended to the end and holds chip-specific interrupts.
In the source code then, the vector table will appear as an array that is marked
to be placed into the .vectors section.
In Rust, a vector table will look something like this:
#![allow(unused)] fn main() { #[link_section=".vectors"] #[used] // Ensures that the symbol is kept until the final binary pub static BASE_VECTORS: [unsafe extern fn(); 16] = [ _estack, // Initial stack pointer value tock_kernel_reset_handler, // Tock's reset handler function /* NMI */ unhandled_interrupt, // Generic handler function ... }
In C, a vector table will look something like this:
__attribute__ ((section(".vectors")))
interrupt_function_t interrupt_table[] = {
(interrupt_function_t) (&_estack),
tock_kernel_reset_handler,
NMI_Handler,
At the time of this writing (November 2018), typical chips (like the sam4l and
nrf52) use the same handler for all interrupts, and look something like:
#![allow(unused)] fn main() { #[link_section = ".vectors"] #[used] // Ensures that the symbol is kept until the final binary pub static IRQS: [unsafe extern "C" fn(); 80] = [generic_isr; 80]; }
RISC-V
All RISC-V boards are linked to run the _start function as the first function
that gets run before jumping to main. This is currently inline assembly as of
this writing:
#![allow(unused)] fn main() { #[cfg(all(target_arch = "riscv32", target_os = "none"))] #[link_section = ".riscv.start"] #[export_name = "_start"] #[naked] pub extern "C" fn _start() { unsafe { asm! (" }
Reset Handler
On boot, the MCU calls the reset handler function defined in vector table. In Tock, the implementation of the reset handler function is architecture specific and handles memory initialization.
Memory Initialization
The main operation the reset handler does is setup the kernel's memory by
copying it from flash. For the SAM4L, this is in the
initialize_ram_jump_to_main() function in arch/cortex-m/src/lib.rs. Once
finished the reset handler jumps to the main() function defined by each board.
The memory initialization function is implemented in assembly as Rust expects that memory is correctly initialized before any Rust instructions execute.
RISC-V Trap setup
The mtvec register needs to be set on RISC-V to handle traps. Setting of the
vectors is handled by chip specific functions. The common RISC-V trap handler is
_start_trap, defined in arch/rv32i/src/lib.rs.
MCU Setup
Any normal MCU initialization is typically handled next. This includes things like enabling the correct clocks or setting up DMA channels.
Peripheral and Capsule Initialization
After the MCU is set up, main initializes peripherals and capsules.
Peripherals are on-chip subsystems, such as UARTs, ADCs, and SPI buses; they are
chip-specific code that read and write memory-mapped I/O registers and are found
in the corresponding chips directory. While peripherals are chip-specific
implementations, they typically provide hardware-independent traits, called
hardware independent layer (HIL) traits, found in kernel/src/hil.
Capsules are software abstractions and services; they are chip-independent and
found in the capsules directory. For example, on the imix and hail platforms,
the SAM4L SPI peripheral is implemented in chips/sam4l/src/spi.rs, while the
capsule that virtualizes the SPI so multiple capsules can share it is in
capsules/src/virtual_spi.rs. This virtualizer can be chip-independent because
the chip-specific code implements the SPI HIL (kernel/src/hil/spi.rs). The
capsule that implements a system call API to the SPI for processes is in
capsules/src/spi.rs.
Boards that initialize many peripherals and capsules use the Component trait
to encapsulate this complexity from main. The Component trait
(kernel/src/component.rs) encapsulates any initialization a particular
peripheral, capsule, or set of capsules need inside a call to the function
finalize(). Changing what the build of the kernel includes involve changing
just which Components are initialized, rather than changing many lines of
main. Components are typically found in the components crate in the
/boards folder, but may also be board-specific and found inside a components
subdirectory of the board directory, e.g. boards/imix/src/imix_components.
Application Startup
Once the kernel components have been setup and initialized, the applications must be loaded. This procedure essentially iterates over the processes stored in flash, extracts and validates their Tock Binary Format header, and adds them to an internal array of process structs.
An example version of this loop is in kernel/src/process.rs as the
load_processes() function. After setting up pointers, it tries to create a
process from the starting address in flash and with a given amount of memory
remaining. If the header is validated, it tries to load the process into memory
and initialize all of the bookkeeping in the kernel associated with the process.
This can fail if the process needs more memory than is available on the chip. If
the process is successfully loaded the kernel importantly notes the address of
the application's entry function which is called when the process is started.
The load process loop ends when the kernel runs out of statically allocated memory to store processes in, available RAM for processes, or there is an invalid TBF header in flash.
Scheduler Execution
Tock provides a Scheduler trait that serves as an abstraction to allow for
plugging in different scheduling algorithms. Schedulers should be initialized at
the end of the reset handler. The final thing that the reset handler must do is
call kernel.kernel_loop(). This starts the Tock scheduler and the main
operation of the kernel.
Syscalls
This document explains how system calls work in Tock with regards to both the kernel and applications. TRD104 contains the more formal specification of the system call API and ABI for 32-bit systems. This document describes the considerations behind the system call design.
Overview of System Calls in Tock
System calls are the method used to send information from applications to the kernel. Rather than directly calling a function in the kernel, applications trigger a context switch to the kernel. The kernel then uses the values in registers and the stack at the time of the interrupt call to determine how to route the system call and which driver function to call with which data values.
Using system calls has three advantages. First, the act of triggering a service call interrupt can be used to change the processor state. Rather than being in unprivileged mode (as applications are run) and limited by the Memory Protection Unit (MPU), after the service call the kernel switches to privileged mode where it has full control of system resources (more detail on ARM processor modes).
Second, context switching to the kernel allows it to do other resource handling before returning to the application. This could include running other applications, servicing queued upcalls, or many other activities.
Finally, and most importantly, using system calls allows applications to be built independently from the kernel. The entire codebase of the kernel could change, but as long as the system call interface remains identical, applications do not even need to be recompiled to work on the platform. Applications, when separated from the kernel, no longer need to be loaded at the same time as the kernel. They could be uploaded at a later time, modified, and then have a new version uploaded, all without modifying the kernel running on a platform.
Tock System Call Types
Tock has 7 general types (i.e. "classes") of system calls:
| Syscall Class |
|---|
| Yield |
| Subscribe |
| Command |
| Read-Write Allow |
| Read-Only Allow |
| Memop |
| Exit |
All communication and interaction between applications and the kernel uses only these system calls.
Within these system calls, there are two general groups of syscalls: administrative and capsule-specific.
-
Administrative Syscalls: These adjust the execution or resources of the running process, and are handled entirely by the core kernel. These calls always behave the same way no matter which kernel resources are exposed to userspace. This group includes:
YieldMemopExit
-
Capsule-Specific Syscalls: These interact with specific capsules (i.e. kernel modules). While the general semantics are the same no matter the underlying capsule or resource being accessed, the actual behavior of the syscall depends on which capsule is being accessed. For example, a command to a timer capsule might start a timer, whereas a command to a temperature sensor capsule might start a temperature measurement. This group includes:
SubscribeCommandRead-Write AllowRead-Only Allow
All Tock system calls are synchronous, which means they immediately return to the application. Capsules must not implement long-running operations by blocking on a command system call, as this prevents other applications or kernel routines from running – kernel code is never preempted.
System Call Descriptions
This provides an introduction to each type of Tock system call. These are described in much more detail in TRD104.
-
Yield: An application yields its execution back to the kernel. The kernel will only trigger an upcall for a process after it has called yield. -
Memop: This group of "memory operations" allows a process to adjust its memory break (i.e. request more memory be available for the process to use), learn about its memory allocations, and provide debug information. -
Exit: An application can call exit to inform the kernel it no longer needs to execute and its resources can be freed. This also lets the process request a restart. -
Subscribe: An application can issue a subscribe system call to register upcalls, which are functions being invoked in response to certain events. These upcalls are similar in concept to UNIX signal handlers. A driver can request an application-provided upcall to be invoked. Every system call driver can provide multiple "subscribe slots", each of which the application can register a upcall to. -
Command: Applications can use command-type system calls to signal arbitrary events or send requests to the userspace driver. A common use-case for command-style systems calls is, for instance, to request that a driver start some long-running operation. -
Read-only Allow: An application may expose some data for drivers to read. Tock provides the read-only allow system call for this purpose: an application invokes this system call passing a buffer, the contents of which are then made accessible to the requested driver. Every driver can have multiple "allow slots", each of which the application can place a buffer in. -
Read-write Allow: Works similarly to read-only allow, but enables drivers to also mutate the application-provided buffer.
Data Movement Between Userspace and Kernel
All data movement and communication between userspace and the kernel happens through syscalls. This section describes the general mechanisms for data movement that syscalls enable. In this case, we use "data" to be very general and describe any form of information transfer.
Userspace → Kernel
Moving data from a userspace application to the kernel happens in two forms.
-
Instruction with simple options. Applications often want to instruct the kernel to take some action (e.g. play a sound, turn on an LED, or take a sensor reading). Some of these may require small amounts of configuration (e.g. which LED, or the resolution of the sensor reading). This data transfer is possible with the
Commandsyscall.There are two important considerations for
Command. First, the amount of data that can be transferred for configuration is on the order of 32 bits. Second,Commandis non-blocking, meaning theCommandsyscall will finish before the requested operation completes. -
Arbitrary buffers of data. Applications often need to pass data to the kernel for the kernel to use it for some action (e.g. audio samples to play, data packets to transmit, or data buffers to encrypt). This data transfer is possible with the "allow" family of syscalls, specifically the
Read-only allow.Once an application shares a buffer with the kernel via allow, the process should not use that buffer until it has "un-shared" the buffer with the kernel.
Kernel → Userspace
Moving data from the kernel to a userspace application to the kernel happens in three ways.
-
Small data that is synchronously available. The kernel may have status information or fixed values it can send to an application (e.g. how many packets have been sent, or the maximum resolution of an ADC). This can be shared via the return value to a
Commandsyscall. An application must call theCommandsyscall, and the return value must be immediately available, but the kernel can provide about 12 bytes of data back to the application via the return value to the command syscall. -
Arbitrary buffers of data. The kernel may have more data to send to application (e.g. an incoming data packet, or ADC readings). This data can be shared with the application by filling in a buffer the application has already shared with the kernel via an allow syscall. For the kernel to be able to modify the buffer, the application must have called the
Read-write allowsyscall. -
Events with small amounts of data. The kernel may need to notify an application about a recent event or provide small amounts of new data (e.g. a button was pressed, a sensor reading is newly available, or a incoming packet has arrived). This is accomplished by the kernel issuing an "upcall" to the application. You can think of an upcall as a callback, where when the process resumes running it executes a particular function provided with particular arguments.
For the kernel to be able to trigger an upcall, the process must have first called
Subscribeto pass the address of the function the upcall will execute.The kernel can pass a few arguments (roughly 12 bytes) with the upcall. This is useful for providing small amounts of data, like a reading sensor reading.
System Call Implementations
All system calls are implemented via context switches. A couple values are passed along with the context switch to indicate the type and manor of the syscall. A process invokes a system call by triggering context switch via a software interrupt that transitions the microcontroller to supervisor/kernel mode. The exact mechanism for this is architecture-specific. TRD104 specifies how userspace and the kernel pass values to each other for Cortex-M and RV32I platforms.
Handling a context switch is one of the few pieces of architecture-specific Tock
code. The code is located in lib.rs within the arch/ folder under the
appropriate architecture. As this code deals with low-level functionality in the
processor it is written in assembly wrapped as Rust function calls.
Context Switch Interface
The architecture crates (in the /arch folder) are responsible for implementing
the UserspaceKernelBoundary trait which defines the functions needed to allow
the kernel to correctly switch to userspace. These functions handle the
architecture-specific details of how the context switch occurs, such as which
registers are saved on the stack, where the stack pointer is stored, and how
data is passed for the Tock syscall interface.
Cortex-M Architecture Details
Starting in the kernel before any application has been run but after the process
has been created, the kernel calls switch_to_user. This code sets up registers
for the application, including the PIC base register and the process stack
pointer, then triggers a service call interrupt with a call to svc. The svc
handler code automatically determines if the system desired a switch to
application or to kernel and sets the processor mode. Finally, the svc handler
returns, directing the PC to the entry point of the app.
The application runs in unprivileged mode while executing. When it needs to use
a kernel resource it issues a syscall by running svc instruction. The
svc_handler determines that it should switch to the kernel from an app, sets
the processor mode to privileged, and returns. Since the stack has changed to
the kernel's stack pointer (rather than the process stack pointer), execution
returns to switch_to_user immediately after the svc that led to the
application starting. switch_to_user saves registers and returns to the kernel
so the system call can be processed.
On the next switch_to_user call, the application will resume execution based
on the process stack pointer, which points to the instruction after the system
call that switched execution to the kernel.
Syscalls may clobber userspace memory, as the kernel may write to buffers
previously given to it using Allow. The kernel will not clobber any userspace
registers except for the return value register (r0). However, Yield must be
treated as clobbering more registers, as it can call an upcall in userspace
before returning. This upcall can clobber r0-r3, r12, and lr. See
this comment
in the libtock-c syscall code for more information about Yield.
RISC-V Architecture Details
Tock assumes that a RISC-V platform that supports context switching has two privilege modes: machine mode and user mode.
The RISC-V architecture provides very lean support for context switching,
providing significant flexibility in software on how to support context
switches. The hardware guarantees the following will happen during a context
switch: when switching from kernel mode to user mode by calling the mret
instruction, the PC is set to the value in the mepc CSR, and the privilege
mode is set to the value in the MPP bits of the mstatus CSR. When switching
from user mode to kernel mode using the ecall instruction, the PC of the
ecall instruction is saved to the mepc CSR, the correct bits are set in the
mcause CSR, and the privilege mode is restored to machine mode. The kernel can
store 32 bits of state in the mscratch CSR.
Tock handles context switching using the following process. When switching to
userland, all register contents are saved to the kernel's stack. Additionally, a
pointer to a per-process struct of stored process state and the PC of where in
the kernel to resume executing after the process switches back to kernel mode
are stored to the kernel's stack. Then, the PC of the process to start executing
is put into the mepc CSR, the kernel stack pointer is saved in mscratch, and
the previous contents of the app's registers from the per-process stored state
struct are copied back into the registers. Then mret is called to switch to
user mode and begin executing the app.
An application calls a system call with the ecall instruction. This causes the
trap handler to execute. The trap handler checks mscratch, and if the value is
nonzero then it contains the stack pointer of the kernel and this trap must have
happened while the system was executing an application. Then, the kernel stack
pointer from mscratch is used to find the pointer to the stored state struct,
and all process registers are saved. The trap handler also saves the process PC
from the mepc CSR and the mcause CSR. It then loads the kernel address of
where to resume the context switching code to mepc and calls mret to exit
the trap handler. Back in the context switching code, the kernel restores its
registers from its stack. Then, using the contents of mcause the kernel
decides why the application stopped executing, and if it was a system call which
one it is. Returning the context switch reason ends the context switching
process.
All values for the system call functions are passed in registers a0-a4. No
values are stored to the application stack. The return value for system call is
set in a0. In most system calls the kernel will not clobber any userspace
registers except for this return value register (a0). However, the yield()
system call results in a upcall executing in the process. This can clobber all
caller saved registers, as well as the return address (ra) register.
Upcalls
The kernel can signal events to userspace via upcalls. Upcalls run a function in
userspace after a context switch. The kernel, as part of the upcall, provides
four 32 bit arguments. The address of the function to run is provided via the
Subscribe syscall.
Process Startup
Upon process initialization, the kernel starts executing a process by running an
upcall to the process's entry point. A single function call task is added to the
process's upcall queue. The function is determined by the ENTRY point in the
process TBF header (typically the _start symbol) and is passed the following
arguments in registers r0 - r3:
r0: the base address of the process coder1: the base address of the processes allocated memory regionr2: the total amount of memory in its regionr3: the current process memory break
How System Calls Connect to Capsules (Drivers)
After a system call is made, the call is handled and routed by the Tock kernel
in kernel.rs
through a series of steps.
-
For
Command,Subscribe,Read-Write Allow, andRead-Only Allowsystem calls, the kernel calls a platform-defined system call filter function. This function determines if the kernel should handle the system call or not.Yield,Exit, andMemopsystem calls are not filtered. This filter function allows the kernel to impose security policies that limit which system calls a process might invoke. The filter function takes the system call and which process issued the system call to return aResult<(), ErrorCode>to signal if the system call should be handled or if an error should be returned to the process. If the filter function disallows the system call it returnsErr(ErrorCode)and theErrorCodeis provided to the process as the return code for the system call. Otherwise, the system call proceeds. The filter interface is unstable and may be changed in the future. -
The kernel scheduler loop handles the
ExitandYieldsystem calls. -
To handle
Memopsystem calls, the scheduler loop invokes thememopmodule, which implements the Memop class. -
Command,Subscribe,Read-Write Allow, andRead-Only Allowfollow a more complex execution path because are implemented by drivers. To route these system calls, the scheduler loop calls a struct that implements theSyscallDriverLookuptrait. This trait has awith_driver()function that the driver number as an argument and returns either a reference to the corresponding driver orNoneif it is not installed. The kernel uses the returned reference to call the appropriate system call function on that driver with the remaining system call arguments.An example board that implements the
SyscallDriverLookuptrait looks something like this:#![allow(unused)] fn main() { struct TestBoard { console: &'static Console<'static, usart::USART>, } impl SyscallDriverLookup for TestBoard { fn with_driver<F, R>(&self, driver_num: usize, f: F) -> R where F: FnOnce(Option<&kernel::syscall::SyscallDriver>) -> R { match driver_num { 0 => f(Some(self.console)), // use capsules::console::DRIVER_NUM rather than 0 in real code _ => f(None), } } } }TestBoardthen supports one driver, the UART console, and maps it to driver number 0. Anycommand,subscribe, andallowsycalls to driver number 0 will get routed to the console, and all other driver numbers will returnErr(ErrorCode::NODEVICE).
Identifying Syscalls
A series of numbers and conventions identify syscalls as they pass via a context switch.
Syscall Class
The first identifier specifies which syscall it is. The values are specified as in the table and are fixed by convention.
| Syscall Class | Syscall Class Number |
|---|---|
| Yield | 0 |
| Subscribe | 1 |
| Command | 2 |
| Read-Write Allow | 3 |
| Read-Only Allow | 4 |
| Memop | 5 |
| Exit | 6 |
Driver Numbers
For capsule-specific syscalls, the syscall must be directed to the correct
capsule (driver). The with_driver() function takes an argument driver_num to
identify the driver.
To enable the kernel and userspace to agree, we maintain a list of known driver numbers.
To support custom capsules and driver, a driver_num whose highest bit is set
is private and can be used by out-of-tree drivers.
Syscall-Specific Numbers
For each capsule/driver, the driver can support more than one of each syscall (e.g. it can support multiple commands). Another number included in the context switch indicates which of the syscall the call refers to.
For the Command syscall, the command_num 0 is reserved as an existence
check: userspace can call a command for a driver with command_num 0 to check
if the driver is installed on the board. Otherwise, the numbers are entirely
driver-specific.
For Subscribe, Read-only allow, and Read-write allow, the numbers start at
0 and increment for each defined use of the various syscalls. There cannot be a
gap between valid subscribe or allow numbers. The actual meaning of each
subscribe or allow number is driver-specific.
Identifying Error and Return Types
Tock includes some defined types and conventions for errors and return values between the kernel and userspace. These allow the kernel to indicate success and failure to userspace.
Naming Conventions
*Code(e.g.ErrorCode,StatusCode): These types are mappings between numeric values and semantic meanings. These can always be encoded in ausize.*Return(e.g.SyscallReturn): These are more complex return types that can include arbitrary values, errors, or*Codetypes.
Type Descriptions
-
*CodeTypes:-
ErrorCode: A standard set of errors and their numeric representations in Tock. This is used to represent errors for syscalls, and elsewhere in the kernel. -
StatusCode: All errors inErrorCodeplus a Success value (represented by 0). This is used to pass a success/error status between the kernel and userspace.StatusCodeis a pseudotype that is not actually defined as a concrete Rust type. Instead, it is always encoded as ausize. Even though it is not a concrete type, it is useful to be able to return to it conceptually, so we give it the nameStatusCode.The intended use of
StatusCodeis to convey success/failure to userspace in upcalls. To try to keep things simple, we use the same numeric representations inStatusCodeas we do withErrorCode.
-
-
*ReturnTypes:SyscallReturn: The return type for a syscall. Includes whether the syscall succeeded or failed, optionally additional data values, and in the case of failure anErrorCode.
Tock Binary Format
Tock userspace applications must follow the Tock Binary Format (TBF). This format describes how the binary data representing a Tock app is formatted. A TBF Object has four parts:
- A header section: encodes metadata about the TBF Object
- The actual Userspace Binary
- An optional Footer section: encodes credentials for the TBF Object
- Padding (optional).
The general TBF format is structured as depicted:
Tock App Binary:
Start of app ─►┌──────────────────────┐◄┐ ◄┐ ◄┐
│ TBF Header │ │ Protected │ │
├──────────────────────┤ │ region │ │
│ Protected trailer │ │ │ Covered │
│ (Optional) │ │ │ by │
├──────────────────────┤◄┘ │ integrity │
│ │ │ │ Total
│ Userspace │ │ │ size
│ Binary │ │ │
│ │ │ │
│ │ │ │
│ │ │ │
├──────────────────────┤ ◄┘ │
│ TBF Footer │ │
│ (Optional) │ │
├──────────────────────┤ │
│ Padding (Optional) │ │
└──────────────────────┘ ◄┘
The Header is interpreted by the kernel (and other tools, like tockloader) to understand important aspects of the app. In particular, the kernel must know where in the application binary is the entry point that it should start executing when running the app for the first time.
The Header is encompassed in the Protected Region, which is the region at the beginning of the app that the app itself cannot access or modify at runtime. This provides a mechanism for the kernel to store persistent data on behalf of the app.
After the Protected Region the app is free to include whatever Userspace Binary it wants, and the format is completely up to the app. This is generally the output binary as created by a linker, but can include any additional binary data. This must include all data needed to actually execute the app. All support for relocations must be handled by the app itself, for example.
If the TBF Object has a Program Header in the Header section, the Userspace Binary can be followed by optional TBF Footers.
TBF Headers and Footers differ in how they are handled for TBF Object integrity. Integrity values (e.g., hashes) for a TBF Object are computed over the Protected Region section and Userspace Binary but not the Footer section or the padding after footers. TBF Headers are covered by integrity, while TBF Footers are not covered by integrity.
Finally, the TBF Object can be padded to a specific length. This is useful when a memory protection unit (MPU) restricts the length and offset of protection regions to powers of two. In such cases, padding allows a TBF Object to be padded to a power of two in size, so the next TBF Object is at a valid alignment.
TBF Design Requirements
The TBF format supports several design choices within the kernel, including:
- App discovery at boot
- Signed apps
- Extensibility and backwards compatibility
App Discovery
When the Tock kernel boots it must discover installed applications. The TBF format supports this by enabling a linked-list structure of apps, where TBF Objects in Tock are stored sequentially in flash memory. The start of TBF Object N+1 is immediately at the end of TBF Object N. The start of the first TBF Object is placed at a well-known address. The kernel then discovers apps by iterating through this array of TBF Objects.
To enable this, the TBF Header specifies the length of the TBF Object so that the kernel can find the start of the next one. If there is a gap between TBF Objects an "empty object" can be inserted to keep the structure intact.
Tock apps are typically stored in sorted order, from longest to shortest. This is to help match MPU rules about alignment.
A TBF Object can contain no code. A TBF Object can be marked as disabled to act as padding between other objects.
Signed Apps
TBF Objects can include a credential to provide integrity or other security properties. Credentials are stored in the TBF Footer. As credentials cannot include themselves, credentials are not computed over the TBF Footer.
The TBF Footer region can include any number of credentials.
TBF Headers and Footers Format
Both TBF Footers and Headers use a "TLV" (type-length-value) format. This means individual entries within the Header and Footer are self-identifying, and different applications can include different entries in the Header and Footer. This also simplifies adding new features to the TBF format over time, as new TLV objects can be defined.
In general, unknown TLVs should be ignored during parsing.
Both TBF Footers and Headers use the same format to simplify parsing.
TBF Header Section
The TBF Header section contains all of a TBF Object's headers. All TBF Objects have a Base Header and the Base Header is always first. All headers are a multiple of 4 bytes long; the TBF Header section is multiple of 4 bytes long.
After the Base Header come optional headers. Optional headers are structured as TLVs (type-length-values). Footers are encoded in the same way. Footers are also called headers for historical reasons: originally TBFs only had headers, and since footers follow the same format TBFs keep these types without changing their names.
TBF Header TLV Types
Each header is identified by a 16-bit number, as specified:
#![allow(unused)] fn main() { // Identifiers for the optional header structs. enum TbfHeaderTypes { TbfHeaderMain = 1, TbfHeaderWriteableFlashRegions = 2, TbfHeaderPackageName = 3, TbfHeaderPicOption1 = 4, TbfHeaderFixedAddresses = 5, TbfHeaderPermissions = 6, TbfHeaderPersistent = 7, TbfHeaderKernelVersion = 8, TbfHeaderProgram = 9, TbfFooterCredentials = 128, } }
Each header starts with the following TLV structure:
#![allow(unused)] fn main() { // Type-length-value header to identify each struct. struct TbfHeaderTlv { tipe: TbfHeaderTypes, // 16 bit specifier of which struct follows // When highest bit of the 16 bit specifier is set // it indicates out-of-tree (private) TLV entry length: u16, // Number of bytes of the following struct } }
TLV elements are aligned to 4 bytes. If a TLV element size is not 4-byte aligned, it will be padded with up to 3 bytes. Each element begins with a 16-bit type and 16-bit length followed by the element data:
0 2 4
+-------------+-------------+-----...---+
| Type | Length | Data |
+-------------+-------------+-----...---+
Typeis a 16-bit unsigned integer specifying the element type.Lengthis a 16-bit unsigned integer specifying the size of the data field in bytes.Datais the element specific data. The format for thedatafield is determined by itstype.
TBF Header Base
The TBF Header section contains a Base Header, followed by a sequence of type-length-value encoded elements. All fields in both the base header and TLV elements are little-endian. The base header is 16 bytes, and has 5 fields:
#![allow(unused)] fn main() { struct TbfHeaderV2Base { version: u16, // Version of the Tock Binary Format (currently 2) header_size: u16, // Number of bytes in the TBF header section total_size: u32, // Total padded size of the program image in bytes, including header flags: u32, // Various flags associated with the application checksum: u32, // XOR of all 4 byte words in the header, including existing optional structs } }
Encoding in flash:
0 2 4 6 8
+-------------+-------------+---------------------------+
| Version | Header Size | Total Size |
+-------------+-------------+---------------------------+
| Flags | Checksum |
+---------------------------+---------------------------+
-
Versiona 16-bit unsigned integer specifying the TBF header version. Always2. -
Header Sizea 16-bit unsigned integer specifying the length of the entire TBF header in bytes (including the base header and all TLV elements). -
Total Sizea 32-bit unsigned integer specifying the total size of the TBF in bytes (including the header). -
Flagsspecifies properties of the process.3 2 1 0 1 0 9 8 7 6 5 4 3 2 1 0 9 8 7 6 5 4 3 2 1 0 9 8 7 6 5 4 3 2 1 0 +-+-+-+-+-+-+-+-+-+-+-+-+-+-+-+-+-+-+-+-+-+-+-+-+-+-+-+-+-+-+-+-+ | Reserved |S|E| +-+-+-+-+-+-+-+-+-+-+-+-+-+-+-+-+-+-+-+-+-+-+-+-+-+-+-+-+-+-+-+-+- Bit 0 marks the process enabled. A
1indicates the process is enabled. Disabled processes will not be launched at startup. - Bit 1 marks the process as sticky. A
1indicates the process is sticky. Sticky processes require additional confirmation to be erased. For example,tockloaderrequires the--forceflag erase them. This is useful for services running as processes that should always be available. - Bits 2-31 are reserved and should be set to 0.
- Bit 0 marks the process enabled. A
-
Checksumthe result of XORing each 4-byte word in the header, excluding the word containing the checksum field itself.
Header TLVs
TBF may contain arbitrary element types. To avoid type ID collisions between elements defined by the Tock project and elements defined out-of-tree, the ID space is partitioned into two segments. Type IDs defined by the Tock project will have their high bit (bit 15) unset, and type IDs defined out-of-tree should have their high bit set.
1 Main
All apps must have either a Main header or a Program header. The Main header is deprecated in favor of the Program header.
#![allow(unused)] fn main() { // All apps must have a Main Header or a Program Header; it may have both. // Without either, the "app" is considered padding and used to insert an empty // linked-list element into the app flash space. If an app has both, it is the // kernel's decision which to use. Older kernels use Main Headers, while newer // (>= 2.1) kernels use Program Headers. struct TbfHeaderMain { base: TbfHeaderTlv, init_fn_offset: u32, // The function to call to start the application protected_trailer_size: u32, // The number of app-immutable bytes after the header minimum_ram_size: u32, // How much RAM the application is requesting } }
The Main element has three 32-bit fields:
0 2 4 6 8
+-------------+-------------+---------------------------+
| Type (1) | Length (12) | init_offset |
+-------------+-------------+---------------------------+
| protected_trailer_size | min_ram_size |
+---------------------------+---------------------------+
init_offsetthe offset in bytes from the beginning of binary payload (i.e. the actual application binary) that contains the first instruction to execute (typically the_startsymbol).protected_trailer_sizethe size of the protected region after the TBF headers. Processes do not have write access to the protected region. TBF headers are contained in the protected region, but are not counted towardsprotected_trailer_size. The protected region thus starts at the first byte of the TBF base header, and isheader_size + protected_trailer_sizebytes in size.minimum_ram_sizethe minimum amount of memory, in bytes, the process needs.
If the Main TLV header is not present, these values all default to 0.
The Main Header and Program Header have overlapping functionality. If a TBF Object has both, the kernel decides which to use. Tock is transitioning to having the Program Header as the standard one to use, but older kernels (2.0 and earlier) do not recognize it and use the Main Header.
2 Writeable Flash Region
#![allow(unused)] fn main() { // A defined flash region inside of the app's flash space. struct TbfHeaderWriteableFlashRegion { writeable_flash_region_offset: u32, writeable_flash_region_size: u32, } // One or more specially identified flash regions the app intends to write. struct TbfHeaderWriteableFlashRegions { base: TbfHeaderTlv, writeable_flash_regions: [TbfHeaderWriteableFlashRegion], } }
Writeable flash regions indicate portions of the binary that the process
intends to mutate in flash.
0 2 4 6 8
+-------------+-------------+---------------------------+
| Type (2) | Length | offset |
+-------------+-------------+---------------------------+
| size | ...
+---------------------------+
offsetthe offset from the beginning of the binary of the writeable region.sizethe size of the writeable region.
3 Package Name
#![allow(unused)] fn main() { // Optional package name for the app. struct TbfHeaderPackageName { base: TbfHeaderTlv, package_name: [u8], // UTF-8 string of the application name } }
The Package name specifies a unique name for the binary. Its only field is an
UTF-8 encoded package name.
0 2 4
+-------------+-------------+----------...-+
| Type (3) | Length | package_name |
+-------------+-------------+----------...-+
package_nameis an UTF-8 encoded package name
5 Fixed Addresses
#![allow(unused)] fn main() { // Fixed and required addresses for process RAM and/or process flash. struct TbfHeaderV2FixedAddresses { base: TbfHeaderTlv, start_process_ram: u32, start_process_flash: u32, } }
Fixed Addresses allows processes to specify specific addresses they need for
flash and RAM. Tock supports position-independent apps, but not all apps are
position-independent. This allows the kernel (and other tools) to avoid loading
a non-position-independent binary at an incorrect location.
0 2 4 6 8
+-------------+-------------+---------------------------+
| Type (5) | Length (8) | ram_address |
+-------------+-------------+---------------------------+
| flash_address |
+---------------------------+
ram_addressthe address in memory the process's memory address must start at. If a fixed address is not required this should be set to0xFFFFFFFF.flash_addressthe address in flash that the process binary (not the header) must be located at. This would match the value provided for flash to the linker. If a fixed address is not required this should be set to0xFFFFFFFF.
6 Permissions
#![allow(unused)] fn main() { struct TbfHeaderDriverPermission { driver_number: u32, offset: u32, allowed_commands: u64, } // A list of permissions for this app struct TbfHeaderV2Permissions { base: TbfHeaderTlv, length: u16, perms: [TbfHeaderDriverPermission], } }
The Permissions section allows an app to specify driver permissions that it is
allowed to use. All driver syscalls that an app will use must be listed. The
list should not include drivers that are not being used by the app.
The data is stored in the optional TbfHeaderV2Permissions field. This includes
an array of all the perms.
0 2 4 6
+-------------+-------------+-------------+---------...--+
| Type (6) | Length | # perms | perms |
+-------------+-------------+-------------+---------...--+
The perms array is made up of a number of elements of
TbfHeaderDriverPermission. The first 16-bit field in the TLV is the number of
driver permission structures included in the perms array. The elements in
TbfHeaderDriverPermission are described below:
Driver Permission Structure:
0 2 4 6 8
+-------------+-------------+---------------------------+
| driver_number | offset |
+-------------+-------------+---------------------------+
| allowed_commands |
+-------------------------------------------------------+
driver_numberis the number of the driver that is allowed. This for example could be0x00000to indicate that theAlarmsyscalls are allowed.allowed_commandsis a bit mask of the allowed commands. For example a value of0b0001indicates that only command 0 is allowed.0b0111would indicate that commands 2, 1 and 0 are all allowed. Note that this assumesoffsetis 0, for more details onoffsetsee below.- The
offsetfield inTbfHeaderDriverPermissionindicates the offset of theallowed_commandsbitmask. All of the examples described in the paragraph above assume anoffsetof 0. Theoffsetfield indicates the start of theallowed_commandsbitmask. Theoffsetis multiple by 64 (the size of theallowed_commandsbitmask). For example anoffsetof 1 and aallowed_commandsvalue of0b0001indicates that command 64 is allowed.
Subscribe and allow commands are always allowed as long as the specific
driver_number has been specified. If a driver_number has not been specified
for the capsule driver then allow and subscribe will be blocked.
Multiple TbfHeaderDriverPermission with the same driver_numer can be
included, so long as no offset is repeated for a single driver. When multiple
offsets and allowed_commandss are used they are ORed together, so that they
all apply.
7 Storage Permissions
#![allow(unused)] fn main() { // A list of storage permissions for accessing persistent storage struct TbfHeaderV2StoragePermissions { base: TbfHeaderTlv, write_id: u32, read_length: u16, read_ids: [u32], modify_length: u16, modify_ids: [u32], } }
The Storage Permissions section is used to identify what access the app has to
persistent storage.
The data is stored in the TbfHeaderV2StoragePermissions field, which includes
a write_id, a number of read_ids, and a number of modify_ids.
0 2 4 6 8
+-------------+-------------+---------------------------+
| Type (7) | Length | write_id |
+-------------+-------------+---------------------------+
| # Read IDs | read_ids (4 bytes each) |
+-------------+------------------------------------...--+
| # Modify IDs| modify_ids (4 bytes each) |
+--------------------------------------------------...--+
write_idindicates the id that all new persistent data is written with. All new data created will be stored with permissions from thewrite_idfield. For existing data see themodify_idssection below.write_iddoes not need to be unique, that is multiple apps can have the same id. Awrite_idof0x00indicates that the app can not perform write operations.read_idslist all of the ids that this app has permission to read. Theread_lengthspecifies the length of theread_idsin elements (not bytes).read_lengthcan be0indicating that there are noread_ids.modify_idslist all of the ids that this app has permission to modify or remove.modify_idsare different fromwrite_idin thatwrite_idapplies to new data whilemodify_idsallows modification of existing data. Themodify_lengthspecifies the length of themodify_idsin elements (not bytes).modify_lengthcan be0indicating that there are nomodify_idsand the app cannot modify existing stored data (even data that it itself wrote).
For example, consider an app that has a write_id of 1, read_ids of 2, 3
and modify_ids of 3, 4. If the app was to write new data, it would be stored
with id 1. The app is able to read data stored with id 2 or 3, note that
it cannot read the data that it writes. The app is also able to overwrite
existing data that was stored with id 3 or 4.
An example of when modify_ids would be useful is on a system where each app
logs errors in its own write_region. An error-reporting app reports these errors
over the network, and once the reported errors are acked erases them from the
log. In this case, modify_ids allow an app to erase multiple different
regions.
8 Kernel Version
#![allow(unused)] fn main() { // Kernel Version struct TbfHeaderV2KernelVersion { base: TbfHeaderTlv, major: u16, minor: u16 } }
The compatibility header is designed to prevent the kernel from running
applications that are not compatible with it.
It defines the following two items:
Kernel majororVis the kernel major number (for Tock 2.0, it is 2)Kernel minororvis the kernel minor number (for Tock 2.0, it is 0)
Apps defining this header are compatible with kernel version ^V.v (>= V.v and < (V+1).0).
The kernel version header refers only to the ABI and API exposed by the kernel itself, it does not cover API changes within drivers.
A kernel major and minor version guarantees the ABI for exchanging data between kernel and userspace and the the system call numbers.
0 2 4 6 8
+-------------+-------------+---------------------------+
| Type (8) | Length (4) | Kernel major| Kernel minor|
+-------------+-------------+---------------------------+
9 Program
#![allow(unused)] fn main() { // A Program Header specifies the end of the application binary within the // TBF, such that the application binary can be followed by footers. It also // has a version number, such that multiple versions of the same application // can be installed. pub struct TbfHeaderV2Program { init_fn_offset: u32, protected_trailer_size: u32, minimum_ram_size: u32, binary_end_offset: u32, version: u32, } }
A Program Header is an extended form of the Main Header. It adds two fields,
binary_end_offset and version. The binary_end_offset field allows the
kernel to identify where in the TBF object the application binary ends. The gap
between the end of the application binary and the end of the TBF object can
contain footers.
0 2 4 6 8
+-------------+-------------+---------------------------+
| Type (9) | Length (20) | init_offset |
+-------------+-------------+---------------------------+
| protected_trailer_size | min_ram_size |
+---------------------------+---------------------------+
| binary_end_offset | version |
+---------------------------+---------------------------+
init_offsetthe offset in bytes from the beginning of binary payload (i.e. the actual application binary) that contains the first instruction to execute (typically the_startsymbol).protected_trailer_sizethe size of the protected region after the TBF headers. Processes do not have write access to the protected region. TBF headers are contained in the protected region, but are not counted towardsprotected_trailer_size. The protected region thus starts at the first byte of the TBF base header, and isheader_size + protected_trailer_sizebytes in size.minimum_ram_sizethe minimum amount of memory, in bytes, the process needs.binary_end_offsetspecifies the offset from the beginning of the TBF Object at which the Userspace Binary ends and optional footers begin.versionspecifies a version number for the application implemented by the Userspace Binary. This allows a kernel to distinguish different versions of a given application.
If a Program header is not present, binary_end_offset can be considered to be
total_size of the Base Header and version is 0.
The Main Header and Program Header have overlapping functionality. If a TBF Object has both, the kernel decides which to use. Tock is transitioning to having the Program Header as the standard one to use, but older kernels (2.0 and earlier) do not recognize it and use the Main Header.
128 Credentials Footer
#![allow(unused)] fn main() { // Credentials footer. The length field of the TLV determines the size of the // data slice. pub struct TbfFooterV2Credentials { format: u32, data: &'static [u8], } }
A Credentials Footer contains cryptographic credentials for the integrity and possibly identity of a Userspace Binary. A Credentials Footer has the following format:
0 2 4 6 8
+-------------+-------------+---------------------------+
| Type (128) | Length (4+n)| format |
+-------------+-------------+---------------------------+
| data |
+--------------------------------------------------...--+
The length of the data field is defined by the Length field. If the data field
is n bytes long, the Length field is 4+n. The format field defines the
format of the data field:
| Format Identifier | Credential Type | Credential Description |
|---|---|---|
| 0 | Reserved | |
| 1 | Rsa3072Key | A 384 byte RSA public key n and a 384 byte PKCS1.15 signature. |
| 2 | Rsa4096Key | A 512 byte RSA public key n and a 512 byte PKCS1.15 signature. |
| 3 | SHA256 | A SHA256 hash. |
| 4 | SHA384 | A SHA384 hash. |
| 5 | SHA512 | A SHA512 hash. |
| 0xA | RSA2048 | A 256 byte PKCS1.15 signature. |
Module Documentation
These pages document specific modules in the Tock codebase.
Process Console
process_console is a capsule that implements a small shell over the UART that
allows a terminal to inspect the kernel and control userspace processes.
Setup
Here is how to add process_console to a board's main.rs (the example is
taken from the microbit's implementation of the Process console):
#![allow(unused)] fn main() { let process_printer = components::process_printer::ProcessPrinterTextComponent::new() .finalize(components::process_printer_text_component_static!()); let _process_console = components::process_console::ProcessConsoleComponent::new( board_kernel, uart_mux, mux_alarm, process_printer, Some(reset_function), ) .finalize(components::process_console_component_static!( nrf52833::rtc::Rtc )); let _ = _process_console.start(); }
Using Process Console
With this capsule properly added to a board's main.rs and the Tock kernel
loaded to the board, make sure there is a serial connection to the board.
Likely, this just means connecting a USB cable from a computer to the board.
Next, establish a serial console connection to the board. An easy way to do this
is to run:
$ tockloader listen
[INFO ] No device name specified. Using default name "tock".
[INFO ] No serial port with device name "tock" found.
[INFO ] Found 2 serial ports.
Multiple serial port options found. Which would you like to use?
[0] /dev/ttyS4 - n/a
[1] /dev/ttyACM0 - "BBC micro:bit CMSIS-DAP" - mbed Serial Port
Which option? [0] 1
[INFO ] Using "/dev/ttyACM0 - "BBC micro:bit CMSIS-DAP" - mbed Serial Port".
[INFO ] Listening for serial output.
tock$
Commands
This module provides a simple text-based console to inspect and control which processes are running. The console has several commands:
help- prints the available commands and argumentslist- lists the current processes with their IDs and running statestatus- prints the current system statusstart n- starts the stopped process with name nstop n- stops the process with name nterminate n- terminates the running process with name n, moving it to the Terminated stateboot n- tries to restart a Terminated process with name nfault n- forces the process with name n into a fault statepanic- causes the kernel to run the panic handlerreset- causes the board to resetkernel- prints the kernel memory mapprocess n- prints the memory map of process with name nconsole-start- activate the process consoleconsole-stop- deactivate the process console
For the examples below we will have 2 processes on the board: blink (which
will blink all the LEDs that are connected to the kernel), and c_hello (which
prints 'Hello World' when the console is started). Also, a micro:bit v2 board
was used as support for the commands, so the results may vary on other devices.
We will assume that the user has a serial connection to the board, either by
using tockloader or another serial port software. With that console open, you
can issue commands.
help
To get a list of the available commands, use the help command:
tock$ help
Welcome to the process console.
Valid commands are: help status list stop start fault boot terminate process kernel panic
list
To see all of the processes on the board, use list:
tock$ list
PID Name Quanta Syscalls Restarts Grants State
0 blink 0 26818 0 1/14 Yielded
1 c_hello 0 8 0 1/14 Yielded
list Command Fields
PID: The identifier for the process. This can change if the process restarts.Name: The process name.Quanta: How many times this process has exceeded its allotted time quanta.Syscalls: The number of system calls the process has made to the kernel.Restarts: How many times this process has crashed and been restarted by the kernel.Grants: The number of grants that have been initialized for the process out of the total number of grants defined by the kernel.State: The state the process is in.
status
To get a general view of the system, use the status command:
tock$ status
Total processes: 2
Active processes: 2
Timeslice expirations: 0
start and stop
You can control processes with the start and stop commands:
tock$ stop blink
Process blink stopped
tock$ list
PID Name Quanta Syscalls Restarts Grants State
2 blink 0 22881 1 1/14 StoppedYielded
1 c_hello 0 8 0 1/14 Yielded
tock$ start blink
Process blink resumed.
tock$ list
PID Name Quanta Syscalls Restarts Grants State
2 blink 0 23284 1 1/14 Yielded
1 c_hello 0 8 0 1/14 Yielded
terminate and boot
You can kill a process with terminate and then restart it with boot:
tock$ terminate blink
Process blink terminated
tock$ list
PID Name Quanta Syscalls Restarts Grants State
2 blink 0 25640 1 0/14 Terminated
1 c_hello 0 8 0 1/14 Yielded
tock$ boot blink
tock$ list
PID Name Quanta Syscalls Restarts Grants State
3 blink 0 251 2 1/14 Yielded
1 c_hello 0 8 0 1/14 Yielded
fault
To force a process into a fault state, you should use the fault command:
tock$ fault blink
panicked at 'Process blink had a fault', kernel/src/process_standard.rs:412:17
Kernel version 899d73cdd
---| No debug queue found. You can set it with the DebugQueue component.
---| Cortex-M Fault Status |---
No Cortex-M faults detected.
---| App Status |---
𝐀𝐩𝐩: blink - [Faulted]
Events Queued: 0 Syscall Count: 2359 Dropped Upcall Count: 0
Restart Count: 0
Last Syscall: Yield { which: 1, address: 0x0 }
Completion Code: None
╔═══════════╤══════════════════════════════════════════╗
║ Address │ Region Name Used | Allocated (bytes) ║
╚0x20006000═╪══════════════════════════════════════════╝
│ Grant Ptrs 112
│ Upcalls 320
│ Process 920
0x20005AB8 ┼───────────────────────────────────────────
│ ▼ Grant 24
0x20005AA0 ┼───────────────────────────────────────────
│ Unused
0x200049FC ┼───────────────────────────────────────────
│ ▲ Heap 0 | 4260 S
0x200049FC ┼─────────────────────────────────────────── R
│ Data 508 | 508 A
0x20004800 ┼─────────────────────────────────────────── M
│ ▼ Stack 232 | 2048
0x20004718 ┼───────────────────────────────────────────
│ Unused
0x20004000 ┴───────────────────────────────────────────
.....
0x00040800 ┬─────────────────────────────────────────── F
│ App Flash 1996 L
0x00040034 ┼─────────────────────────────────────────── A
│ Protected 52 S
0x00040000 ┴─────────────────────────────────────────── H
R0 : 0x00000001 R6 : 0x000406B0
R1 : 0x00000000 R7 : 0x20004000
R2 : 0x0000000B R8 : 0x00000000
R3 : 0x0000000B R10: 0x00000000
R4 : 0x200047AB R11: 0x00000000
R5 : 0x200047AB R12: 0x20004750
R9 : 0x20004800 (Static Base Register)
SP : 0x20004778 (Process Stack Pointer)
LR : 0x00040457
PC : 0x0004045E
YPC : 0x0004045E
APSR: N 0 Z 0 C 1 V 0 Q 0
GE 0 0 0 0
EPSR: ICI.IT 0x00
ThumbBit true
Total number of grant regions defined: 14
Grant 0 : -- Grant 5 : -- Grant 10 : --
Grant 1 : -- Grant 6 : -- Grant 11 : --
Grant 2 0x0: 0x20005aa0 Grant 7 : -- Grant 12 : --
Grant 3 : -- Grant 8 : -- Grant 13 : --
Grant 4 : -- Grant 9 : --
Cortex-M MPU
Region 0: [0x20004000:0x20005000], length: 4096 bytes; ReadWrite (0x3)
Sub-region 0: [0x20004000:0x20004200], Enabled
Sub-region 1: [0x20004200:0x20004400], Enabled
Sub-region 2: [0x20004400:0x20004600], Enabled
Sub-region 3: [0x20004600:0x20004800], Enabled
Sub-region 4: [0x20004800:0x20004A00], Enabled
Sub-region 5: [0x20004A00:0x20004C00], Disabled
Sub-region 6: [0x20004C00:0x20004E00], Disabled
Sub-region 7: [0x20004E00:0x20005000], Disabled
Region 1: Unused
Region 2: [0x00040000:0x00040800], length: 2048 bytes; UnprivilegedReadOnly (0x2)
Sub-region 0: [0x00040000:0x00040100], Enabled
Sub-region 1: [0x00040100:0x00040200], Enabled
Sub-region 2: [0x00040200:0x00040300], Enabled
Sub-region 3: [0x00040300:0x00040400], Enabled
Sub-region 4: [0x00040400:0x00040500], Enabled
Sub-region 5: [0x00040500:0x00040600], Enabled
Sub-region 6: [0x00040600:0x00040700], Enabled
Sub-region 7: [0x00040700:0x00040800], Enabled
Region 3: Unused
Region 4: Unused
Region 5: Unused
Region 6: Unused
Region 7: Unused
To debug, run `make debug RAM_START=0x20004000 FLASH_INIT=0x4005d`
in the app's folder and open the .lst file.
𝐀𝐩𝐩: c_hello - [Yielded]
Events Queued: 0 Syscall Count: 8 Dropped Upcall Count: 0
Restart Count: 0
Last Syscall: Yield { which: 1, address: 0x0 }
Completion Code: None
╔═══════════╤══════════════════════════════════════════╗
║ Address │ Region Name Used | Allocated (bytes) ║
╚0x20008000═╪══════════════════════════════════════════╝
│ Grant Ptrs 112
│ Upcalls 320
│ Process 920
0x20007AB8 ┼───────────────────────────────────────────
│ ▼ Grant 76
0x20007A6C ┼───────────────────────────────────────────
│ Unused
0x20006A04 ┼───────────────────────────────────────────
│ ▲ Heap 0 | 4200 S
0x20006A04 ┼─────────────────────────────────────────── R
│ Data 516 | 516 A
0x20006800 ┼─────────────────────────────────────────── M
│ ▼ Stack 128 | 2048
0x20006780 ┼───────────────────────────────────────────
│ Unused
0x20006000 ┴───────────────────────────────────────────
.....
0x00041000 ┬─────────────────────────────────────────── F
│ App Flash 1996 L
0x00040834 ┼─────────────────────────────────────────── A
│ Protected 52 S
0x00040800 ┴─────────────────────────────────────────── H
R0 : 0x00000001 R6 : 0x00040C50
R1 : 0x00000000 R7 : 0x20006000
R2 : 0x00000000 R8 : 0x00000000
R3 : 0x00000000 R10: 0x00000000
R4 : 0x00040834 R11: 0x00000000
R5 : 0x20006000 R12: 0x200067F0
R9 : 0x20006800 (Static Base Register)
SP : 0x200067D0 (Process Stack Pointer)
LR : 0x00040A3F
PC : 0x00040A46
YPC : 0x00040A46
APSR: N 0 Z 0 C 1 V 0 Q 0
GE 0 0 0 0
EPSR: ICI.IT 0x00
ThumbBit true
Total number of grant regions defined: 14
Grant 0 : -- Grant 5 : -- Grant 10 : --
Grant 1 : -- Grant 6 : -- Grant 11 : --
Grant 2 : -- Grant 7 : -- Grant 12 : --
Grant 3 : -- Grant 8 : -- Grant 13 : --
Grant 4 0x1: 0x20007a6c Grant 9 : --
Cortex-M MPU
Region 0: [0x20006000:0x20007000], length: 4096 bytes; ReadWrite (0x3)
Sub-region 0: [0x20006000:0x20006200], Enabled
Sub-region 1: [0x20006200:0x20006400], Enabled
Sub-region 2: [0x20006400:0x20006600], Enabled
Sub-region 3: [0x20006600:0x20006800], Enabled
Sub-region 4: [0x20006800:0x20006A00], Enabled
Sub-region 5: [0x20006A00:0x20006C00], Enabled
Sub-region 6: [0x20006C00:0x20006E00], Disabled
Sub-region 7: [0x20006E00:0x20007000], Disabled
Region 1: Unused
Region 2: [0x00040800:0x00041000], length: 2048 bytes; UnprivilegedReadOnly (0x2)
Sub-region 0: [0x00040800:0x00040900], Enabled
Sub-region 1: [0x00040900:0x00040A00], Enabled
Sub-region 2: [0x00040A00:0x00040B00], Enabled
Sub-region 3: [0x00040B00:0x00040C00], Enabled
Sub-region 4: [0x00040C00:0x00040D00], Enabled
Sub-region 5: [0x00040D00:0x00040E00], Enabled
Sub-region 6: [0x00040E00:0x00040F00], Enabled
Sub-region 7: [0x00040F00:0x00041000], Enabled
Region 3: Unused
Region 4: Unused
Region 5: Unused
Region 6: Unused
Region 7: Unused
To debug, run `make debug RAM_START=0x20006000 FLASH_INIT=0x4085d`
in the app's folder and open the .lst file.
panic
You can also force a kernel panic with the panic command:
tock$ panic
panicked at 'Process Console forced a kernel panic.', capsules/src/process_console.rs:959:29
Kernel version 899d73cdd
---| No debug queue found. You can set it with the DebugQueue component.
---| Cortex-M Fault Status |---
No Cortex-M faults detected.
---| App Status |---
𝐀𝐩𝐩: blink - [Yielded]
Events Queued: 0 Syscall Count: 1150 Dropped Upcall Count: 0
Restart Count: 0
Last Syscall: Yield { which: 1, address: 0x0 }
Completion Code: None
╔═══════════╤══════════════════════════════════════════╗
║ Address │ Region Name Used | Allocated (bytes) ║
╚0x20006000═╪══════════════════════════════════════════╝
│ Grant Ptrs 112
│ Upcalls 320
│ Process 920
0x20005AB8 ┼───────────────────────────────────────────
│ ▼ Grant 24
0x20005AA0 ┼───────────────────────────────────────────
│ Unused
0x200049FC ┼───────────────────────────────────────────
│ ▲ Heap 0 | 4260 S
0x200049FC ┼─────────────────────────────────────────── R
│ Data 508 | 508 A
0x20004800 ┼─────────────────────────────────────────── M
│ ▼ Stack 232 | 2048
0x20004718 ┼───────────────────────────────────────────
│ Unused
0x20004000 ┴───────────────────────────────────────────
.....
0x00040800 ┬─────────────────────────────────────────── F
│ App Flash 1996 L
0x00040034 ┼─────────────────────────────────────────── A
│ Protected 52 S
0x00040000 ┴─────────────────────────────────────────── H
R0 : 0x00000001 R6 : 0x000406B0
R1 : 0x00000000 R7 : 0x20004000
R2 : 0x00000004 R8 : 0x00000000
R3 : 0x00000004 R10: 0x00000000
R4 : 0x200047AB R11: 0x00000000
R5 : 0x200047AB R12: 0x20004750
R9 : 0x20004800 (Static Base Register)
SP : 0x20004778 (Process Stack Pointer)
LR : 0x00040457
PC : 0x0004045E
YPC : 0x0004045E
APSR: N 0 Z 0 C 1 V 0 Q 0
GE 0 0 0 0
EPSR: ICI.IT 0x00
ThumbBit true
Total number of grant regions defined: 14
Grant 0 : -- Grant 5 : -- Grant 10 : --
Grant 1 : -- Grant 6 : -- Grant 11 : --
Grant 2 0x0: 0x20005aa0 Grant 7 : -- Grant 12 : --
Grant 3 : -- Grant 8 : -- Grant 13 : --
Grant 4 : -- Grant 9 : --
Cortex-M MPU
Region 0: [0x20004000:0x20005000], length: 4096 bytes; ReadWrite (0x3)
Sub-region 0: [0x20004000:0x20004200], Enabled
Sub-region 1: [0x20004200:0x20004400], Enabled
Sub-region 2: [0x20004400:0x20004600], Enabled
Sub-region 3: [0x20004600:0x20004800], Enabled
Sub-region 4: [0x20004800:0x20004A00], Enabled
Sub-region 5: [0x20004A00:0x20004C00], Disabled
Sub-region 6: [0x20004C00:0x20004E00], Disabled
Sub-region 7: [0x20004E00:0x20005000], Disabled
Region 1: Unused
Region 2: [0x00040000:0x00040800], length: 2048 bytes; UnprivilegedReadOnly (0x2)
Sub-region 0: [0x00040000:0x00040100], Enabled
Sub-region 1: [0x00040100:0x00040200], Enabled
Sub-region 2: [0x00040200:0x00040300], Enabled
Sub-region 3: [0x00040300:0x00040400], Enabled
Sub-region 4: [0x00040400:0x00040500], Enabled
Sub-region 5: [0x00040500:0x00040600], Enabled
Sub-region 6: [0x00040600:0x00040700], Enabled
Sub-region 7: [0x00040700:0x00040800], Enabled
Region 3: Unused
Region 4: Unused
Region 5: Unused
Region 6: Unused
Region 7: Unused
To debug, run `make debug RAM_START=0x20004000 FLASH_INIT=0x4005d`
in the app's folder and open the .lst file.
𝐀𝐩𝐩: c_hello - [Yielded]
Events Queued: 0 Syscall Count: 8 Dropped Upcall Count: 0
Restart Count: 0
Last Syscall: Yield { which: 1, address: 0x0 }
Completion Code: None
╔═══════════╤══════════════════════════════════════════╗
║ Address │ Region Name Used | Allocated (bytes) ║
╚0x20008000═╪══════════════════════════════════════════╝
│ Grant Ptrs 112
│ Upcalls 320
│ Process 920
0x20007AB8 ┼───────────────────────────────────────────
│ ▼ Grant 76
0x20007A6C ┼───────────────────────────────────────────
│ Unused
0x20006A04 ┼───────────────────────────────────────────
│ ▲ Heap 0 | 4200 S
0x20006A04 ┼─────────────────────────────────────────── R
│ Data 516 | 516 A
0x20006800 ┼─────────────────────────────────────────── M
│ ▼ Stack 128 | 2048
0x20006780 ┼───────────────────────────────────────────
│ Unused
0x20006000 ┴───────────────────────────────────────────
.....
0x00041000 ┬─────────────────────────────────────────── F
│ App Flash 1996 L
0x00040834 ┼─────────────────────────────────────────── A
│ Protected 52 S
0x00040800 ┴─────────────────────────────────────────── H
R0 : 0x00000001 R6 : 0x00040C50
R1 : 0x00000000 R7 : 0x20006000
R2 : 0x00000000 R8 : 0x00000000
R3 : 0x00000000 R10: 0x00000000
R4 : 0x00040834 R11: 0x00000000
R5 : 0x20006000 R12: 0x200067F0
R9 : 0x20006800 (Static Base Register)
SP : 0x200067D0 (Process Stack Pointer)
LR : 0x00040A3F
PC : 0x00040A46
YPC : 0x00040A46
APSR: N 0 Z 0 C 1 V 0 Q 0
GE 0 0 0 0
EPSR: ICI.IT 0x00
ThumbBit true
Total number of grant regions defined: 14
Grant 0 : -- Grant 5 : -- Grant 10 : --
Grant 1 : -- Grant 6 : -- Grant 11 : --
Grant 2 : -- Grant 7 : -- Grant 12 : --
Grant 3 : -- Grant 8 : -- Grant 13 : --
Grant 4 0x1: 0x20007a6c Grant 9 : --
Cortex-M MPU
Region 0: [0x20006000:0x20007000], length: 4096 bytes; ReadWrite (0x3)
Sub-region 0: [0x20006000:0x20006200], Enabled
Sub-region 1: [0x20006200:0x20006400], Enabled
Sub-region 2: [0x20006400:0x20006600], Enabled
Sub-region 3: [0x20006600:0x20006800], Enabled
Sub-region 4: [0x20006800:0x20006A00], Enabled
Sub-region 5: [0x20006A00:0x20006C00], Enabled
Sub-region 6: [0x20006C00:0x20006E00], Disabled
Sub-region 7: [0x20006E00:0x20007000], Disabled
Region 1: Unused
Region 2: [0x00040800:0x00041000], length: 2048 bytes; UnprivilegedReadOnly (0x2)
Sub-region 0: [0x00040800:0x00040900], Enabled
Sub-region 1: [0x00040900:0x00040A00], Enabled
Sub-region 2: [0x00040A00:0x00040B00], Enabled
Sub-region 3: [0x00040B00:0x00040C00], Enabled
Sub-region 4: [0x00040C00:0x00040D00], Enabled
Sub-region 5: [0x00040D00:0x00040E00], Enabled
Sub-region 6: [0x00040E00:0x00040F00], Enabled
Sub-region 7: [0x00040F00:0x00041000], Enabled
Region 3: Unused
Region 4: Unused
Region 5: Unused
Region 6: Unused
Region 7: Unused
To debug, run `make debug RAM_START=0x20006000 FLASH_INIT=0x4085d`
in the app's folder and open the .lst file.
reset
You can also reset the board with the reset command:
tock$ reset
kernel
You can view the kernel memory map with the kernel command:
tock$ kernel
Kernel version: 2.1 (build 899d73cdd)
╔═══════════╤══════════════════════════════╗
║ Address │ Region Name Used (bytes) ║
╚0x20003DAC═╪══════════════════════════════╝
│ BSS 11692
0x20001000 ┼─────────────────────────────── S
│ Relocate 0 R
0x20001000 ┼─────────────────────────────── A
│ ▼ Stack 4096 M
0x20000000 ┼───────────────────────────────
.....
0x0001A000 ┼─────────────────────────────── F
│ RoData 27652 L
0x000133FC ┼─────────────────────────────── A
│ Code 78844 S
0x00000000 ┼─────────────────────────────── H
process
You can also view the memory map for a process with the process command:
tock$ process c_hello
𝐀𝐩𝐩: c_hello - [Yielded]
Events Queued: 0 Syscall Count: 8 Dropped Upcall Count: 0
Restart Count: 0
Last Syscall: Yield { which: 1, address: 0x0 }
Completion Code: None
╔═══════════╤══════════════════════════════════════════╗
║ Address │ Region Name Used | Allocated (bytes) ║
╚0x20008000═╪══════════════════════════════════════════╝
│ Grant Ptrs 112
│ Upcalls 320
│ Process 920
0x20007AB8 ┼───────────────────────────────────────────
│ ▼ Grant 76
0x20007A6C ┼───────────────────────────────────────────
│ Unused
0x20006A04 ┼───────────────────────────────────────────
│ ▲ Heap 0 | 4200 S
0x20006A04 ┼─────────────────────────────────────────── R
│ Data 516 | 516 A
0x20006800 ┼─────────────────────────────────────────── M
│ ▼ Stack 128 | 2048
0x20006780 ┼───────────────────────────────────────────
│ Unused
0x20006000 ┴───────────────────────────────────────────
.....
0x00041000 ┬─────────────────────────────────────────── F
│ App Flash 1996 L
0x00040834 ┼─────────────────────────────────────────── A
│ Protected 52 S
0x00040800 ┴─────────────────────────────────────────── H
console-start
This command activates the process console so that it responds to commands and
shows the prompt. This reverses console-stop.
console-stop
This command puts the process console in a hibernation state. The console is
still running in the sense that it is receiving UART data, but it will not
respond to any commands other than console-start. It will also not show the
prompt.
The purpose of this mode is to "free up" the general UART console for apps that use the console extensively or interactively.
The console can be re-activated with console-start.
Features
Command History
You can use the up and down arrows to scroll through the command history and to
view the previous commands you have run. If you inserted more commands than the
command history can hold, oldest commands will be overwritten. You can view the
commands in bidirectional order, up arrow for oldest commands and down arrow
for newest.
If the user custom size for the history is set to 0, the history will be
disabled and the rust compiler will be able to optimize the binary file by
removing dead code. If you are typing a command and accidentally press the
up arrow key, you can press down arrow in order to retrieve the command you
were typing. If you scroll through the history and you want to edit a command
and accidentally press the up or down arrow key, scroll to the bottom of the
history and you will get back to the command you were typing.
Here is how to add a custom size for the command history used by the
ProcessConsole structure to keep track of the typed commands, in the main.rs
of boards:
#![allow(unused)] fn main() { const COMMAND_HISTORY_LEN : usize = 30; pub struct Platform { ... pconsole: &'static capsules::process_console::ProcessConsole< 'static, COMMAND_HISTORY_LEN, // or { capsules::process_console::DEFAULT_COMMAND_HISTORY_LEN } // for the default behaviour VirtualMuxAlarm<'static, nrf52840::rtc::Rtc<'static>>, components::process_console::Capability, >, ... } let _process_console = components::process_console::ProcessConsoleComponent::new( board_kernel, uart_mux, mux_alarm, process_printer, Some(reset_function), ) .finalize(components::process_console_component_static!( nrf52833::rtc::Rtc, COMMAND_HISTORY_LEN // or nothing for the default behaviour )); }
Note: In order to disable any functionality for the command history set the
COMMAND_HISTORY_LENto0or1(the history will be disabled for a size of1, because the first position from the command history is reserved for accidents by pressingupordownarrow key).
Command Navigation
Using Left and Right arrow keys you can navigate in a command, in order to
move the cursor to your desired position in a command. By pressing Home key
the cursor will be moved to the beginning of the command and by pressing End
key the cursor will be moved to the end of the command that is currently
displayed. When typing a character, it will be displayed under the cursor
(basically it will be inserted in the command at the cursor position). After
that the cursor will advance to next position (to the right). If you press
backspace the character before the cursor will be removed (the opposite action
of inserting a character) and the cursor will advance to left by one position.
Using Delete key, you can remove the cursor under the cursor. In this case the
cursor will not advance to any new position.
Pressing Enter in the middle of a command, is the same as pressing Enter at
the end of the command (basically you do not need to press End and then
Enter in order to send the command in order to be processed).
Note: These functions try to achieve the same experience as working in the bash terminal, moving freely in a command and modifying the command without rewriting it from the beginning.
Inserting multiple whitespace characters between commands or at the beginning of a command does not affect the resulting command, for example
# The command:
tock$ stop blink
# Will be interpreted as:
tock$ stop blink
Tock Networking Stack Design Document
NOTE: This document is a work in progress.
This document describes the design of the Networking stack on Tock.
The design described in this document is based off of ideas contributed by Phil Levis, Amit Levy, Paul Crews, Hubert Teo, Mateo Garcia, Daniel Giffin, and Hudson Ayers.
Table of Contents
This document is split into several sections. These are as follows:
-
Principles - Describes the main principles which the design of this stack intended to meet, along with some justification of why these principles matter. Ultimately, the design should follow from these principles.
-
Stack Diagram - Graphically depicts the layout of the stack
-
Explanation of queuing - Describes where packets are queued prior to transmission.
-
List of Traits - Describes the traits which will exist at each layer of the stack. For traits that may seem surprisingly complex, provide examples of specific messages that require this more complex trait as opposed to the more obvious, simpler trait that might be expected.
-
Explanation of Queuing - Describe queuing principles for this stack
-
Description of rx path
-
Description of the userland interface to the networking stack
-
Implementation Details - Describes how certain implementations of these traits will work, providing some examples with pseudocode or commented explanations of functionality
-
Example Message Traversals - Shows how different example messages (Thread or otherwise) will traverse the stack
Principles
-
Keep the simple case simple
- Sending an IP packet via an established network should not require a more complicated interface than send(destination, packet)
- If functionality were added to allow for the transmission of IP packets over the BLE interface, this IP send function should not have to deal with any options or MessageInfo structs that include 802.15.4 layer information.
- This principle reflects a desire to limit the complexity of Thread/the tock networking stack to the capsules that implement the stack. This prevents the burden of this complexity from being passed up to whatever applications use Thread
-
Layering is separate from encapsulation
- Libraries that handle encapsulation should not be contained within any specific layering construct. For example, If the Thread control unit wants to encapsulate a UDP payload inside of a UDP packet inside of an IP packet, it should be able to do so using encapsulation libraries and get the resulting IP packet without having to pass through all of the protocol layers
- Accordingly, implementations of layers can take advantage of these encapsulation libraries, but are not required to.
-
Dataplane traits are Thread-independent
- For example, the IP trait should not make any assumption that send() will be called for a message that will be passed down to the 15.4 layer, in case this IP trait is used on top of an implementation that passes IP packets down to be sent over a BLE link layer. Accordingly the IP trait can not expose any arguments regarding 802.15.4 security parameters.
- Even for instances where the only implementation of a trait in the near future will be a Thread-based implementation, the traits should not require anything that limit such a trait to Thread-based implementations
-
Transmission and reception APIs are decoupled
- This allows for instances where receive and send_done callbacks should be delivered to different clients (ex: Server listening on all addresses but also sending messages from specific addresses)
- Prevents send path from having to navigate the added complexity required for Thread to determine whether to forward received messages up the stack
Stack Diagram
IPv6 over ethernet: Non-Thread 15.4: Thread Stack: Encapsulation Libraries
+-------------------+-------------------+----------------------------+
| Application |-------------------\
----------------------------------------+-------------+---+----------+ \
|TCP Send| UDP Send |TCP Send| UDP Send | | TCP Send | | UDP Send |--\ v
+--------+----------+--------+----------+ +----------+ +----------+ \ +------------+ +------------+
| IP Send | IP Send | | IP Send | \ -----> | UDP Packet | | TCP Packet |
| | | +-------------------------+ \ / +------------+ +------------+
| | | | \ / +-----------+
| | | | -+-------> | IP Packet |
| | | THREAD | / +-----------+
| IP Send calls eth | IP Send calls 15.4| <--------|------> +-------------------------+
| 6lowpan libs with | 6lowpan libs with | | \ -------> | 6lowpan compress_Packet |
| default values | default values | | \ +-------------------------+
| | | | \ +-------------------------+
| | + +-----------| ------> | 6lowpan fragment_Packet |
| | | | 15.4 Send | +-------------------------+
|-------------------|-------------------+----------------------------+
| ethernet | IEEE 802.15.4 Link Layer |
+-------------------+------------------------------------------------+
Notes on the stack:
- IP messages sent via Thread networks are sent through Thread using an IP Send method that exposes only the parameters specified in the IP_Send trait. Other parameters of the message (6lowpan decisions, link layer parameters, many IP header options) are decided by Thread.
- The stack provides an interface for the application layer to send raw IPv6 packets over Thread.
- When the Thread control plane generates messages (MLE messages etc.), they are formatted using calls to the encapsulation libraries and then delivered to the 802.15.4 layer using the 15.4 send function
- This stack design allows Thread to control header elements from transport down to link layer, and to set link layer security parameters and more as required for certain packers
- The application can either directly send IP messages using the IP Send implementation exposed by the Thread stack or it can use the UDP Send and TCP send implementation exposed by the Thread stack. If the application uses the TCP or UDP send implementations it must use the transport packet library to insert its payload inside a packet and set certain header fields. The transport send method uses the IP Packet library to set certain IP fields before handing the packet off to Thread. Thread then sets other parameters at other layers as needed before sending the packet off via the 15.4 send function implemented for Thread.
- Note that currently this design leaves it up to the application layer to decide what interface any given packet will be transmitted from. This is because currently we are working towards a minimum functional stack. However, once this is working we intend to add a layer below the application layer that would handle interface multiplexing by destination address via a forwarding table. This should be straightforward to add in to our current design.
- This stack does not demonstrate a full set of functionality we are planning to implement now. Rather it demonstrates how this setup allows for multiple implementations of each layer based off of traits and libraries such that a flexible network stack can be configured, rather than creating a network stack designed such that applications can only use Thread.
Explanation of Queuing
Queuing happens at the application layer in this stack. The userland interface to the networking stack (described in greater detail in Networking_Userland.md) already handles queuing multiple packets sent from userland apps. In the kernel, any application which wishes to send multiple UDP packets must handle queuing itself, waiting for a send_done to return from the radio before calling send on the next packet in a series of packets.
List of Traits
This section describes a number of traits which must be implemented by any network stack. It is expected that multiple implementations of some of these traits may exist to allow for Tock to support more than just Thread networking.
Before discussing these traits - a note on buffers:
Prior implementations of the tock networking stack passed around references to
'static mut [u8]to pass packets along the stack. This is not ideal from a standpoint of wanting to be able to prevent as many errors as possible at compile time. The next iteration of code will pass 'typed' buffers up and down the stack. There are a number of packet library traits defined below (e.g. IPPacket, UDPPacket, etc.). Transport Layer traits will be implemented by a struct that will contain at least one field - a[u8]buffer with lifetime 'a. Lower level traits will simply contain payload fields that are Transport Level packet traits (thanks to a TransportPacket enum). This design allows for all buffers passed to be passed as type 'UDPPacket', 'IPPacket', etc. An added advantage of this design is that each buffer can easily be operated on using the library functions associated with this buffer type.
The traits below are organized by the network layer they would typically be associated with.
Transport Layer
Thus far, the only transport layer protocol implemented in Tock is UDP.
Documentation describing the structs and traits that define the UDP layer can be found in capsules/src/net/udp/(udp.rs, udp_send.rs, udp_recv.rs)
Additionally, a driver exists that provides a userland interface via which udp packets can be sent and received. This is described in greater detail in Networking_Userland.md
Network Stack Receive Path
- The radio in the kernel has a single
RxClient, which is set as the mac layer (awake_mac, typically) - The mac layer (i.e.
AwakeMac) has a singleRxClient, which is the mac_device(ieee802154::Framer::framer) - The Mac device has a single receive client -
MuxMac(virtual MAC device). - The
MuxMaccan have multiple "users" which are of typeMacUser - Any received packet is passed to ALL MacUsers, which are expected to filter packets themselves accordingly.
- Right now, we initialize two MacUsers in the kernel (in main.rs/components). These are the 'radio_mac', which is the MacUser for the RadioDriver that enables the userland interface to directly send 802154 frames, and udp_mac, the mac layer that is ultimately associated with the udp userland interface.
- The udp_mac MacUser has a single receive client, which is the
sixlowpan_statestruct sixlowpan_statehas a single rx_client, which in our case is a single struct that implements theip_receivetrait.- the
ip_receiveimplementing struct (IP6RecvStruct) has a single client, which is udp_recv, aUDPReceivestruct. - The UDPReceive struct is a field of the UDPDriver, which ultimately passes the packets up to userland.
So what are the implications of all this?
-
Currently, any userland app could receive udp packets intended for anyone else if the app implmenets 6lowpan itself on the received raw frames.
-
Currently, packets are only muxed at the Mac layer.
-
Right now the IPReceive struct receives all IP packets sent to the MAC address of this device, and soon will drop all packets sent to non-local addresses. Right now, the device effectively only has one address anyway, as we only support 6lowpan over 15.4, and as we haven't implemented a loopback interface on the IP_send path. If, in the future, we implement IP forwarding on Tock, we will need to add an IPSend object to the IPReceiver which would then retransmit any packets received that were not destined for local addresses.
Explanation of Configuration
This section describes how the IP stack can be configured, including setting addresses and other parameters of the MAC layer.
-
Source IP address: An array of local interfaces on the device is contained in main.rs. Currently, this array contains two hardcoded addresses, and one address generated from the unique serial number on the sam4l.
-
Destination IP address: The destination IP address is configured by passing the address to the send_to() call when sending IPv6 packets.
-
src MAC address: This address is configured in main.rs. Currently, the src mac address for each device is configured by default to be a 16-bit short address representing the last 16 bits of the unique 120 bit serial number on the sam4l. However, userland apps can change the src address by calling ieee802154_set_address()
-
dst MAC address: This is currently a constant set in main.rs. (DST_MAC_ADDR). In the future this will change, once Tock implements IPv6 Neighbor Discovery.
-
src pan: This is set via a constant configured in main.rs (PAN_ID). The same constant is used for the dst pan.
-
dst pan: Same as src_pan. If we need to support use of the broadcast PAN as a dst_pan, this may change.
-
radio channel: Configured as a constant in main.rs (RADIO_CHANNEL).
Tock Userland Networking Design
This section describes the current userland interface for the networking stack on Tock. This section should serve as a description of the abstraction provided by libTock - what the exact system call interface looks like or how libTock or the kernel implements this functionality is out-of-scope of this document.
Overview
The Tock networking stack and libTock should attempt to expose a networking interface that is similar to the POSIX networking interface. The primary motivation for this design choice is that application programmers are used to the POSIX networking interface design, and significant amounts of code have already been written for POSIX-style network interfaces. By designing the libTock networking interface to be as similar to POSIX as possible, we hope to improve developer experience while enabling the easy transition of networking code to Tock.
Design
udp.c and udp.h in libtock-c/libtock define the userland interface to the Tock networking stack. These files interact with capsules/src/net/udp/driver.rs in the main tock repository. driver.rs implements an interface for sending and receiving UDP messages. It also exposes a list of interace addresses to the application layer. The primary functionality embedded in the UDP driver is within the allow(), subscribe(), and command() calls which can be made to the driver.
Details of this driver can be found in doc/syscalls folder
udp.c and udp.h in libtock-c make it easy to interact with this driver interface. Important functions available to userland apps written in c include:
udp_socket() - sets the port on which the app will receive udp packets, and
sets the src_port of outgoing packets sent via that socket. Once socket
binding is implemented in the kernel, this function will handle reserving ports
to listen on and send from.
udp_close() - currently just returns success, but once socket binding has been
implemented in the kernel, this function will handle freeing bound ports.
udp_send_to() - Sends a udp packet to a specified addr/port pair, returns the
result of the tranmission once the radio has transmitted it (or once a failure
has occured).
udp_recv_from_sync() - Pass an interface to listen on and an incoming source
address to listen for. Sets up a callback to wait for a received packet, and
yeilds until that callback is triggered. This function never returns if a packet
is not received.
udp_recv_from() - Pass an interface to listen on and an incoming source
address to listen for. However, this takes in a buffer to which the received
packet should be placed, and returns the callback that will be triggered when a
packet is received.
udp_list_ifaces() - Populates the passed pointer of ipv6 addresses with the
available ipv6 addresses of the interfaces on the device. Right now this merely
returns a constant hardcoded into the UDP driver, but should change to return
the source IP addresses held in the network configuration file once that is
created. Returns up to len addresses.
Other design notes:
The current design of the driver has a few limitations, these include:
-
Currently, any app can listen on any address/port pair
-
The current tx implementation allows for starvation, e.g. an app with an earlier app ID can starve a later ID by sending constantly.
POSIX Socket API Functions
Below is a fairly comprehensive overview of the POSIX networking socket interface. Note that much of this functionality pertains to TCP or connection- based protocols, which we currently do not handle.
-
socket(domain, type, protocol) -> int fddomain: AF_INET, AF_INET6, AF_UNIXtype: SOCK_STREAM (TCP), SOCK_DGRAM (UDP), SOCK_SEQPACKET (?), SOCK_RAWprotocol: IPPROTO_TCP, IPPROTO_SCTP, IPPROTO_UDP, IPPROTO_DCCP
-
bind(socketfd, my_addr, addrlen) -> int successsocketfd: Socket file descriptor to bind tomy_addr: Address to bind onaddrlen: Length of address
-
listen(socketfd, backlog) -> int successsocketfd: Socket file descriptorbacklog: Number of pending connections to be queued
Only necessary for stream-oriented data modes
-
connect(socketfd, addr, addrlen) -> int successsocketfd: Socket file descriptor to connect withaddr: Address to connect to (server protocol address)addrlen: Length of address
When used with connectionless protocols, defines the remote address for sending and receiving data, allowing the use of functions such as
send()andrecv()and preventing the reception of datagrams from other sources. -
accept(socketfd, cliaddr, addrlen) -> int successsocketfd: Socket file descriptor of the listening socket that has the connection queuedcliaddr: A pointer to an address to receive the client's address informationaddrlen: Specifies the size of the client address structure
-
send(socketfd, buffer, length, flags) -> int successsocketfd: Socket file descriptor to send onbuffer: Buffer to sendlength: Length of buffer to sendflags: Various flags for the transmission
Note that the
send()function will only send a message when thesocketfdis connected (including for connectionless sockets) -
sendto(socketfd, buffer, length, flags, dst_addr, addrlen) -> int successsocketfd: Socket file descriptor to send onbuffer: Buffer to sendlength: Length of buffer to sendflags: Various flags for the transmissiondst_addr: Address to send to (ignored for connection type sockets)addrlen: Length ofdst_addr
Note that if the socket is a connection type, dst_addr will be ignored.
-
recv(socketfd, buffer, length, flags)socketfd: Socket file descriptor to receive onbuffer: Buffer where the message will be storedlength: Length of bufferflags: Type of message reception
Typically used with connected sockets as it does not permit the application to retrieve the source address of received data.
-
recvfrom(socketfd, buffer, length, flags, address, addrlen)socketfd: Socket file descriptor to receive onbuffer: Buffer to store the messagelength: Length of the bufferflags: Various flags for receptionaddress: Pointer to a structure to store the sending addressaddrlen: Length of address structure
Normally used with connectionless sockets as it permits the application to retrieve the source address of received data
-
close(socketfd)socketfd: Socket file descriptor to delete
-
gethostbyname()/gethostbyaddr()Legacy interfaces for resolving host names and addresses -
select(nfds, readfds, writefds, errorfds, timeout)nfds: The range of file descriptors to be tested (0..nfds)readfds: On input, specifies file descriptors to be checked to see if they are ready to be read. On output, indicates which file descriptors are ready to be readwritefds: Same as readfds, but for writingerrorfds: Same as readfds, writefds, but for errorstimeout: A structure that indicates the max amount of time to block if no file descriptors are ready. If None, blocks indefinitely
-
poll(fds, nfds, timeout)fds: Array of structures for file descriptors to be checked. The array members are structures which contain the file descriptor, and events to check for plus areas to write which events occurrednfds: Number of elements in the fds arraytimeout: If 0 return immediately, or if -1 block indefinitely. Otherwise, wait at leasttimeoutmilliseconds for an event to occur
-
getsockopt()/setsockopt()
Tock Userland API
Below is a list of desired functionality for the libTock userland API.
-
struct sock_addr_tipv6_addr_t: IPv6 address (single or ANY)port_t: Transport level port (single or ANY) -
struct sock_handle_tOpaque to the user; allocated in userland by malloc (or on the stack) -
list_ifaces() -> iface[]ifaces: A list ofipv6_addr_t, namepairs corresponding to all interfaces available -
udp_socket(sock_handle_t, sock_addr_t) -> int socketfdsocketfd: Socket object to be initialized as a UDP socket with the given address informationsock_addr_t: Contains an IPv6 address and a port -
udp_close(sock_handle_t)sock_handle_t: Socket to close -
send_to(sock_handle_t, buffer, length, sock_addr_t)sock_handle_t: Socket to send usingbuffer: Buffer to sendlength: Length of buffer to sendsock_addr_t: Address struct (IPv6 address, port) to send the packet from
-
recv_from(sock_handle_t, buffer, length, sock_addr_t)sock_handle_t: Receiving socketbuffer: Buffer to receive intolength: Length of buffersock_addr_t: Struct where the kernel writes the received packet's sender information
Differences Between the APIs
There are two major differences between the proposed Tock APIs and the standard
POSIX APIs. First, the POSIX APIs must support connection-based protocols such
as TCP, whereas the Tock API is only concerned with connectionless, datagram
based protocols. Second, the POSIX interface has a concept of the sock_addr_t
structure, which is used to encapsulate information such as port numbers to bind
on and interface addresses. This makes bind_to_port redundant in POSIX, as we
can simply set the port number in the sock_addr_t struct when binding. I think
one of the major questions is whether to adopt this convention, or to use the
above definitions for at least the first iteration.
Example: ip_sense
An example use of the userland networking stack can be found in libtock-c/examples/ip_sense
Implementation Details for potential future Thread implementation
This section was written when the networking stack was incomplete, and aspects may be outdated. This goes for all sections following this point in the document.
The Thread specification determines an entire control plane that spans many different layers in the OSI networking model. To adequately understand the interactions and dependencies between these layers' behaviors, it might help to trace several types of messages and see how each layer processes the different types of messages. Let's trace carefully the way OpenThread handles messages.
We begin with the most fundamental message: a data-plane message that does not interact with the Thread control plane save for passing through a Thread-defined network interface. Note that some of the procedures in the below traces will not make sense when taken independently: the responsibility-passing will only make sense when all the message types are taken as a whole. Additionally, no claim is made as to whether or not this sequence of callbacks is the optimal way to express these interactions: it is just OpenThread's way of doing it.
Data plane: IPv6 datagram
- Upper layer (application) wants to send a payload
- Provides payload
- Specifies the IP6 interface to send it on (via some identifier)
- Specifies protocol (IP6 next header field)
- Specifies destination IP6 address
- Possibly doesn't specify source IP6 address
- IP6 interface dispatcher (with knowledge of all the interfaces) fills in the IP6 header and produces an IP6 message
- Payload, protocol, and destination address used directly from the upper layer
- Source address is more complicated
- If the address is specified and is not multicast, it is used directly
- If the address is unspecified or multicast, source address is determined from the specific IP6 selected AND the destination address via a matching scheme on the addresses associated with the interface.
- Now that the addresses are determined, the IP6 layer computes the pseudoheader
checksum.
- If the application layer's payload has a checksum that includes the pseudoheader (UDP, ICMP6), this partial checksum is now used to update the checksum field in the payload.
- The actual IP6 interface (Thread-controlled) tries to send that message
- First step is to determine whether the message can be sent immediately or not (sleepy child or not). This passes the message to the scheduler. This is important for sleepy children where there is a control scheme that determines when messages are sent.
- Next, determine the MAC src/dest addresses.
- If this is a direct transmission, there is a source matching scheme to determine if the destination address used should be short or long. The same length is used for the source MAC address, obtained from the MAC interface.
- Notify the MAC layer to notify you that your message can be sent.
- The MAC layer schedules its transmissions and determines that it can send the above message
- MAC sets the transmission power
- MAC sets the channel differently depending on the message type
- The IP6 interface fills up the frame. This is the chance for the IP6 interface to do things like fragmentation, retransmission, and so on. The MAC layer just wants a frame.
- XXX: The IP6 interface fills up the MAC header. This should really be the
responsibility of the MAC layer. Anyway, here is what is done:
- Channel, source PAN ID, destination PAN ID, and security modes are determined by message type. Note that the channel set by the MAC layer is sometimes overwritten.
- A mesh extension header is added for some messages. (eg. indirect transmissions)
- The IP6 message is then 6LoWPAN-compressed/fragmented into the payload section of the frame.
- The MAC layer receives the raw frame and tries to send it
- MAC sets the sequence number of the frame (from the previous sequence number for the correct link neighbor), if it is not a retransmission
- The frame is secured if needed. This is another can of worms:
- Frame counter is dependent on the link neighbor and whether or not the frame is a retransmission
- Key is dependent on which key id mode is selected, and also the link neighbor's key sequence
- Key sequence != frame counter
- One particular mode requires using a key, source and frame counter that is a Thread-defined constant.
- The frame is transmitted, an ACK is waited for, and the process completes.
As you can see, the data dependencies are nowhere as clean as the OSI model dictates. The complexity mostly arises because
- Layer 4 checksum can include IPv6 pseudoheader
- IP6 source address (mesh local? link local? multicast?) is determined by interface and destination address
- MAC src/dest addresses are dependent on the next device on the route to the IP6 destination address
- Channel, src/dest PAN ID, security is dependent on message type
- Mesh extension header presence is dependent on message type
- Sequence number is dependent on message type and destination
Note that all of the MAC layer dependencies in step 5 can be pre-decided so that the MAC layer is the only one responsible for writing the MAC header.
This gives a pretty good overview of what minimally needs to be done to even be able to send normal IPv6 datagrams, but does not cover all of Thread's complexities. Next, we look at some control-plane messages.
Control plane: MLE messages
- The MLE layer encapsulates its messages in UDP on a constant port
- Security is determined by MLE message type. If MLE-layer security is required, the frame is secured using the same CCM* encryption scheme used in the MAC layer, but with a different key discipline.
- MLE key sequence is global across a single Thread device
- MLE sets IP6 source address to the interface's link local address
- This UDP-encapsulated MLE message is sent to the IP6 dispatch again
- The actual IP6 interface (Thread-controlled) tries to send that message
- The MAC layer schedules the transmission
- The IP6 interface fills up the frame.
- MLE messages disable link-layer security when MLE-layer security is present. However, if link-layer security is disabled and the MLE message doesn't fit in a single frame, link-layer security is enabled so that fragmentation can proceed.
- The MAC layer receives the raw frame and tries to send it
The only cross-layer dependency introduced by the MLE layer is the dependency between MLE-layer security and link-layer security. Whether or not the MLE layer sits atop an actual UDP socket is an implementation detail.
Control plane: Mesh forwarding
If Thread REED devices are to be eventually supported in Tock, then we must also consider this case. If a frame is sent to a router which is not its final destination, then the router must forward that message to the next hop.
- The MAC layer receives a frame, decrypts it and passes it to the IP6 interface
- The IP6 reception reads the frame and realizes that it is an indirect transmission that has to be forwarded again
- The frame must contain a mesh header, and the HopsLeft field in it should be decremented
- The rest of the payload remains the same
- Hence, the IP6 interface needs to send a raw 6LoWPAN-compressed frame
- The IP6 transmission interface receives a raw 6LoWPAN-compressed frame to be transmitted again
- This frame must still be scheduled: it might be destined for a sleepy device that is not yet awake
- The MAC layer schedules the transmission
- The IP6 transmission interface copies the frame to be retransmitted verbatim, but with the modified mesh header and a new MAC header
- The MAC layer receives the raw frame and tries to send it
This example shows that the IP6 transmission interface may need to handle more message types than just IP6 datagrams: there is a case where it is convenient to be able to handle a datagram that is already 6LoWPAN compressed.
Control plane: MAC data polling
From time to time, a sleepy edge device will wake up and begin polling its parent to check if any frames are available for it. This is done via a MAC command frame, which must still be sent through the transmission pipeline with link security enabled (Key ID mode 1). OpenThread does this by routing it through the IP6 transmission interface, which arguably isn't the right choice.
- Data poll manager send a data poll message directly to the IP6 transmission interface, skipping the IP6 dispatch
- The IP6 transmission interface notices the different type of message, which always warrants a direct transmission.
- The MAC layer schedules the transmission
- The IP6 transmission interface fills in the frame
- The MAC dest is set to the parent of this node and the MAC src is set to be the same length as the address of the parent
- The payload is filled up to contain the Data Request MAC command
- The MAC security level and key ID mode is also fixed for MAC commands under the Thread specification
- The MAC layer secures the frame and sends it out
We could imagine giving the data poll manager direct access as a client of the MAC layer to avoid having to shuffle data through the IP6 transmission interface. This is only justified because MAC command frames are never 6LoWPAN-compressed or fragmented, nor do they depend on the IP6 interface in any way.
Control plane: Child supervision
This type of message behaves similarly to the MAC data polls. The message is essentially and empty MAC frame, but OpenThread chooses to also route it through the IP6 transmission interface. It would be far better to allow a child supervision implementation to be a direct client of the MAC interface.
Control plane: Joiner entrust and MLE announce
These two message types are also explicitly marked, because they require a specific Key ID Mode to be selected when producing the frame for the MAC interface.
Caveat about MAC layer security
So far, it seems like we can expect the MAC layer to have no cross-layer dependencies: it receives frames with a completely specified description of how they are to be secured and transmitted, and just does so. However, this is not entirely the case.
When the frame is being secured, the key ID mode has been set by the upper layers as described above, and this key ID mode is used to select between a few different key disciplines. For example, mode 0 is only used by Joiner entrust messages and uses the Thread KEK sequence. Mode 1 uses the MAC key sequence and Mode 2 is a constant key used only in MLE announce messages. Hence, this key ID mode selection is actually enabling an upper layer to determine the specific key being used in the link layer.
Note that we cannot just reduce this dependency by allowing the upper layer to specify the key used in MAC encryption. During frame reception, the MAC layer itself has to know which key to use in order to decrypt the frames correctly.
Bluetooth Low Energy Design
This document describes the design of the BLE stack in Tock.
System call interface
The system call interface is modeled after the HCI interface defined in the Bluetooth specification.
Device address
The kernel assigns the device address. The process may read the device address
using an allow system call.
Advertising
For advertising, the system call interface allows a process to configure an advertising payload, advertising event type, scan response payload, interval and tx power. Permissible advertising types include:
- Connectable undirected
- Connectable directed
- Non-connectable undirected
- Scannable undirected
The driver is not responsible for validating that the payload for these advertising types follows any particular specification. Advertising event types that require particular interactions at the link-layer with peer devices (e.g. scanning or establishing connections) are not permissible:
- Scan request
- Scan response
- Connect request
Scan response are sent automatically if a scan response payload is configured. Scan request and connection requests are handled by other parts of the system call interface.
To set up an advertisement:
-
Configure the advertisement payload, type, interval, tx power and, optionally, scan response payload.
- Advertisement payload
allow - Advertisement type
command - If the advertising type is scannable, you SHOULD configure a scan response
payload using
allow - Advertisement interval
command - Advertisement tx power
command
- Advertisement payload
-
Start periodic advertising using a
command
Any changes to the configuration while periodic advertising is happening will take effect in a future advertising event. The kernel will use best effort to reconfigure advertising in as few events as possible.
To stop advertising
- Stop periodic advertising a
command
Scanning
Connection-oriented communication
Hardware Interface Layer (HIL)
The Bluetooth Low Energy Radio HIL defines a cross-platform interface for interacting with on-chip BLE radios (i.e. it does not necessarily work for radios on a dedicated IC connected over a bus).
The goal of this interface is to expose low-level details of the radio that are common across platforms, except in cases where abstraction is needed for common cases to meet timing constraints.
#![allow(unused)] fn main() { pub trait BleRadio { /// Sets the channel on which to transmit or receive packets. /// /// Returns Err(ErrorCode::BUSY) if the radio is currently transmitting or /// receiving, otherwise Ok(()). fn set_channel(&self, channel: RadioChannel) -> Result<(), ErrorCode>; /// Sets the transmit power /// /// Returns Err(ErrorCode::BUSY) if the radio is currently transmitting or /// receiving, otherwise Ok(()). fn set_tx_power(&self, power: u8) -> Result<(), ErrorCode>; /// Transmits a packet over the radio /// /// Returns Err(ErrorCode::BUSY) if the radio is currently transmitting or /// receiving, otherwise Ok(()). fn transmit_packet( &self, buf: &'static mut [u8], disable: bool) -> Result<(), ErrorCode>; /// Receives a packet of at most `buf.len()` size /// /// Returns Err(ErrorCode::BUSY) if the radio is currently transmitting or /// receiving, otherwise Ok(()). fn receive_packet(&self, buf: &'static mut [u8]) -> Result<(), ErrorCode>; // Aborts an ongoing transmision // // Returns None if no transmission was ongoing, or the buffer that was // being transmitted. fn abort_tx(&self) -> Option<&'static mut [u8]>; // Aborts an ongoing reception // // Returns None if no transmission was ongoing, or the buffer that was // // being received into. The returned buffer may or may not have some populated // bytes. fn abort_rx(&self) -> Option<&'static mut [u8]>; // Disable periodic advertisements // // Returns always Ok(()) because it does not respect whether // the driver is actively advertising or not fn disable(&self) -> Result<(), ErrorCode>; } pub trait RxClient { fn receive_event(&self, buf: &'static mut [u8], len: u8, result: Result<(), ErrorCode>); } pub trait TxClient { fn transmit_event(&self, buf: &'static mut [u8], result: Result<(), ErrorCode>); } pub enum RadioChannel { DataChannel0 = 4, DataChannel1 = 6, DataChannel2 = 8, DataChannel3 = 10, DataChannel4 = 12, DataChannel5 = 14, DataChannel6 = 16, DataChannel7 = 18, DataChannel8 = 20, DataChannel9 = 22, DataChannel10 = 24, DataChannel11 = 28, DataChannel12 = 30, DataChannel13 = 32, DataChannel14 = 34, DataChannel15 = 36, DataChannel16 = 38, DataChannel17 = 40, DataChannel18 = 42, DataChannel19 = 44, DataChannel20 = 46, DataChannel21 = 48, DataChannel22 = 50, DataChannel23 = 52, DataChannel24 = 54, DataChannel25 = 56, DataChannel26 = 58, DataChannel27 = 60, DataChannel28 = 62, DataChannel29 = 64, DataChannel30 = 66, DataChannel31 = 68, DataChannel32 = 70, DataChannel33 = 72, DataChannel34 = 74, DataChannel35 = 76, DataChannel36 = 78, AdvertisingChannel37 = 2, AdvertisingChannel38 = 26, AdvertisingChannel39 = 80, } }